Use & Care
Page 2
...: 1. To disconnect cord, turn the control to the blender. To protect against risk of table or counter, or touch hot surfaces, including the stove. 10. handle carefully-especially when assembling, disassembling or cleaning inside blender jar. 12. When blending hot liquids, remove center-piece... of severe injury to persons or damage to OFF ( O ) then remove plug from outlet when not in use of lid. Start blending at lowest speed....
...: 1. To disconnect cord, turn the control to the blender. To protect against risk of table or counter, or touch hot surfaces, including the stove. 10. handle carefully-especially when assembling, disassembling or cleaning inside blender jar. 12. When blending hot liquids, remove center-piece... of severe injury to persons or damage to OFF ( O ) then remove plug from outlet when not in use of lid. Start blending at lowest speed....
Use & Care
Page 3
..., an approved extension cord may not be equal to reduce the hazards of the extension cord must be used on this plug is when a blender requires the most . 840164500 ENnv09.qxd 8/23/07 3:25 PM Page 3 OTHER CONSUMER SAFETY INFORMATION This appliance is determined by children or accidentally...Care must be provided with food or liquid. The contents may freeze and may draw significantly less power. 3 To reduce the risk of the blender is intended for household use . Peak power is a measure of input wattage/amperes after 30 seconds of operation. This is the measure of ...
..., an approved extension cord may not be equal to reduce the hazards of the extension cord must be used on this plug is when a blender requires the most . 840164500 ENnv09.qxd 8/23/07 3:25 PM Page 3 OTHER CONSUMER SAFETY INFORMATION This appliance is determined by children or accidentally...Care must be provided with food or liquid. The contents may freeze and may draw significantly less power. 3 To reduce the risk of the blender is intended for household use . Peak power is a measure of input wattage/amperes after 30 seconds of operation. This is the measure of ...
Use & Care
Page 4
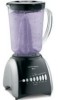
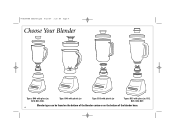
840164500 ENnv09.qxd 8/23/07 3:25 PM Page 4 Choose Your Blender Types: B46 with glass jar, B20, B23, B30, Type: B46 with plastic jar Type: B33 with plastic jar Types: B33 with glass jar, B12, B29, B45, B49 Blender type can be found on the bottom of the blender carton or on the bottom of the blender base. 4
840164500 ENnv09.qxd 8/23/07 3:25 PM Page 4 Choose Your Blender Types: B46 with glass jar, B20, B23, B30, Type: B46 with plastic jar Type: B33 with plastic jar Types: B33 with glass jar, B12, B29, B45, B49 Blender type can be found on the bottom of the blender carton or on the bottom of the blender base. 4
Use & Care
Page 5
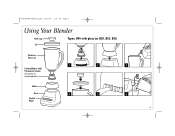
840164500 ENnv09.qxd 8/23/07 3:25 PM Page 5 Using Your Blender Filler Cap Types: B46 with glass jar, B20, B23, B30, Lid Plastic or Glass Jar 1 2 3 Cutting Blades with Permanent Gasket (Do not try to remove gasket.) Collar Base Control Panel 4 5 6 5
840164500 ENnv09.qxd 8/23/07 3:25 PM Page 5 Using Your Blender Filler Cap Types: B46 with glass jar, B20, B23, B30, Lid Plastic or Glass Jar 1 2 3 Cutting Blades with Permanent Gasket (Do not try to remove gasket.) Collar Base Control Panel 4 5 6 5

Use & Care
Page 6
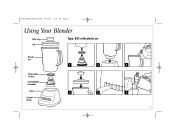
840164500 ENnv09.qxd 8/23/07 3:25 PM Page 6 Using Your Blender Filler Cap Type: B46 with plastic jar Lid Plastic Jar with Non-Removable Cutting Blades Dishwasher Drain Holes Base Control Panel 6 1 2 3 4 5
840164500 ENnv09.qxd 8/23/07 3:25 PM Page 6 Using Your Blender Filler Cap Type: B46 with plastic jar Lid Plastic Jar with Non-Removable Cutting Blades Dishwasher Drain Holes Base Control Panel 6 1 2 3 4 5
Use & Care
Page 7
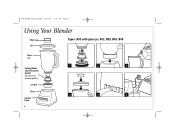
840164500 ENnv09.qxd 8/23/07 3:25 PM Page 7 Using Your Blender Filler Cap Lid Type: B33 with plastic jar Plastic Jar Removable Gasket Cutting Blade Assembly Base Control Panel 1 2 4 5 3 6 7
840164500 ENnv09.qxd 8/23/07 3:25 PM Page 7 Using Your Blender Filler Cap Lid Type: B33 with plastic jar Plastic Jar Removable Gasket Cutting Blade Assembly Base Control Panel 1 2 4 5 3 6 7
Use & Care
Page 8
840164500 ENnv09.qxd 8/23/07 3:25 PM Page 8 Using Your Blender Filler Cap Lid Types: B33 with glass jar, B12, B29, B45, B49 Glass Jar Cutting Blades with Permanent Gasket (Do not try to remove gasket.) Jar Nut Base Control Panel 8 1 2 3 4 4 5
840164500 ENnv09.qxd 8/23/07 3:25 PM Page 8 Using Your Blender Filler Cap Lid Types: B33 with glass jar, B12, B29, B45, B49 Glass Jar Cutting Blades with Permanent Gasket (Do not try to remove gasket.) Jar Nut Base Control Panel 8 1 2 3 4 4 5
Use & Care
Page 9
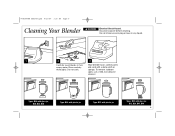
Do not immerse cord, plug or base in any liquid. 1 2 3 Carefully wash blades in hot, soapy water. Wipe blender base, control panel, and cord with glass jar, B12, B29, B45, B49 9 840164500 ENnv09.qxd 8/23/07 3:25 PM Page 9 Cleaning Your Blender w WARNING Electrical Shock Hazard. Rinse and dry thoroughly. Do not soak. Disconnect power before cleaning. Types: B46 with glass jar, B20, B23, B30 Type: B46 with plastic jar Type: B33 with plastic jar Types: B33 with a damp cloth or sponge. To remove stubborn spots, use a mild, non-abrasive cleanser.
Do not immerse cord, plug or base in any liquid. 1 2 3 Carefully wash blades in hot, soapy water. Wipe blender base, control panel, and cord with glass jar, B12, B29, B45, B49 9 840164500 ENnv09.qxd 8/23/07 3:25 PM Page 9 Cleaning Your Blender w WARNING Electrical Shock Hazard. Rinse and dry thoroughly. Do not soak. Disconnect power before cleaning. Types: B46 with glass jar, B20, B23, B30 Type: B46 with plastic jar Type: B33 with plastic jar Types: B33 with a damp cloth or sponge. To remove stubborn spots, use a mild, non-abrasive cleanser.
Use & Care
Page 10
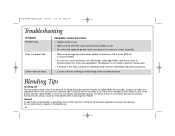
...the ice cubes. When only crushed ice is recommended. • Do not try to jar. Place lid on blender jar then Pulse on jar. • For units with separate gasket, make sure gasket is operating, remove ... desired, add 1 cup (250 ml) of the 5 pulse speeds. Continue until mixture is crushed to a complete stop between pulses. General To add foods when blender is in the blender jar. 10 PROBABLE CAUSE/SOLUTION • Tighten collar on jar. • Make...opening. 840164500 ENnv09.qxd 8/23/07 3:25 PM Page 10 Troubleshooting PROBLEM Blender leaks. Cannot remove base.
...the ice cubes. When only crushed ice is recommended. • Do not try to jar. Place lid on blender jar then Pulse on jar. • For units with separate gasket, make sure gasket is operating, remove ... desired, add 1 cup (250 ml) of the 5 pulse speeds. Continue until mixture is crushed to a complete stop between pulses. General To add foods when blender is in the blender jar. 10 PROBABLE CAUSE/SOLUTION • Tighten collar on jar. • Make...opening. 840164500 ENnv09.qxd 8/23/07 3:25 PM Page 10 Troubleshooting PROBLEM Blender leaks. Cannot remove base.


