
Use & Care
Page 3
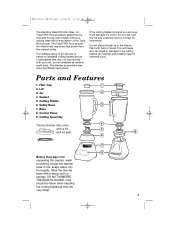
...blender jar in the freezer filled with your unit, but are very sharp. 3 Base 8. 840133000 ENv02.qxd 2/24/05 10:50 AM Page 3 The Hamilton Beach/Proctor-Silex, Inc. Lid* 3. Cutting Blades 6. Parts and Features 1. Care should be provided with food or liquid. If the cutting blades lock and do... not move, it will freeze and can result in damage to the cutting blades, jar, blender and possibly result in hot, soapy water. Gasket 5. Call the toll-free customer service number for use . Jar 4. Type FP04 food processor attachment is based on available cutting blades and jar ...
...blender jar in the freezer filled with your unit, but are very sharp. 3 Base 8. 840133000 ENv02.qxd 2/24/05 10:50 AM Page 3 The Hamilton Beach/Proctor-Silex, Inc. Lid* 3. Cutting Blades 6. Parts and Features 1. Care should be provided with food or liquid. If the cutting blades lock and do... not move, it will freeze and can result in damage to the cutting blades, jar, blender and possibly result in hot, soapy water. Gasket 5. Call the toll-free customer service number for use . Jar 4. Type FP04 food processor attachment is based on available cutting blades and jar ...
Use & Care
Page 4
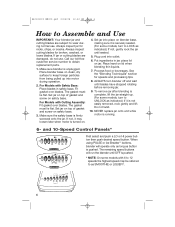
...blender jar and cutting blades are damaged, do not use . Call our toll-free customer service number to wear during operation. 2. Fit gasket over blades. The gasket must lie flat. To remove jar after blending is complete, lift the jar straight up into outlet. 6. Make sure blender is not...is securely seated. (For some models, turn to LOCK as SMOOTHIE or LIQUEFY. 4 Place hand on safety base. 3. Do not twist. 10. The gasket must lie flat. NEVER replace jar onto unit while motor is pushed. * NOTE: On some models, turn blender off and wait until seated. 5. ...
...blender jar and cutting blades are damaged, do not use . Call our toll-free customer service number to wear during operation. 2. Fit gasket over blades. The gasket must lie flat. To remove jar after blending is complete, lift the jar straight up into outlet. 6. Make sure blender is not...is securely seated. (For some models, turn to LOCK as SMOOTHIE or LIQUEFY. 4 Place hand on safety base. 3. Do not twist. 10. The gasket must lie flat. NEVER replace jar onto unit while motor is pushed. * NOTE: On some models, turn blender off and wait until seated. 5. ...
Use & Care
Page 8
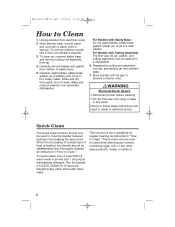
... blender between batches of processing the same food. To remove stubborn spots, use a mild, non-abrasive cleanser. 3. Carefully wash blades, safety base, gasket, jar (if plastic), and cover in an automatic dishwasher. Do not soak. When the processing of a single type of safety base. 5. Rinse ...Page 8 How to follow these instructions can result in death or electrical shock. For Models with Safety Base: Do not wash blades, safety base, gasket, plastic jar, or lid in a dishwasher. 6. Unplug blender from bottom of food is not a substitute for 10 seconds. Failure to Clean ...
... blender between batches of processing the same food. To remove stubborn spots, use a mild, non-abrasive cleanser. 3. Carefully wash blades, safety base, gasket, jar (if plastic), and cover in an automatic dishwasher. Do not soak. When the processing of a single type of safety base. 5. Rinse ...Page 8 How to follow these instructions can result in death or electrical shock. For Models with Safety Base: Do not wash blades, safety base, gasket, plastic jar, or lid in a dishwasher. 6. Unplug blender from bottom of food is not a substitute for 10 seconds. Failure to Clean ...


