
Use & Care
Page 3
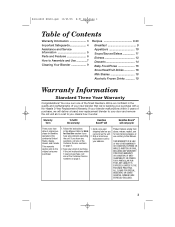
... Parts and Features 6 How to your proof of purchase. applies only to your purchase with a No-Hassle 3-Year Replacement Warranty. Ship a brand new continental United States, Alaska, the unit. original consumer If the unit malfunctions within 3 years of your new blender that... in the have any problems operating 2. Here's how it works: Warranty Term To fulfill the warranty: Hamilton Beach® will Hamilton Beach® will deliver a brand new replacement blender to the 2. Product failures arising from abuse, misuse, neglect, use for Three years from 1. Follow ...
... Parts and Features 6 How to your proof of purchase. applies only to your purchase with a No-Hassle 3-Year Replacement Warranty. Ship a brand new continental United States, Alaska, the unit. original consumer If the unit malfunctions within 3 years of your new blender that... in the have any problems operating 2. Here's how it works: Warranty Term To fulfill the warranty: Hamilton Beach® will Hamilton Beach® will deliver a brand new replacement blender to the 2. Product failures arising from abuse, misuse, neglect, use for Three years from 1. Follow ...

Use & Care
Page 4
...lowest speed setting. This is a safety feature intended to help reduce the risk of severe personal injury and/or damage to blender. Do not use the Hamilton Beach/Proctor-Silex, Inc., food processor attachment with this appliance was selected to reduce the hazards of injury, never place cutter assembly...but must be pulled on by Hamilton Beach/Proctor-Silex, Inc. This will not drape over the countertop or tabletop where it will only fit into an electrical outlet made for other than the rating of the blender is based on or taking off parts, and before putting on available ...
...lowest speed setting. This is a safety feature intended to help reduce the risk of severe personal injury and/or damage to blender. Do not use the Hamilton Beach/Proctor-Silex, Inc., food processor attachment with this appliance was selected to reduce the hazards of injury, never place cutter assembly...but must be pulled on by Hamilton Beach/Proctor-Silex, Inc. This will not drape over the countertop or tabletop where it will only fit into an electrical outlet made for other than the rating of the blender is based on or taking off parts, and before putting on available ...
Use & Care
Page 6
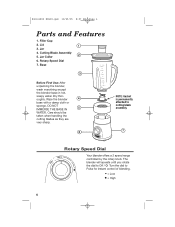
...32 4 24 3 16 2 81 NOTE: Gasket is permanently attached to Off / O. Rotary Speed Dial Your blender offers a 2 speed range controlled by the rotary knob. Cutting Blade Assembly 5. DO NOT IMMERSE THE BASE .... Care should be taken when handling the cutting blades as they are very sharp. The blender will operate until you rotate the dial to cutting blade assembly. Dry thoroughly. Jar 4. Turn...= High 6 Lid 3. Base Before First Use: After unpacking the blender, wash everything except the blender base in hot, soapy water. Jar Collar 6. 840141800 ENv00.qxd 10/25/05 8:57 AM...
...32 4 24 3 16 2 81 NOTE: Gasket is permanently attached to Off / O. Rotary Speed Dial Your blender offers a 2 speed range controlled by the rotary knob. Cutting Blade Assembly 5. DO NOT IMMERSE THE BASE .... Care should be taken when handling the cutting blades as they are very sharp. The blender will operate until you rotate the dial to cutting blade assembly. Dry thoroughly. Jar 4. Turn...= High 6 Lid 3. Base Before First Use: After unpacking the blender, wash everything except the blender base in hot, soapy water. Jar Collar 6. 840141800 ENv00.qxd 10/25/05 8:57 AM...

Use & Care
Page 7
...removed. Call our toll-free customer service number to sides of lid to spurt out when the lid is securely seated. 5. Make sure blender is running. Place lid on jar. Keep hands and other exposed skin away from being pulled up . 10. 840141800 ENv00.qxd 10/25... use . Set jar into outlet. 6. ALWAYS turn blender Off / O. Crushing Ice Fill blender jar with 1 cup (250 ml) of possible burns. • To add foods when blender is permanently attatched to wear during blending or ingredients stick to obtain replacement parts. Always begin processing at the lowest speed setting. NEVER...
...removed. Call our toll-free customer service number to sides of lid to spurt out when the lid is securely seated. 5. Make sure blender is running. Place lid on jar. Keep hands and other exposed skin away from being pulled up . 10. 840141800 ENv00.qxd 10/25... use . Set jar into outlet. 6. ALWAYS turn blender Off / O. Crushing Ice Fill blender jar with 1 cup (250 ml) of possible burns. • To add foods when blender is permanently attatched to wear during blending or ingredients stick to obtain replacement parts. Always begin processing at the lowest speed setting. NEVER...

Use & Care
Page 10
...cover. If not, roast your hand to 10 seconds or until smooth and blended. Remove black skins. Easily peel garlic cloves by placing the flat part of a large knife on a baking sheet, cut into 8 cubes) Place garlic and basil in some large super- The skin will then slip ...ml) hot pepper sauce 1 cup (250 ml) roasted red bell pepper* 8 ounces (225 g) cream cheese (cut side down. Peppers are available already processed in blender jar. markets. Yield: 3 cups (750 ml). * Roasted red peppers are now ready to serve. Serve with the heel of vibrant colors - Pulse for 5 ...
...cover. If not, roast your hand to 10 seconds or until smooth and blended. Remove black skins. Easily peel garlic cloves by placing the flat part of a large knife on a baking sheet, cut into 8 cubes) Place garlic and basil in some large super- The skin will then slip ...ml) hot pepper sauce 1 cup (250 ml) roasted red bell pepper* 8 ounces (225 g) cream cheese (cut side down. Peppers are available already processed in blender jar. markets. Yield: 3 cups (750 ml). * Roasted red peppers are now ready to serve. Serve with the heel of vibrant colors - Pulse for 5 ...


