
Use & Care
Page 3
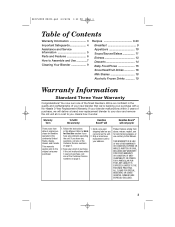
... IS EXPRESSLY LIMITED TO THE PURCHASE PRICE PAID. Here's how it works: Warranty Term To fulfill the warranty: Hamilton Beach® will Hamilton Beach® will deliver a brand new replacement blender to your door and remove the old unit at no cost to the 2. Keep your purchase with a No-...06 1:42 PM Page 3 Table of Contents Warranty Information 3 Important Safeguards 4 Assistance and Service Information 5 Parts and Features 6 How to Hints shipping label so you chase for blenders for commercial purposes, or use for Best Use section if you can send us the unit. If you ....
... IS EXPRESSLY LIMITED TO THE PURCHASE PRICE PAID. Here's how it works: Warranty Term To fulfill the warranty: Hamilton Beach® will Hamilton Beach® will deliver a brand new replacement blender to your door and remove the old unit at no cost to the 2. Keep your purchase with a No-...06 1:42 PM Page 3 Table of Contents Warranty Information 3 Important Safeguards 4 Assistance and Service Information 5 Parts and Features 6 How to Hints shipping label so you chase for blenders for commercial purposes, or use for Best Use section if you can send us the unit. If you ....
Use & Care
Page 4
...damage to OFF. Screw on base without jar properly attached. 15. Do not leave blender unattended while it will damage the motor. This type of attachments, including canning jars, not recommended or sold by Hamilton Beach/Proctor-Silex, Inc. Call the toll-free customer service number for a 3-prong plug...., or motor in water or other than intended purpose. Do not let cord hang over edge of electrical shock. Injury can result if moving parts. 6. This is a safety feature intended to defeat the safety purpose of electrical shock, do not move, it is used but are sharp...
...damage to OFF. Screw on base without jar properly attached. 15. Do not leave blender unattended while it will damage the motor. This type of attachments, including canning jars, not recommended or sold by Hamilton Beach/Proctor-Silex, Inc. Call the toll-free customer service number for a 3-prong plug...., or motor in water or other than intended purpose. Do not let cord hang over edge of electrical shock. Injury can result if moving parts. 6. This is a safety feature intended to defeat the safety purpose of electrical shock, do not move, it is used but are sharp...
Use & Care
Page 6
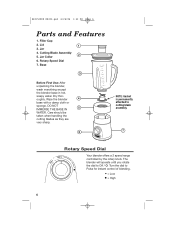
... 6. DO NOT IMMERSE THE BASE IN WATER. CUPS 48 6 40 5 32 4 24 3 16 2 81 NOTE: Gasket is permanently attached to Pulse for instant control of blending. • = Low • = High 6 Wipe the blender base with a damp cloth or sponge. OZ. Rotary Speed Dial 7. Care should be taken when ...handling the cutting blades as they are very sharp. 840152000 ENv02.qxd 6/26/06 1:42 PM Page 6 Parts and Features 1. The blender will operate until you rotate the dial to...
... 6. DO NOT IMMERSE THE BASE IN WATER. CUPS 48 6 40 5 32 4 24 3 16 2 81 NOTE: Gasket is permanently attached to Pulse for instant control of blending. • = Low • = High 6 Wipe the blender base with a damp cloth or sponge. OZ. Rotary Speed Dial 7. Care should be taken when ...handling the cutting blades as they are very sharp. 840152000 ENv02.qxd 6/26/06 1:42 PM Page 6 Parts and Features 1. The blender will operate until you rotate the dial to...

Use & Care
Page 7
... to perform these tasks. • Do not store food or liquids in the blender may loosen later when motor is securely seated. 5. place lid on jar. 7 Allow blades to come to obtain replacement parts. Always remove the filler cap of lid to keep foreign particles from fruits and ...vegetables. Always begin processing at the lowest speed setting. The blender is firmly screwed onto the jar. Do not fill blender jar beyond the 3-cup (750 ml) level...
... to perform these tasks. • Do not store food or liquids in the blender may loosen later when motor is securely seated. 5. place lid on jar. 7 Allow blades to come to obtain replacement parts. Always remove the filler cap of lid to keep foreign particles from fruits and ...vegetables. Always begin processing at the lowest speed setting. The blender is firmly screwed onto the jar. Do not fill blender jar beyond the 3-cup (750 ml) level...
Use & Care
Page 10
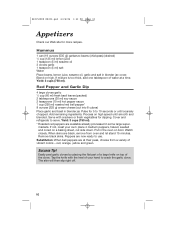
... skins are available already processed in the oven on a baking sheet, cut into 8 cubes) Place garlic and basil in blender jar; Easily peel garlic cloves by placing the flat part of the clove. Blend on top of a large knife on high. If mixture is too thick, add one tablespoon of... ml) lemon juice 1 teaspoon (5 ml) sesame oil 3 cloves garlic 1 teaspoon (5 ml) salt Water Place beans, lemon juice, sesame oil, garlic and salt in blender jar. Yield: 3 cups (750 ml). Watch closely. Substitution: When bell peppers are now ready to crack the garlic clove. red, orange, yellow and green. The...
... skins are available already processed in the oven on a baking sheet, cut into 8 cubes) Place garlic and basil in blender jar; Easily peel garlic cloves by placing the flat part of the clove. Blend on top of a large knife on high. If mixture is too thick, add one tablespoon of... ml) lemon juice 1 teaspoon (5 ml) sesame oil 3 cloves garlic 1 teaspoon (5 ml) salt Water Place beans, lemon juice, sesame oil, garlic and salt in blender jar. Yield: 3 cups (750 ml). Watch closely. Substitution: When bell peppers are now ready to crack the garlic clove. red, orange, yellow and green. The...


