
Use and Care Manual
Page 2
... attachments not recommended by the appliance manufacturer may occur if the filter holder is securely in a heated oven. 14. No user-serviceable parts are closely supervised and instructed concerning use of fire, electric shock, and/or injury to OFF (O) and then remove plug from spilled,...12. To disconnect appliance, turn controls to persons, including the following: 1. Children should be taken, as burns can occur from touching hot parts or from wall outlet. 15. To protect against fire, electric shock, and injury to cool before cleaning. Allow to persons, do not ...
... attachments not recommended by the appliance manufacturer may occur if the filter holder is securely in a heated oven. 14. No user-serviceable parts are closely supervised and instructed concerning use of fire, electric shock, and/or injury to OFF (O) and then remove plug from spilled,...12. To disconnect appliance, turn controls to persons, including the following: 1. Children should be taken, as burns can occur from touching hot parts or from wall outlet. 15. To protect against fire, electric shock, and injury to cool before cleaning. Allow to persons, do not ...

Use and Care Manual
Page 4
Rinse and dry. Espresso Espresso/Pod Filter for 2 Cups Filter for 1 Cup Filter Holder Locking Lever Ground Espresso/Pod Filter Holder Frothing Nozzle and Cover Brew Head Opening Removable Drip Tray Frothing Nozzle Wrench Base Removable Drip Tray Holder Measuring Scoop With Tamping Tool 4 Brew one cycle and discard water. Parts and Features *To order parts: US: 1.800.851.8900 www.hamiltonbeach.com Canada: 1.800.267.2826 Mexico: 01 800 71 16 100 Removable Water Reservoir Cup Warmer BEFORE FIRST USE: Wash all removable parts in hot, soapy water.
Rinse and dry. Espresso Espresso/Pod Filter for 2 Cups Filter for 1 Cup Filter Holder Locking Lever Ground Espresso/Pod Filter Holder Frothing Nozzle and Cover Brew Head Opening Removable Drip Tray Frothing Nozzle Wrench Base Removable Drip Tray Holder Measuring Scoop With Tamping Tool 4 Brew one cycle and discard water. Parts and Features *To order parts: US: 1.800.851.8900 www.hamiltonbeach.com Canada: 1.800.267.2826 Mexico: 01 800 71 16 100 Removable Water Reservoir Cup Warmer BEFORE FIRST USE: Wash all removable parts in hot, soapy water.

Use and Care Manual
Page 5
Parts and Features (cont.) Amber ON Light STANDBY Knob Position BREW Knob Position ON/OFF Button Green READY Light (for BREW and STEAM) STEAM Knob Position Control Knob 5
Parts and Features (cont.) Amber ON Light STANDBY Knob Position BREW Knob Position ON/OFF Button Green READY Light (for BREW and STEAM) STEAM Knob Position Control Knob 5
Use and Care Manual
Page 7
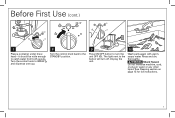
Before First Use (cont.) 7 Place a container under brew head-it should be wide enough to turn off. Wash parts again with warm, soapy water. Do not immerse machine, cord, or plug in water or any other liquid. Unplug the unit. w WARNING Shock Hazard. Rinse and dry thoroughly. See Cleaning section on page 15 for full instructions. 7 The light next to the button will turn the unit OFF (O). Turn the control knob to BREW and dispense one cup. 8 Turn the control knob back to the STANDBY position. 9 10 Press ON/OFF button to catch water from both spouts.
Before First Use (cont.) 7 Place a container under brew head-it should be wide enough to turn off. Wash parts again with warm, soapy water. Do not immerse machine, cord, or plug in water or any other liquid. Unplug the unit. w WARNING Shock Hazard. Rinse and dry thoroughly. See Cleaning section on page 15 for full instructions. 7 The light next to the button will turn the unit OFF (O). Turn the control knob to BREW and dispense one cup. 8 Turn the control knob back to the STANDBY position. 9 10 Press ON/OFF button to catch water from both spouts.

Use and Care Manual
Page 11
.... then remove. 16 Clean filter holder and brew head after each use. See Cleaning instructions on handle lever, Ensure filter holder is cool. The metal parts of the filter holder and hold the lever open.
.... then remove. 16 Clean filter holder and brew head after each use. See Cleaning instructions on handle lever, Ensure filter holder is cool. The metal parts of the filter holder and hold the lever open.

Use and Care Manual
Page 15
... to catch water from both spouts. then remove cover of frothing nozzle and wipe down nozzle with warm water and damp cloth. 6 No parts are dishwasher-safe. 15 Disconnect power before wiping exterior of water. Turn control knob back to STEAM position and let steam flow for about ...Every other use: Remove nozzle tip with warm, soapy Carefully wipe exterior and brew water. Rinse and dry thoroughly. 5 head with a cloth. Wash all parts with wrench on tamping tool and wash in any liquid. 1 Make sure unit is turned on and the green ready light illuminated. Unplug the unit...
... to catch water from both spouts. then remove cover of frothing nozzle and wipe down nozzle with warm water and damp cloth. 6 No parts are dishwasher-safe. 15 Disconnect power before wiping exterior of water. Turn control knob back to STEAM position and let steam flow for about ...Every other use: Remove nozzle tip with warm, soapy Carefully wipe exterior and brew water. Rinse and dry thoroughly. 5 head with a cloth. Wash all parts with wrench on tamping tool and wash in any liquid. 1 Make sure unit is turned on and the green ready light illuminated. Unplug the unit...

Use and Care Manual
Page 16
... the espresso setting. • Grind your espresso so that is ground too fine, then the water will make the best-tasting coffee. 16 The metal parts of the coffee and how the appliance works. For best results, use a setting that it even easier to brew a great cup of espresso and cleanup...
... the espresso setting. • Grind your espresso so that is ground too fine, then the water will make the best-tasting coffee. 16 The metal parts of the coffee and how the appliance works. For best results, use a setting that it even easier to brew a great cup of espresso and cleanup...


