Use and Care Manual
Page 2
...tripped over a longer cord. Repair should be taken to arrange the extension cord so that it will not drape over edge of the percolator in fire, electrical shock, or injury to reduce the risk of accessory attachments not recommended by using electric appliances, basic safety precautions ...should always be used on by authorized service personnel only. 16. If it can occur from touching hot parts or from percolator. 15. Care must be equal to appliance first; To avoid an electrical circuit overload, do not use and before putting on examination, ...
...tripped over a longer cord. Repair should be taken to arrange the extension cord so that it will not drape over edge of the percolator in fire, electrical shock, or injury to reduce the risk of accessory attachments not recommended by using electric appliances, basic safety precautions ...should always be used on by authorized service personnel only. 16. If it can occur from touching hot parts or from percolator. 15. Care must be equal to appliance first; To avoid an electrical circuit overload, do not use and before putting on examination, ...
Use and Care Manual
Page 5
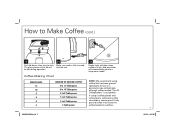
... coffeemaker, although coffee marked "For All Coffeemakers" is acceptable. be a coarse grind. NOTE: We recommend using a coffee grinder and whole beans, percolator coffee should be hot during operation. Coffee-Making Chart WATER LEVEL 12 10 8 6 4 2 AMOUNT OF GROUND COFFEE 8 to 12 Tablespoons 8 to 10 Tablespoons 6 to 8 Tablespoons 5 ...
... coffeemaker, although coffee marked "For All Coffeemakers" is acceptable. be a coarse grind. NOTE: We recommend using a coffee grinder and whole beans, percolator coffee should be hot during operation. Coffee-Making Chart WATER LEVEL 12 10 8 6 4 2 AMOUNT OF GROUND COFFEE 8 to 12 Tablespoons 8 to 10 Tablespoons 6 to 8 Tablespoons 5 ...
Use and Care Manual
Page 6
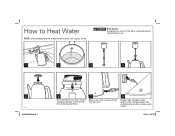
Scalding may occur if the lid is removed during operation. 7 Make sure cord is fully inserted into the unit. 8 Ready Light will glow when water is hot, and percolator will be hot during the brewing cycle. 12 10 8 6 4 1 2 3 4 5 6 840223300 ENv04.indd 6 6 Push lid down; How to Heat Water NOTE: Use heated water to lock. then twist to make instant coffee, hot cocoa, or tea. w WARNING Burn Hazard. The glass portion of the lid will automatically go into a keep-warm mode. 12/13/12 4:30 PM
Scalding may occur if the lid is removed during operation. 7 Make sure cord is fully inserted into the unit. 8 Ready Light will glow when water is hot, and percolator will be hot during the brewing cycle. 12 10 8 6 4 1 2 3 4 5 6 840223300 ENv04.indd 6 6 Push lid down; How to Heat Water NOTE: Use heated water to lock. then twist to make instant coffee, hot cocoa, or tea. w WARNING Burn Hazard. The glass portion of the lid will automatically go into a keep-warm mode. 12/13/12 4:30 PM
Use and Care Manual
Page 7
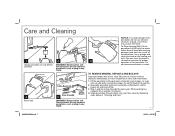
...840223300 ENv04.indd 7 12/13/12 4:30 PM When perking has stopped, let sit another 15 minutes. 4. Electrocution and Shock Hazard: Do not immerse percolator, cord, or plug in areas with stem assembly, coffee basket, coffee basket lid, and twist-off lid. 3. Coffee Basket Lid Stem Assembly 5 Coffee... and white vinegar. Do not fill beyond 12-cup line. 2. Care and Cleaning 1 Unplug and allow to maintain the proper operation of the percolator. This part must be properly 3 cleaned to cool before cleaning. 4 Rinse well. 2 WARNING! then clean by following steps above in and ...
...840223300 ENv04.indd 7 12/13/12 4:30 PM When perking has stopped, let sit another 15 minutes. 4. Electrocution and Shock Hazard: Do not immerse percolator, cord, or plug in areas with stem assembly, coffee basket, coffee basket lid, and twist-off lid. 3. Coffee Basket Lid Stem Assembly 5 Coffee... and white vinegar. Do not fill beyond 12-cup line. 2. Care and Cleaning 1 Unplug and allow to maintain the proper operation of the percolator. This part must be properly 3 cleaned to cool before cleaning. 4 Rinse well. 2 WARNING! then clean by following steps above in and ...
