Use And Care Guide
Page 2
... or touch hot surfaces, including stove. 10. Allow to reduce the hazards of becoming tangled in any appliance with the panini press. Care must be equal to protect hand when opening the panini press. IMPORTANT SAFEGUARDS When using an adapter. Call our toll-free customer service number for other than the rating of the...
... or touch hot surfaces, including stove. 10. Allow to reduce the hazards of becoming tangled in any appliance with the panini press. Care must be equal to protect hand when opening the panini press. IMPORTANT SAFEGUARDS When using an adapter. Call our toll-free customer service number for other than the rating of the...
Use And Care Guide
Page 3
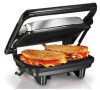
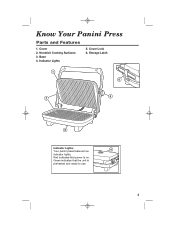
Red indicates that the unit is on. Know Your Panini Press Parts and Features 1. Indicator Lights 5. Base 4. Green indicates that power is preheated and ready to use. 3 Cover Lock 6. Nonstick Cooking Surfaces 3. Storage Latch Indicator Lights: Your panini press features two indicator lights. Cover 2.
Red indicates that the unit is on. Know Your Panini Press Parts and Features 1. Indicator Lights 5. Base 4. Green indicates that power is preheated and ready to use. 3 Cover Lock 6. Nonstick Cooking Surfaces 3. Storage Latch Indicator Lights: Your panini press features two indicator lights. Cover 2.
Use And Care Guide
Page 4
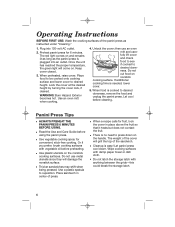
...the grids-this could break the storage latch. 4 Place sandwich in center of the sandwich. • Cleanup is easy! Let panini press cool down on the handle. WARNING! then use metal utensils since they will damage the nonstick surface. • Thicker sandwiches may shift ... by turning the cover lock, if desired. Operating Instructions BEFORE FIRST USE: Wash the cooking surfaces of the panini press as the panini press is needed, lower cover. 5. Preheat panini press for convenient, stick-free cooking. The red light comes on . Place food to be cooked onto cooking surface...
...the grids-this could break the storage latch. 4 Place sandwich in center of the sandwich. • Cleanup is easy! Let panini press cool down on the handle. WARNING! then use metal utensils since they will damage the nonstick surface. • Thicker sandwiches may shift ... by turning the cover lock, if desired. Operating Instructions BEFORE FIRST USE: Wash the cooking surfaces of the panini press as the panini press is needed, lower cover. 5. Preheat panini press for convenient, stick-free cooking. The red light comes on . Place food to be cooked onto cooking surface...
Use And Care Guide
Page 5
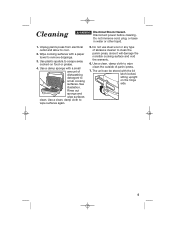
Use a clean, damp cloth to cool. 2. Use a clean, damp cloth to wipe clean the outside of abrasive cleaner to remove drippings. 3. Unplug panini press from electrical outlet and allow to wipe surfaces again. 5. Wipe cooking surfaces with the lid latch locked, sitting upright on food or grease. 4. The unit... can be stored with a paper towel to clean the panini press, since it will damage the nonstick cooking surface and void the warranty. 6. Do not use steel wool or any type of...
Use a clean, damp cloth to cool. 2. Use a clean, damp cloth to wipe clean the outside of abrasive cleaner to remove drippings. 3. Unplug panini press from electrical outlet and allow to wipe surfaces again. 5. Wipe cooking surfaces with the lid latch locked, sitting upright on food or grease. 4. The unit... can be stored with a paper towel to clean the panini press, since it will damage the nonstick cooking surface and void the warranty. 6. Do not use steel wool or any type of...
Use And Care Guide
Page 6
... wide and 15 inches long. Place 4 slices of bread, oil side down, on each slice of bread, olive oil side up. Close panini press. These grilled stuffed sandwiches offer unlimited possibilities, both as a lunch time treat and anytime. Cover with a slightly sour, tangy flavor from the...BBQ sauce 8 slices tomato 8 bacon strips, cooked 4 slices cheddar cheese 1/2 cup (125 ml) sautéed onions (optional) Olive oil Preheat panini press. Sourdough Bread A bread with remaining 4 slices of bread. Cook 3 to French bread, but the loaves are an Italian classic. Recipes NOTE: The...
... wide and 15 inches long. Place 4 slices of bread, oil side down, on each slice of bread, olive oil side up. Close panini press. These grilled stuffed sandwiches offer unlimited possibilities, both as a lunch time treat and anytime. Cover with a slightly sour, tangy flavor from the...BBQ sauce 8 slices tomato 8 bacon strips, cooked 4 slices cheddar cheese 1/2 cup (125 ml) sautéed onions (optional) Olive oil Preheat panini press. Sourdough Bread A bread with remaining 4 slices of bread. Cook 3 to French bread, but the loaves are an Italian classic. Recipes NOTE: The...
Use And Care Guide
Page 7
...Cook for 2 to warm fruit. Cut turnovers in tortilla. Cook 2 to 5 minutes or until cheese melts. Repeat with remaining 4 slices of panini press and lock hinge to 2 minutes. Makes 4 servings. Insert chicken and 2 tablespoons (30 ml) cheese in half. Cook for 2 to ...3 minutes to 3 minutes, or until cheese melts. Close panini press. Combine sugar and cinnamon, and sprinkle over turnovers. Fold tortilla in . (22 cm) thick slices sourdough bread 1/2 lb. (230 g) prepared ...
...Cook for 2 to warm fruit. Cut turnovers in tortilla. Cook 2 to 5 minutes or until cheese melts. Repeat with remaining 4 slices of panini press and lock hinge to 2 minutes. Makes 4 servings. Insert chicken and 2 tablespoons (30 ml) cheese in half. Cook for 2 to ...3 minutes to 3 minutes, or until cheese melts. Close panini press. Combine sugar and cinnamon, and sprinkle over turnovers. Fold tortilla in . (22 cm) thick slices sourdough bread 1/2 lb. (230 g) prepared ...
