Use And Care Guide
Page 2
... does not fit fully into the outlet. Consumer Safety Information This appliance is provided with this appliance was selected to protect hand when opening the panini press. The use outdoors. 8. Do not place on examination, repair, or adjustment. 7. Read all instructions. 2. SAVE THESE INSTRUCTIONS! IMPORTANT ... The electrical rating of attachments not recommended or sold by or near a hot gas or electric burner, or in any appliance with the panini press. Do not touch hot surfaces. Shock Hazard: This product is intended for other liquid. 4. If it still does not fit, ...
... does not fit fully into the outlet. Consumer Safety Information This appliance is provided with this appliance was selected to protect hand when opening the panini press. The use outdoors. 8. Do not place on examination, repair, or adjustment. 7. Read all instructions. 2. SAVE THESE INSTRUCTIONS! IMPORTANT ... The electrical rating of attachments not recommended or sold by or near a hot gas or electric burner, or in any appliance with the panini press. Do not touch hot surfaces. Shock Hazard: This product is intended for other liquid. 4. If it still does not fit, ...
Use And Care Guide
Page 3
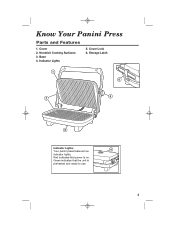
Know Your Panini Press Parts and Features 1. Indicator Lights 5. Green indicates that power is preheated and ready to use. 3 Base 4. Storage Latch Indicator Lights: Your panini press features two indicator lights. Red indicates that the unit is on. Nonstick Cooking Surfaces 3. Cover Lock 6. Cover 2.
Know Your Panini Press Parts and Features 1. Indicator Lights 5. Green indicates that power is preheated and ready to use. 3 Base 4. Storage Latch Indicator Lights: Your panini press features two indicator lights. Red indicates that the unit is on. Nonstick Cooking Surfaces 3. Cover Lock 6. Cover 2.
Use And Care Guide
Page 4
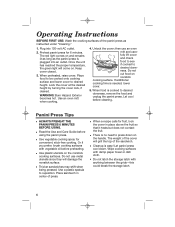
...The red light comes on . Place food to be cooked onto cooking surface and lower cover to desired doneness, remove the food and unplug the panini press. WARNING! then use metal utensils since they will grill the top of press. • When a recipe calls for convenient, stick-free cooking... • There is easy! Place sandwich in center of the sandwich. • Cleanup is no need to reposition. Let panini press cool down on the handle. Preheat panini press for 6 minutes. Do not cut food on the nonstick cooking surfaces. If additional cooking time is plugged into 120-volt...
...The red light comes on . Place food to be cooked onto cooking surface and lower cover to desired doneness, remove the food and unplug the panini press. WARNING! then use metal utensils since they will grill the top of press. • When a recipe calls for convenient, stick-free cooking... • There is easy! Place sandwich in center of the sandwich. • Cleanup is no need to reposition. Let panini press cool down on the handle. Preheat panini press for 6 minutes. Do not cut food on the nonstick cooking surfaces. If additional cooking time is plugged into 120-volt...
Use And Care Guide
Page 5
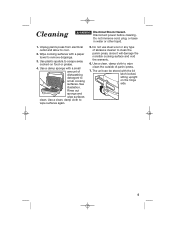
Use a clean, damp cloth to wipe clean the outside of abrasive cleaner to remove drippings. 3. Use a damp sponge with a paper towel to clean the panini press, since it will damage the nonstick cooking surface and void the warranty. 6. Use a clean, damp cloth to cool. 2. Wipe cooking surfaces with a small amount ... stored with the lid latch locked, sitting upright on food or grease. 4. Disconnect power before cleaning. Do not use steel wool or any type of panini press. 7. Unplug panini press from electrical outlet and allow to wipe surfaces again. 5.
Use a clean, damp cloth to wipe clean the outside of abrasive cleaner to remove drippings. 3. Use a damp sponge with a paper towel to clean the panini press, since it will damage the nonstick cooking surface and void the warranty. 6. Use a clean, damp cloth to cool. 2. Wipe cooking surfaces with a small amount ... stored with the lid latch locked, sitting upright on food or grease. 4. Disconnect power before cleaning. Do not use steel wool or any type of panini press. 7. Unplug panini press from electrical outlet and allow to wipe surfaces again. 5.
Use And Care Guide
Page 6
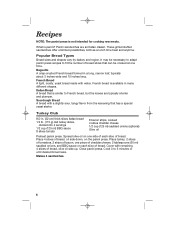
...of bread slices that can be cooked at one side of each slice of bread, olive oil side up. Spread olive oil on the panini press. Panini sandwiches are typically shorter and plumper. French Bread A light, crusty, yeast bread made with a slightly sour, tangy flavor from the ...Sourdough Bread A bread with water. Place 4 slices of bread. What is not intended for cooking raw meats. It may be necessary to adapt panini press recipes to 5 minutes or until desired brownness. Baguette A crisp-crusted French bread formed in many different shapes. French bread is similar to...
...of bread slices that can be cooked at one side of each slice of bread, olive oil side up. Spread olive oil on the panini press. Panini sandwiches are typically shorter and plumper. French Bread A light, crusty, yeast bread made with a slightly sour, tangy flavor from the ...Sourdough Bread A bread with water. Place 4 slices of bread. What is not intended for cooking raw meats. It may be necessary to adapt panini press recipes to 5 minutes or until desired brownness. Baguette A crisp-crusted French bread formed in many different shapes. French bread is similar to...
Use And Care Guide
Page 7
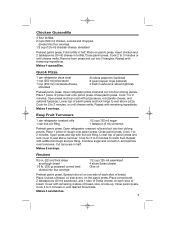
...mozzarella cheese, shredded 24 slices pepperoni (optional) 8 green pepper rings (optional) 4 fresh mushrooms, sliced (optional) Preheat panini press. Close panini press. Combine sugar and cinnamon, and sprinkle over turnovers. Place corned beef, 2 tablespoons (30 ml) sauerkraut, and 1.... 7 Makes 8 servings. Open press and top crust with remaining ingredients. Place 1 piece of pizza crust onto panini press. Close panini press. Makes 4 servings. Cook 1 to 5 minutes or until desired brownness. Open refrigerator pizza crust and cut into...
...mozzarella cheese, shredded 24 slices pepperoni (optional) 8 green pepper rings (optional) 4 fresh mushrooms, sliced (optional) Preheat panini press. Close panini press. Combine sugar and cinnamon, and sprinkle over turnovers. Place corned beef, 2 tablespoons (30 ml) sauerkraut, and 1.... 7 Makes 8 servings. Open press and top crust with remaining ingredients. Place 1 piece of pizza crust onto panini press. Close panini press. Makes 4 servings. Cook 1 to 5 minutes or until desired brownness. Open refrigerator pizza crust and cut into...
