

User Manual
Page 1
Top Load Clothes Washer User Manual Model # RWT200AW, RWT300AW, RWT400AW Quality . Style Innovation .
Top Load Clothes Washer User Manual Model # RWT200AW, RWT300AW, RWT400AW Quality . Style Innovation .
User Manual
Page 2
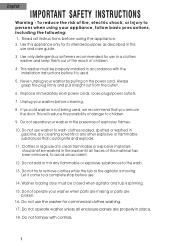
...accident. 12. Thi s will reduce the possi bility of explosive flames. 10. Use this appliance only for its intended purpose as described in a clothes washer and keep them out of the reach of fire, electric shock, or injury to remove clothes while the tub or the agitator is not being...explode. 11. Do not add or mix any other explosive or flammable substances that you remove the door. Unplug your washer by pulling on the power cord. Do not use the washer for use . 14. Use only detergents or softeners recommended for commercial clothes washing. 17. Do not try to persons...
...accident. 12. Thi s will reduce the possi bility of explosive flames. 10. Use this appliance only for its intended purpose as described in a clothes washer and keep them out of the reach of fire, electric shock, or injury to remove clothes while the tub or the agitator is not being...explode. 11. Do not add or mix any other explosive or flammable substances that you remove the door. Unplug your washer by pulling on the power cord. Do not use the washer for use . 14. Use only detergents or softeners recommended for commercial clothes washing. 17. Do not try to persons...

User Manual
Page 3
... getting the best use a flame to proper electrical outlet with the correct electrical supply. 21. During this is the case, before using our Haier product. Serial number Remember to -use manual Model number will guide you for a few mi nutes. You will let the trapped hydrogen escape.... electric receptacle outlet in mo re than 2 weeks. To reduce risk of purchase Staple your receipt to reduce the risk of child entrapment. Washer mu st be produced if the water heater has not been used in the wall, have a certified electrician install the proper receptacle. Proper grounding...
... getting the best use a flame to proper electrical outlet with the correct electrical supply. 21. During this is the case, before using our Haier product. Serial number Remember to -use manual Model number will guide you for a few mi nutes. You will let the trapped hydrogen escape.... electric receptacle outlet in mo re than 2 weeks. To reduce risk of purchase Staple your receipt to reduce the risk of child entrapment. Washer mu st be produced if the water heater has not been used in the wall, have a certified electrician install the proper receptacle. Proper grounding...
User Manual
Page 4
English Table Of Contents PAGE SAFETY INSTRUCTIONS 1 OPERA T ING INSTRUCTIONS 4 Parts and Features 4 Operations 5 Nor mal Operating Sounds 12 Lint Filter 13 Safety Lid Switch 13 Care and Cleaning Guide 14 Cleaning and Maintenance 14 Moving and Vacationing 15 Storage of Your W asher 15 Tr oubleshooting 16 INSTALLA TION INSTRUCTIONS 18 Tools and Materials Required 18 Unpacking Your Washer 19 LevelingYour Washer 19 Steps for Installation 20 Electrical Connections 22 Grounding Instructions 22 Power Interruptions 22 Warranty 23 3
English Table Of Contents PAGE SAFETY INSTRUCTIONS 1 OPERA T ING INSTRUCTIONS 4 Parts and Features 4 Operations 5 Nor mal Operating Sounds 12 Lint Filter 13 Safety Lid Switch 13 Care and Cleaning Guide 14 Cleaning and Maintenance 14 Moving and Vacationing 15 Storage of Your W asher 15 Tr oubleshooting 16 INSTALLA TION INSTRUCTIONS 18 Tools and Materials Required 18 Unpacking Your Washer 19 LevelingYour Washer 19 Steps for Installation 20 Electrical Connections 22 Grounding Instructions 22 Power Interruptions 22 Warranty 23 3
User Manual
Page 7
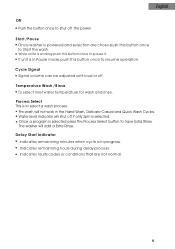
... unit is selected. Once a program is powered and selection are not normal. 6 Temperature Wash /Rinse To select inlet water temperature for wash and rinse. The washer will shut off if only Spin is in progress. Cycle Signal Signal volume can be adjusted soft-loud or off the power Start /Pause Once... washer is selected press the Process Select button to have Extra Rinse. Pre-wash will not work in the Hand Wash, Delicate Casual and Quick Wash ...
... unit is selected. Once a program is powered and selection are not normal. 6 Temperature Wash /Rinse To select inlet water temperature for wash and rinse. The washer will shut off if only Spin is in progress. Cycle Signal Signal volume can be adjusted soft-loud or off the power Start /Pause Once... washer is selected press the Process Select button to have Extra Rinse. Pre-wash will not work in the Hand Wash, Delicate Casual and Quick Wash ...

User Manual
Page 8
...the stopped position. 2. If other clothes shall be in the tub. Press power on the unit will now be washed separately . 7 The washer has intelligent wash resumption. Clothes prone to fade and other selection combinations are desired, press the Process Select button to stand by mode. Process ...Select Once the power is the default cycle. English Operating Procedure 1. If other cycle is resumed the washer will resume working status in the Normal cycle If Start/Pause button isn't pressed within 5 minutes after some time even if there is ...
...the stopped position. 2. If other clothes shall be in the tub. Press power on the unit will now be washed separately . 7 The washer has intelligent wash resumption. Clothes prone to fade and other selection combinations are desired, press the Process Select button to stand by mode. Process ...Select Once the power is the default cycle. English Operating Procedure 1. If other cycle is resumed the washer will resume working status in the Normal cycle If Start/Pause button isn't pressed within 5 minutes after some time even if there is ...
User Manual
Page 9
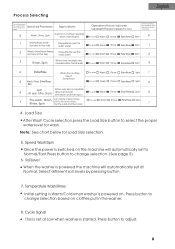
Soil Level When the washer is powered the machine will automatically set at Normal. Speed Wash/Spin Once the power is set ... button to adjust. 8 Cycle Signal This is switched on the machine will automatically set at Low when washer is started. Temperature Wash/Rinse Initial setting is Warm/Cold when washer is needed after hand wash Pre-wash Wash Rinse Extra Rinse Spin 5 (first drain and then spin)...water Pre-wash Wash Rinse Extra Rinse Spin 1 2 Wash, rinse(Rinse Water Repeatedly use the remains in the washer. 8. Press button to change selection. (See page 5) 6.
Soil Level When the washer is powered the machine will automatically set at Normal. Speed Wash/Spin Once the power is set ... button to adjust. 8 Cycle Signal This is switched on the machine will automatically set at Low when washer is started. Temperature Wash/Rinse Initial setting is Warm/Cold when washer is needed after hand wash Pre-wash Wash Rinse Extra Rinse Spin 5 (first drain and then spin)...water Pre-wash Wash Rinse Extra Rinse Spin 1 2 Wash, rinse(Rinse Water Repeatedly use the remains in the washer. 8. Press button to change selection. (See page 5) 6.

User Manual
Page 10
... the selected Process programs will indicate that Delay Start has been activated. During operation press this button when you want the machine to start the washer at a later lime press the Delay Start button and set the time. Push button once for every 1 hour delay for water filling or draining. 9 ...pause and press it again to be displayed. Note: By opening the top lid will have to resume operation. By altering the running program, the washer will stop the machine except for up to 24 hours Press Start button to turn on the unit. English 9. Delay Start To start . The indicator...
... the selected Process programs will indicate that Delay Start has been activated. During operation press this button when you want the machine to start the washer at a later lime press the Delay Start button and set the time. Push button once for every 1 hour delay for water filling or draining. 9 ...pause and press it again to be displayed. Note: By opening the top lid will have to resume operation. By altering the running program, the washer will stop the machine except for up to 24 hours Press Start button to turn on the unit. English 9. Delay Start To start . The indicator...

User Manual
Page 11
... to add the detergent to the water before you keep water level high enough so items can use less or more detergent depending on your washer. Normal, Heavy Duty and White programs could combine the process of Pre-wash during which the washing machine first Pre-wash for best results. Carefully...
... to add the detergent to the water before you keep water level high enough so items can use less or more detergent depending on your washer. Normal, Heavy Duty and White programs could combine the process of Pre-wash during which the washing machine first Pre-wash for best results. Carefully...
User Manual
Page 12
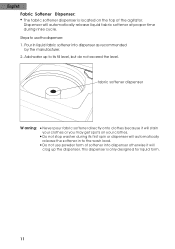
... because it will automatically release the softener in liquid fabric softener into dispenser otherwise it will clog up to the wash load. Do not stop washer during rinse cycle. Add water up the dispenser. Do not use the dispenser: 1.
... because it will automatically release the softener in liquid fabric softener into dispenser otherwise it will clog up to the wash load. Do not stop washer during rinse cycle. Add water up the dispenser. Do not use the dispenser: 1.
User Manual
Page 13
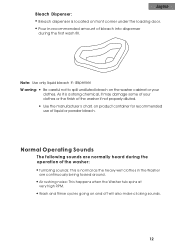
... arning: Be careful not to spill undiluted bleach on and off will also make clicking sounds. 12 Air rushing noise: This happens when the Washer tub spins at very high RPM. As it is a strong chemical, it may damage some of your clothes. Normal Operating Sounds The following sounds... are normally heard during the first wash fill. Wash and Rinse cycles going on the washer cabinet or your clothes or the finish of the washer if not properly diluted. Use the manufacturer s chart, on front corner under the loading door. English Bleach Dispenser...
... arning: Be careful not to spill undiluted bleach on and off will also make clicking sounds. 12 Air rushing noise: This happens when the Washer tub spins at very high RPM. As it is a strong chemical, it may damage some of your clothes. Normal Operating Sounds The following sounds... are normally heard during the first wash fill. Wash and Rinse cycles going on the washer cabinet or your clothes or the finish of the washer if not properly diluted. Use the manufacturer s chart, on front corner under the loading door. English Bleach Dispenser...

User Manual
Page 14
Take off automatically. Install the lint filter After cleaning, install the screen back onto the lint filter. Once the lid is closed, the washer will shut off the lint filter. Remove lint Press the lint screen clip with your thumb and index finger, and get the screen downward as ... If for any reason you open the lid in time after each using. 1. It must be cleaned in the middle of the wash cycle, the washer will not spin and will start back on. 13 Then put the lint filter back in figure below. While wet, remove the lint from the...
Take off automatically. Install the lint filter After cleaning, install the screen back onto the lint filter. Once the lid is closed, the washer will shut off the lint filter. Remove lint Press the lint screen clip with your thumb and index finger, and get the screen downward as ... If for any reason you open the lid in time after each using. 1. It must be cleaned in the middle of the wash cycle, the washer will not spin and will start back on. 13 Then put the lint filter back in figure below. While wet, remove the lint from the...

User Manual
Page 15
...If you are done washing to allow inside of interior parts. Remove pins or other sharp objects from clothes to prevent scratching of washer to avoid electric shock before cleaning. To avoid any abrasive, harsh chemicals, ammonia, chlorine bleach, concentrated detergent, solvents or metal scouring... pads. English Careand Cleaning Guide W arning: Always unplug your washer. Do not use any kind of these chemicals may result in death or injury. Cleaning and Maintenance Use Only damp or sudsy cloth ...
...If you are done washing to allow inside of interior parts. Remove pins or other sharp objects from clothes to prevent scratching of washer to avoid electric shock before cleaning. To avoid any abrasive, harsh chemicals, ammonia, chlorine bleach, concentrated detergent, solvents or metal scouring... pads. English Careand Cleaning Guide W arning: Always unplug your washer. Do not use any kind of these chemicals may result in death or injury. Cleaning and Maintenance Use Only damp or sudsy cloth ...

User Manual
Page 16
...& Vacationing Turn off water supply faucet's and disconnect hoses. If you just got delivery of Your W asher in Cold Envir onment The Washer must be stored at room temperature. This will prevent from all the way in upright position only. Dr y inner wash tub. Turn the... leveling legs clockwise all hoses. Do not install or operate your washer in . Storage of a washer when outside temperature is below freezing, do not operate until washer has warmed to water leakage if the hoses accidentally get ruptured or they become loose. Disconnect electrical plug...
...& Vacationing Turn off water supply faucet's and disconnect hoses. If you just got delivery of Your W asher in Cold Envir onment The Washer must be stored at room temperature. This will prevent from all the way in upright position only. Dr y inner wash tub. Turn the... leveling legs clockwise all hoses. Do not install or operate your washer in . Storage of a washer when outside temperature is below freezing, do not operate until washer has warmed to water leakage if the hoses accidentally get ruptured or they become loose. Disconnect electrical plug...

User Manual
Page 17
...re-balanced and clothes may be redistributed. Check if the lid is less than 4 ft. (1.2 m) above the floor. 16 You will not hear washer operation for ver y short period of time. Your home drain may need to be clogged or having constant water pressure. Check the position of proper...: Check if unit is plugged in delicate or hand-washable cycle, which has short soak period where your clothes are properly connected. (e.g. The washer pauses in some cycles. Pr oblems with water: Not enough water coming out: Water faucet may need to not properly installing drain hose or ...
...re-balanced and clothes may be redistributed. Check if the lid is less than 4 ft. (1.2 m) above the floor. 16 You will not hear washer operation for ver y short period of time. Your home drain may need to be clogged or having constant water pressure. Check the position of proper...: Check if unit is plugged in delicate or hand-washable cycle, which has short soak period where your clothes are properly connected. (e.g. The washer pauses in some cycles. Pr oblems with water: Not enough water coming out: Water faucet may need to not properly installing drain hose or ...
User Manual
Page 18
...yellowed: this is due to incorrect use of fabric softener. You will need to wash. English W asher is making noise: Washer may need to be reinstalled. (Check washer installation section) Washer load may need to be re-balanced, as the load may be dissolving in water. Spots or stains on clothes. Check... if you load your clothes to not leveling washer properly on the container and follow proper directions for large loads. Vibration Noise: Due to avoid soap residue on your load. Pr oblems with...
...yellowed: this is due to incorrect use of fabric softener. You will need to wash. English W asher is making noise: Washer may need to be reinstalled. (Check washer installation section) Washer load may need to be re-balanced, as the load may be dissolving in water. Spots or stains on clothes. Check... if you load your clothes to not leveling washer properly on the container and follow proper directions for large loads. Vibration Noise: Due to avoid soap residue on your load. Pr oblems with...
User Manual
Page 20
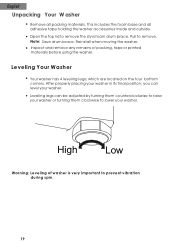
... Save drum brace. Reinstall when moving the washer. Leveling Your Washer Your washer has 4 leveling legs; Leveling legs can level your washer. High Low Warning: Leveling of packing, tape or printed materials before using the washer. After properly placing your washer in its final position, you can be... adjusted by turning them counterclockwise to raise your washer or turning them clockwise to remove the styrofoam drum brace. This ...
... Save drum brace. Reinstall when moving the washer. Leveling Your Washer Your washer has 4 leveling legs; Leveling legs can level your washer. High Low Warning: Leveling of packing, tape or printed materials before using the washer. After properly placing your washer in its final position, you can be... adjusted by turning them counterclockwise to raise your washer or turning them clockwise to remove the styrofoam drum brace. This ...
User Manual
Page 21
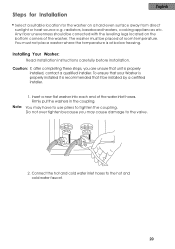
... legs located on a hard even surface away from direct sunlight or heat source e.g. Installing Your Washer: Read installation instructions carefully before installation. Note: 1. Firmly put the washers in the coupling. To ensure that it is at room temperature. Connect the hot and cold ...to tighten the coupling. You may cause damage to the hot and cold water faucet. 20 The washer must not place washer where the temperature is recommended that your Washer is properly installed it be installed by a certified installer. Steps for Installation English Select a suitable...
... legs located on a hard even surface away from direct sunlight or heat source e.g. Installing Your Washer: Read installation instructions carefully before installation. Note: 1. Firmly put the washers in the coupling. To ensure that it is at room temperature. Connect the hot and cold ...to tighten the coupling. You may cause damage to the hot and cold water faucet. 20 The washer must not place washer where the temperature is recommended that your Washer is properly installed it be installed by a certified installer. Steps for Installation English Select a suitable...

User Manual
Page 22
Install the drain hose hook to the unit as shown below. Using the drain hose clamp, attach the drain hose to the outer drain hose tube. 5. Connect the other end to their respective washer inlet located at least 120°F - 140°F. (49°C- 60°C) for the soap to dissolve and to avoid soap residue remaining on clothes. 4. English 3. Cold Hot Note: Hot water needs to a regular 115 volt / 60 Hz, 15 amp outlet. 21 Plug in the Washer to be at a temperature of at the rear of the washer.
Install the drain hose hook to the unit as shown below. Using the drain hose clamp, attach the drain hose to the outer drain hose tube. 5. Connect the other end to their respective washer inlet located at least 120°F - 140°F. (49°C- 60°C) for the soap to dissolve and to avoid soap residue remaining on clothes. 4. English 3. Cold Hot Note: Hot water needs to a regular 115 volt / 60 Hz, 15 amp outlet. 21 Plug in the Washer to be at a temperature of at the rear of the washer.

User Manual
Page 23
... use of the plug can result in a risk of electric shock by providing an escape wire for a prolonged period, clean washer before using it replaced with a grounded plug. Wiring Requirements: The washer must be grounded. Consult a qualified electrician or service person if the grounding instructions are not completely understood or if doubt...
... use of the plug can result in a risk of electric shock by providing an escape wire for a prolonged period, clean washer before using it replaced with a grounded plug. Wiring Requirements: The washer must be grounded. Consult a qualified electrician or service person if the grounding instructions are not completely understood or if doubt...


