Product Manual
Page 5
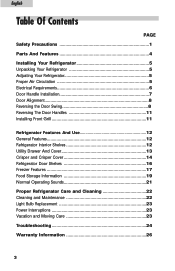
English Table Of Contents PAGE Safety Precautions 1 Parts And Features 4 Installing Your Refrigerator 5 Unpacking Your Refrigerator 5 Adjusting Your Refrigerator 5 Proper Air Circulation 5 Electrical Requirements 6 Door Handle Installation 7 Door Alignment 8 Reversing the Door Swing 8 ...
English Table Of Contents PAGE Safety Precautions 1 Parts And Features 4 Installing Your Refrigerator 5 Unpacking Your Refrigerator 5 Adjusting Your Refrigerator 5 Proper Air Circulation 5 Electrical Requirements 6 Door Handle Installation 7 Door Alignment 8 Reversing the Door Swing 8 ...
Product Manual
Page 6
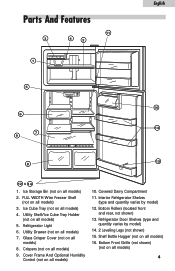
... Holder (not on all models) 5. Cover Frame And Optional Humidity Control (not on all models) 10. Shelf Bottle Hugger (not on all models) 16. English Parts And Features 11 3 4 2 1 5 10 6 13 7 9 15 8 12 & 14 1. Refrigerator Light 6. Bottom Front Grille (not shown) (not on all models) 4 Glass Crisper Cover (not on all...
... Holder (not on all models) 5. Cover Frame And Optional Humidity Control (not on all models) 10. Shelf Bottle Hugger (not on all models) 16. English Parts And Features 11 3 4 2 1 5 10 6 13 7 9 15 8 12 & 14 1. Refrigerator Light 6. Bottom Front Grille (not shown) (not on all models) 4 Glass Crisper Cover (not on all...
Product Manual
Page 9
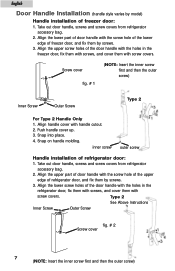
... fig. # 1 (NOTE: Insert the inner screw first and then the outer screw) Inner Screw Outer Screw Type 2 For Type 2 Handle Only 1. Align the lower part of door handle with the screw hole of the lower edge of the door handle with the holes in the refrigerator door, fix them with... with screws, and cover them by model) Handle installation of refrigerator door, and fix them with screw covers. Snap into place. 4. Align the upper part of door handle with the screw hole of the upper edge of freezer door: 1. Take out door handle, screws and screw covers from refrigerator accessory...
... fig. # 1 (NOTE: Insert the inner screw first and then the outer screw) Inner Screw Outer Screw Type 2 For Type 2 Handle Only 1. Align the lower part of door handle with the screw hole of the lower edge of the door handle with the holes in the refrigerator door, fix them with... with screws, and cover them by model) Handle installation of refrigerator door, and fix them with screw covers. Snap into place. 4. Align the upper part of door handle with the screw hole of the upper edge of freezer door: 1. Take out door handle, screws and screw covers from refrigerator accessory...
Product Manual
Page 11
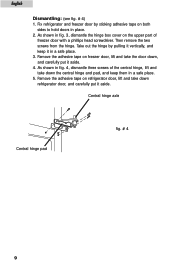
... the hinge box cover on freezer door, lift and take down refrigerator door, and carefully put it aside. Remove the adhesive tape on the upper part of the central hinge, lift and take down , and carefully put it aside. 4. As shown in a safe place. 3. English Dismantling: (see fig. # 4) 1. Remove the adhesive...
... the hinge box cover on freezer door, lift and take down refrigerator door, and carefully put it aside. Remove the adhesive tape on the upper part of the central hinge, lift and take down , and carefully put it aside. 4. As shown in a safe place. 3. English Dismantling: (see fig. # 4) 1. Remove the adhesive...
Product Manual
Page 12
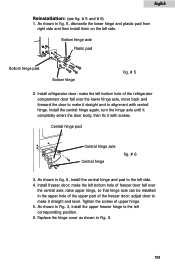
... alignment with screws. As shown in fig. 6, install the central hinge and pad to make it straight and in the upper hole of the upper part of upper hinge. 5. Install the central hinge again, turn the hinge axle until it completely enters the door body, then fix it straight and level...
... alignment with screws. As shown in fig. 6, install the central hinge and pad to make it straight and in the upper hole of the upper part of upper hinge. 5. Install the central hinge again, turn the hinge axle until it completely enters the door body, then fix it straight and level...
Product Manual
Page 28
... be presented to the authorized service center before warranty repairs are covered in normal usage during the initial 12 month period. Haier America New York, NY 10018 26 Any damages to state. This warranty does not cover incidental or consequential damages, so ... Defects other than manufacturing. Damage from other than household use. Damage from misuse, abuse, accident, alteration, lack of this period only parts are rendered. Damage from improper installation. Decorative trims or replaceable lightbulbs. Labor (after the initial 12 months). This warranty gives you specific...
... be presented to the authorized service center before warranty repairs are covered in normal usage during the initial 12 month period. Haier America New York, NY 10018 26 Any damages to state. This warranty does not cover incidental or consequential damages, so ... Defects other than manufacturing. Damage from other than household use. Damage from misuse, abuse, accident, alteration, lack of this period only parts are rendered. Damage from improper installation. Decorative trims or replaceable lightbulbs. Labor (after the initial 12 months). This warranty gives you specific...


