Product Manual
Page 3
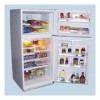
... abrasion damage along its length, the plug or the connector end. 5) Unplug your refrigerator before cleaning or before making any sharp instrument in defrosting your refrigerator. 7) If your old refrigerator is not being used . See grounding instructions in the freezer compartment, particularly when hands are still cold-below 40˚F". Use refrozen foods as...
... abrasion damage along its length, the plug or the connector end. 5) Unplug your refrigerator before cleaning or before making any sharp instrument in defrosting your refrigerator. 7) If your old refrigerator is not being used . See grounding instructions in the freezer compartment, particularly when hands are still cold-below 40˚F". Use refrozen foods as...
Product Manual
Page 4
... easy-to your refrigerator in the presence of your old refrigerator or freezer, take off the doors. Model number Serial number Date of purchase Staple your receipt to -use of explosive fumes. You will guide you in back of child entrapment. It is designed for using our Haier product. Leave the shelves in an...
... easy-to your refrigerator in the presence of your old refrigerator or freezer, take off the doors. Model number Serial number Date of purchase Staple your receipt to -use of explosive fumes. You will guide you in back of child entrapment. It is designed for using our Haier product. Leave the shelves in an...
Product Manual
Page 5
...8 Reversing The Door Handles 11 Installing Front Grill 11 Refrigerator Features And Use 12 General Features 12 Refrigerator Interior Shelves 12 Utility Drawer And Cover 13 Crisper and Crisper Cover 14 Refrigerator Door Shelves 16 Freezer Features 17 Food Storage Information 19 Normal Operating Sounds 21... Proper Refrigerator Care and Cleaning 22 Cleaning and Maintenance 22 Light Bulb Replacement 23 Power ...
...8 Reversing The Door Handles 11 Installing Front Grill 11 Refrigerator Features And Use 12 General Features 12 Refrigerator Interior Shelves 12 Utility Drawer And Cover 13 Crisper and Crisper Cover 14 Refrigerator Door Shelves 16 Freezer Features 17 Food Storage Information 19 Normal Operating Sounds 21... Proper Refrigerator Care and Cleaning 22 Cleaning and Maintenance 22 Light Bulb Replacement 23 Power ...
Product Manual
Page 6
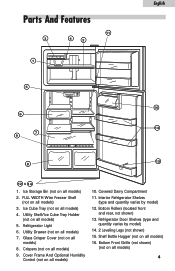
...) 4 Utility Drawer (not on all models) 7. Covered Dairy Compartment 11. English Parts And Features 11 3 4 2 1 5 10 6 13 7 9 15 8 12 & 14 1. FULL WIDTH Wire Freezer Shelf (not on all models) 3. Refrigerator Light 6. Ice Storage Bin (not on all models) 2. Crispers (not on all models) 9. Bottom Rollers (located front and rear, not shown) 13.
...) 4 Utility Drawer (not on all models) 7. Covered Dairy Compartment 11. English Parts And Features 11 3 4 2 1 5 10 6 13 7 9 15 8 12 & 14 1. FULL WIDTH Wire Freezer Shelf (not on all models) 3. Refrigerator Light 6. Ice Storage Bin (not on all models) 2. Crispers (not on all models) 9. Bottom Rollers (located front and rear, not shown) 13.
Product Manual
Page 7
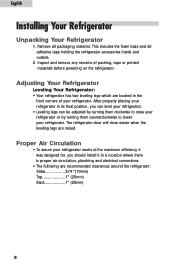
... install it in the front corners of packing, tape or printed materials before powering on the refrigerator. Proper Air Circulation • To assure your refrigerator. English Installing Your Refrigerator Unpacking Your Refrigerator 1. Adjusting Your Refrigerator Leveling Your Refrigerator: • Your refrigerator has two leveling legs which are located in a location where there is proper air circulation, plumbing...
... install it in the front corners of packing, tape or printed materials before powering on the refrigerator. Proper Air Circulation • To assure your refrigerator. English Installing Your Refrigerator Unpacking Your Refrigerator 1. Adjusting Your Refrigerator Leveling Your Refrigerator: • Your refrigerator has two leveling legs which are located in a location where there is proper air circulation, plumbing...
Product Manual
Page 8
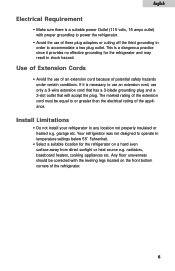
...of potential safety hazards under certain conditions. The marked rating of the extension cord must be corrected with proper grounding to power the refrigerator. • Avoid the use of an extension cord because of three plug adapters or cutting off the third grounding in order to... plug. Any floor unevenness should be equal to operate in temperature settings below 55˚ Fahrenheit. • Select a suitable location for the refrigerator and may result in any location not properly insulated or heated e.g. This is a dangerous practice since it is a suitable power Outlet (115 ...
...of potential safety hazards under certain conditions. The marked rating of the extension cord must be corrected with proper grounding to power the refrigerator. • Avoid the use of an extension cord because of three plug adapters or cutting off the third grounding in order to... plug. Any floor unevenness should be equal to operate in temperature settings below 55˚ Fahrenheit. • Select a suitable location for the refrigerator and may result in any location not properly insulated or heated e.g. This is a dangerous practice since it is a suitable power Outlet (115 ...
Product Manual
Page 9
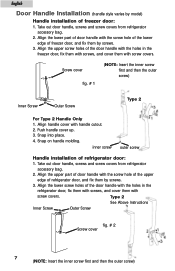
... 2 Screw cover 7 (NOTE: Insert the inner screw first and then the outer screw) Align the upper screw holes of freezer door: 1. Snap into place. 4. inner screw outer screw Handle installation of refrigerator door, and fix them by screws. 3. Align the upper part of door handle with the screw hole of the upper... edge of refrigerator door: 1. Align the lower part of door handle with the screw hole of the lower edge of the door handle with the holes in the freezer door, fix them with screws, and cover them by screws. 3. Screw...
... 2 Screw cover 7 (NOTE: Insert the inner screw first and then the outer screw) Align the upper screw holes of freezer door: 1. Snap into place. 4. inner screw outer screw Handle installation of refrigerator door, and fix them by screws. 3. Align the upper part of door handle with the screw hole of the upper... edge of refrigerator door: 1. Align the lower part of door handle with the screw hole of the lower edge of the door handle with the holes in the freezer door, fix them with screws, and cover them by screws. 3. Screw...
Product Manual
Page 11
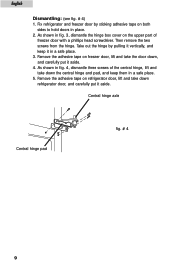
... from the hinge. As shown in fig. 3, dismantle the hinge box cover on freezer door, lift and take the door down, and carefully put it in fig. 4, dismantle three screws of freezer door with a phillips head screwdriver. Remove the adhesive tape on the upper part of... shown in a safe place. 3. Central hinge axle Central hinge pad fig. # 4 9 Take out the hinge by sticking adhesive tape on refrigerator door, lift and take down refrigerator door, and carefully put it vertically, and keep them in place. 2. English Dismantling: (see fig. # 4) 1. Remove the adhesive tape ...
... from the hinge. As shown in fig. 3, dismantle the hinge box cover on freezer door, lift and take the door down, and carefully put it in fig. 4, dismantle three screws of freezer door with a phillips head screwdriver. Remove the adhesive tape on the upper part of... shown in a safe place. 3. Central hinge axle Central hinge pad fig. # 4 9 Take out the hinge by sticking adhesive tape on refrigerator door, lift and take down refrigerator door, and carefully put it vertically, and keep them in place. 2. English Dismantling: (see fig. # 4) 1. Remove the adhesive tape ...
Product Manual
Page 12
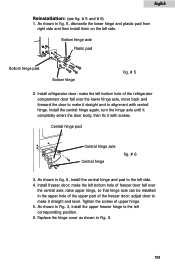
Install refrigerator door: make the left bottom hole of freezer door fall over the central axle; As shown in fig. 6, install the central hinge and pad to make it straight and in alignment with screws. ... side and then install them on the left bottom hole of the refrigerator compartment door fall over the lower hinge axle, move back and forward the door to the left corresponding position. 6. As shown in Fig. 3, install the upper freezer hinge to make the left side. Central hinge pad Central hinge axle...
Install refrigerator door: make the left bottom hole of freezer door fall over the central axle; As shown in fig. 6, install the central hinge and pad to make it straight and in alignment with screws. ... side and then install them on the left bottom hole of the refrigerator compartment door fall over the lower hinge axle, move back and forward the door to the left corresponding position. 6. As shown in Fig. 3, install the upper freezer hinge to make the left side. Central hinge pad Central hinge axle...
Product Manual
Page 13
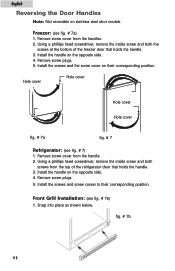
... and both the screws at the bottom of the refrigerator door that holds the handle. 3. Install the handle on the opposite side. 4. Using a phillips head screwdriver, remove the inside screw and both screws from the top of the freezer door that holds the handle. 3. Front Grill Installation... steel door models. Remove screw cover from the handle. 2. Hole cover Hole cover Hole cover Hole cover fig. # 7a fig. # 7 Refrigerator: (see fig. # 7) 1. English Reversing the Door Handles Note: Not reversible on their corresponding position. Install the screws and screw covers to their...
... and both the screws at the bottom of the refrigerator door that holds the handle. 3. Install the handle on the opposite side. 4. Using a phillips head screwdriver, remove the inside screw and both screws from the top of the freezer door that holds the handle. 3. Front Grill Installation... steel door models. Remove screw cover from the handle. 2. Hole cover Hole cover Hole cover Hole cover fig. # 7a fig. # 7 Refrigerator: (see fig. # 7) 1. English Reversing the Door Handles Note: Not reversible on their corresponding position. Install the screws and screw covers to their...
Product Manual
Page 14
... General Features NOTE: All features not available on all models (Note: If the refrigerator has been placed in a horizontal or tilted position for you to OFF stops cooling in both the refrigeration and freezer sections. Their varied adjustability allows you in the fresh food section for any period ...of the shelf until it is removed. 12 At first, set the Interior Light: Your refrigerator is the coldest. To replace the shelf, ...
... General Features NOTE: All features not available on all models (Note: If the refrigerator has been placed in a horizontal or tilted position for you to OFF stops cooling in both the refrigeration and freezer sections. Their varied adjustability allows you in the fresh food section for any period ...of the shelf until it is removed. 12 At first, set the Interior Light: Your refrigerator is the coldest. To replace the shelf, ...
Product Manual
Page 15
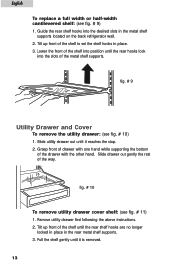
... supports. 3. Slide utility drawer out until the rear shelf hooks are no longer locked in place in the metal shelf supports located on the back refrigerator wall. 2.
... supports. 3. Slide utility drawer out until the rear shelf hooks are no longer locked in place in the metal shelf supports located on the back refrigerator wall. 2.
Product Manual
Page 16
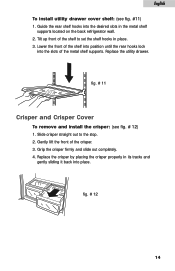
... up front of the shelf into position until the rear hooks lock into the desired slots in the metal shelf supports located on the back refrigerator wall. 2. Replace the crisper by placing the crisper properly in place. 3. Replace the utility drawer. Gently lift the front of the metal shelf supports. Lower...
... up front of the shelf into position until the rear hooks lock into the desired slots in the metal shelf supports located on the back refrigerator wall. 2. Replace the crisper by placing the crisper properly in place. 3. Replace the utility drawer. Gently lift the front of the metal shelf supports. Lower...
Product Manual
Page 17
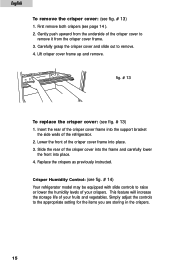
Gently push upward from the underside of the crisper cover frame into place. 3. Insert the rear of the refrigerator. 2. Replace the crispers as previously instructed. Slide the rear of the crisper cover into the frame and carefully lower the front into the support ...bracket the side walls of the crisper cover frame into place. 4. First remove both crispers (see fig. # 14) Your refrigerator model may be equipped with slide controls to remove it from the crisper cover frame. 3. Lift crisper cover frame up and remove. Crisper Humidity Control...
Gently push upward from the underside of the crisper cover frame into place. 3. Insert the rear of the refrigerator. 2. Replace the crispers as previously instructed. Slide the rear of the crisper cover into the frame and carefully lower the front into the support ...bracket the side walls of the crisper cover frame into place. 4. First remove both crispers (see fig. # 14) Your refrigerator model may be equipped with slide controls to remove it from the crisper cover frame. 3. Lift crisper cover frame up and remove. Crisper Humidity Control...

Product Manual
Page 18
... with gallon door storage shelves. Low High High/Low Settings fig. # 14 Refrigerator Door Shelves Gallon door storage: (see fig. # 15) Your refrigerator may be equipped with the door shelf brackets. 16 To replace refrigerator door shelves: (see fig. # 15) 1. To remove refrigerator door shelves: (see fig. # 15) 1. English • LOW setting allows moist...
... with gallon door storage shelves. Low High High/Low Settings fig. # 14 Refrigerator Door Shelves Gallon door storage: (see fig. # 15) Your refrigerator may be equipped with the door shelf brackets. 16 To replace refrigerator door shelves: (see fig. # 15) 1. To remove refrigerator door shelves: (see fig. # 15) 1. English • LOW setting allows moist...
Product Manual
Page 19
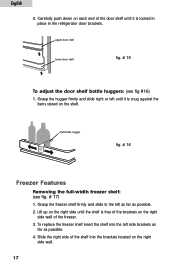
... brackets on the right side wall. 17 Grasp the hugger firmly and slide right or left until the shelf is locked in place in the refrigerator door brackets. Grasp the freezer shelf firmly and slide to the left side brackets as far as possible. 2. shelf bottle hugger fig. # 16... into the brackets located on the right side wall of the shelf into the left as far as possible. 4. Slide the right side of the freezer. 3. Carefully push down on each end of the door shelf until it is snug against the items stored on the shelf. English 2. upper door shelf...
... brackets on the right side wall. 17 Grasp the hugger firmly and slide right or left until the shelf is locked in place in the refrigerator door brackets. Grasp the freezer shelf firmly and slide to the left side brackets as far as possible. 2. shelf bottle hugger fig. # 16... into the brackets located on the right side wall of the shelf into the left as far as possible. 4. Slide the right side of the freezer. 3. Carefully push down on each end of the door shelf until it is snug against the items stored on the shelf. English 2. upper door shelf...
Product Manual
Page 20
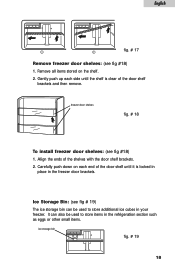
... be used to store items in the refrigeration section such as eggs or other small items. ice storage bin fig. # 19 18 Remove all items stored on each side until the shelf is clear of the door shelf until it is locked in place in your freezer. Ice Storage Bin: (see fig #... 19) The ice storage bin can also be used to store additional ice cubes in the freezer door brackets. freezer door shelves fig. # 18 To install freezer door shelves: (see fig #18) 1. Carefully push down on the shelf. 2. Gently push up each end of the door shelf brackets and then remove...
... be used to store items in the refrigeration section such as eggs or other small items. ice storage bin fig. # 19 18 Remove all items stored on each side until the shelf is clear of the door shelf until it is locked in place in your freezer. Ice Storage Bin: (see fig #... 19) The ice storage bin can also be used to store additional ice cubes in the freezer door brackets. freezer door shelves fig. # 18 To install freezer door shelves: (see fig #18) 1. Carefully push down on the shelf. 2. Gently push up each end of the door shelf brackets and then remove...

Product Manual
Page 21
This will ensure proper shelf life and prevent the transfer of storage are required, store immediately in the freezer section. 19 If you have humidity controlled crispers place the items in sealed plastic bags before storing in the crisper. • Vegetables with skins... to wrap or store food in airtight and moisture proof material unless otherwise noted. English Ice Cube Trays: Your refrigerator is not prepackaged, be allowed to cool before storing in the refrigeration. Food Storage Information Fresh Food • When storing fresh food, which is equipped with one or two ice ...
This will ensure proper shelf life and prevent the transfer of storage are required, store immediately in the freezer section. 19 If you have humidity controlled crispers place the items in sealed plastic bags before storing in the crisper. • Vegetables with skins... to wrap or store food in airtight and moisture proof material unless otherwise noted. English Ice Cube Trays: Your refrigerator is not prepackaged, be allowed to cool before storing in the refrigeration. Food Storage Information Fresh Food • When storing fresh food, which is equipped with one or two ice ...
Product Manual
Page 23
... interior of your unit to maintain the temperature you have selected. • Boiling water, gurgling sounds or slight vibrations that are the result of the refrigerant circulating through the cooling coils. • Sizzling or popping sounds resulting from frost melting during the defrost cycle and dripping on the defrost heater. •...
... interior of your unit to maintain the temperature you have selected. • Boiling water, gurgling sounds or slight vibrations that are the result of the refrigerant circulating through the cooling coils. • Sizzling or popping sounds resulting from frost melting during the defrost cycle and dripping on the defrost heater. •...
Product Manual
Page 24
Ignoring this warning may dissolve, damage and/or discolor your refrigerator before cleaning. Caution: Before using cleaning products, always read and follow manufacturer's instructions and warnings to general instructions. SOME of these chemicals may... use harsh chemicals, abrasives, ammonia, chlorine bleach,concentrated detergents, solvents or metal scouring pads. Gaskets must be kept clean and pliable to wipe down your refrigerator. • Rinse with clean warm water and dry with warm water. General: • Prepare a cleaning solution of 3-4 tablespoons of gaskets will keep ...
Ignoring this warning may dissolve, damage and/or discolor your refrigerator before cleaning. Caution: Before using cleaning products, always read and follow manufacturer's instructions and warnings to general instructions. SOME of these chemicals may... use harsh chemicals, abrasives, ammonia, chlorine bleach,concentrated detergents, solvents or metal scouring pads. Gaskets must be kept clean and pliable to wipe down your refrigerator. • Rinse with clean warm water and dry with warm water. General: • Prepare a cleaning solution of 3-4 tablespoons of gaskets will keep ...


