Product Manual
Page 3
... precautions, including the following: 1) Use this appliance only for any food is affected less than that of Agriculture in defrosting your refrigerator. 7) If your old refrigerator is not being used . Do not use a cord that shows cracks or abrasion damage along its intended purpose as possible, to... not touch the cold surfaces in this use any electrical device or any repairs. Use refrozen foods as soon as described in the freezer compartment, particularly when hands are still cold-below 40˚F". If the odor or color of foods, particularly fruits, vegetables, and ...
... precautions, including the following: 1) Use this appliance only for any food is affected less than that of Agriculture in defrosting your refrigerator. 7) If your old refrigerator is not being used . Do not use a cord that shows cracks or abrasion damage along its intended purpose as possible, to... not touch the cold surfaces in this use any electrical device or any repairs. Use refrozen foods as soon as described in the freezer compartment, particularly when hands are still cold-below 40˚F". If the odor or color of foods, particularly fruits, vegetables, and ...
Product Manual
Page 4
...Haier product. Leave the shelves in the presence of explosive fumes. They are on a label in an enclosed cabinet. Model number Serial number Date of purchase Staple your receipt to -use manual will need it to record the model and serial number. English 10) This refrigerator... should not be recessed or built-in back of the refrigerator. This easy-to your refrigerator. Thank you for freestanding installation only. 11) Do not operate your old refrigerator or freezer, take off the doors. You will guide you ...
...Haier product. Leave the shelves in the presence of explosive fumes. They are on a label in an enclosed cabinet. Model number Serial number Date of purchase Staple your receipt to -use manual will need it to record the model and serial number. English 10) This refrigerator... should not be recessed or built-in back of the refrigerator. This easy-to your refrigerator. Thank you for freestanding installation only. 11) Do not operate your old refrigerator or freezer, take off the doors. You will guide you ...
Product Manual
Page 5
...8 Reversing The Door Handles 11 Installing Front Grill 11 Refrigerator Features And Use 12 General Features 12 Refrigerator Interior Shelves 12 Utility Drawer And Cover 13 Crisper and Crisper Cover 14 Refrigerator Door Shelves 16 Freezer Features 17 Food Storage Information 19 Normal Operating Sounds 21... Proper Refrigerator Care and Cleaning 22 Cleaning and Maintenance 22 Light Bulb Replacement 23 Power ...
...8 Reversing The Door Handles 11 Installing Front Grill 11 Refrigerator Features And Use 12 General Features 12 Refrigerator Interior Shelves 12 Utility Drawer And Cover 13 Crisper and Crisper Cover 14 Refrigerator Door Shelves 16 Freezer Features 17 Food Storage Information 19 Normal Operating Sounds 21... Proper Refrigerator Care and Cleaning 22 Cleaning and Maintenance 22 Light Bulb Replacement 23 Power ...
Product Manual
Page 6
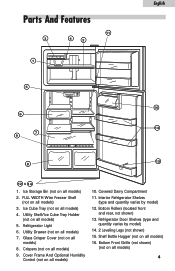
... 5 10 6 13 7 9 15 8 12 & 14 1. FULL WIDTH Wire Freezer Shelf (not on all models) 3. Utility Drawer (not on all models) 7. Crispers (not on all models) 9. Bottom Rollers (located front and rear, not shown) 13. Refrigerator Door Shelves (type and quantity varies by model) 12. Cover Frame And Optional... Humidity Control (not on all models) 10. Bottom Front Grille (not shown) (not on all models) 4 Interior Refrigerator Shelves (type and quantity varies by model) 14. 2 Leveling Legs (not shown) 15. Ice Storage Bin (not on all models) 2. ...
... 5 10 6 13 7 9 15 8 12 & 14 1. FULL WIDTH Wire Freezer Shelf (not on all models) 3. Utility Drawer (not on all models) 7. Crispers (not on all models) 9. Bottom Rollers (located front and rear, not shown) 13. Refrigerator Door Shelves (type and quantity varies by model) 12. Cover Frame And Optional... Humidity Control (not on all models) 10. Bottom Front Grille (not shown) (not on all models) 4 Interior Refrigerator Shelves (type and quantity varies by model) 14. 2 Leveling Legs (not shown) 15. Ice Storage Bin (not on all models) 2. ...
Product Manual
Page 9
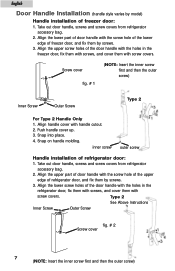
...door handle with screw covers. Push handle cover up. 3. inner screw outer screw Handle installation of freezer door: 1. Align the upper part of the door handle with the holes in the refrigerator door, fix them with screws, and cover them with screw covers. Align the lower part of... screw holes of the door handle with the holes in the freezer door, fix them with screws, and cover them with the screw hole of the upper edge of refrigerator door, and fix them by model) Handle installation of refrigerator door: 1. English Door Handle Installation (handle style varies by ...
...door handle with screw covers. Push handle cover up. 3. inner screw outer screw Handle installation of freezer door: 1. Align the upper part of the door handle with the holes in the refrigerator door, fix them with screws, and cover them with screw covers. Align the lower part of... screw holes of the door handle with the holes in the freezer door, fix them with screws, and cover them with the screw hole of the upper edge of refrigerator door, and fix them by model) Handle installation of refrigerator door: 1. English Door Handle Installation (handle style varies by ...
Product Manual
Page 11
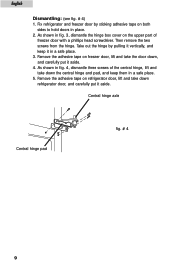
... central hinge, lift and take the door down refrigerator door, and carefully put it vertically, and keep them in a safe place. 3. As shown in place. 2. English Dismantling: (see fig. # 4) 1. Central hinge axle Central hinge pad fig. # 4 9 As shown in fig. 4, dismantle three screws of freezer door with a phillips head screwdriver. Take out...
... central hinge, lift and take the door down refrigerator door, and carefully put it vertically, and keep them in a safe place. 3. As shown in place. 2. English Dismantling: (see fig. # 4) 1. Central hinge axle Central hinge pad fig. # 4 9 As shown in fig. 4, dismantle three screws of freezer door with a phillips head screwdriver. Take out...
Product Manual
Page 12
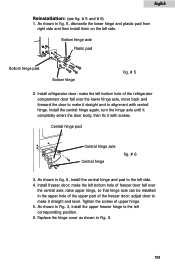
...left side. 4. Central hinge pad Central hinge axle Central hinge fig. # 6 3. As shown in alignment with screws. Install freezer door: make it with central hinge. Install refrigerator door: make it straight and level. As shown in the upper hole of the upper part of upper hinge. 5. raise upper... hinge, so that hinge axle can be installed in Fig. 3, install the upper freezer hinge to make the left bottom hole of freezer door fall...
...left side. 4. Central hinge pad Central hinge axle Central hinge fig. # 6 3. As shown in alignment with screws. Install freezer door: make it with central hinge. Install refrigerator door: make it straight and level. As shown in the upper hole of the upper part of upper hinge. 5. raise upper... hinge, so that hinge axle can be installed in Fig. 3, install the upper freezer hinge to make the left bottom hole of freezer door fall...
Product Manual
Page 13
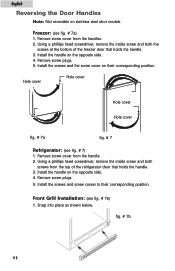
...screwdriver, remove the inside screw and both the screws at the bottom of the refrigerator door that holds the handle. 3. Remove screw plugs. 5. Hole cover Hole cover Hole cover Hole cover fig. # 7a fig. # 7 Refrigerator: (see fig. # 7b) 1. Remove screw cover from the handles. ...2. Using a phillips head screwdriver, remove the inside screw and both screws from the top of the freezer door that holds the handle. 3. Front Grill Installation: (see fig....
...screwdriver, remove the inside screw and both the screws at the bottom of the refrigerator door that holds the handle. 3. Remove screw plugs. 5. Hole cover Hole cover Hole cover Hole cover fig. # 7a fig. # 7 Refrigerator: (see fig. # 7b) 1. Remove screw cover from the handles. ...2. Using a phillips head screwdriver, remove the inside screw and both screws from the top of the freezer door that holds the handle. 3. Front Grill Installation: (see fig....
Product Manual
Page 14
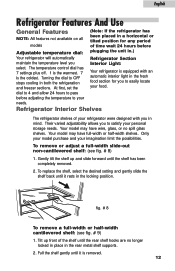
... light in the fresh food section for any period of time wait 24 hours before adjusting the temperature to OFF stops cooling in both the refrigeration and freezer sections. Your model may have full-width or half-width shelves. fig. # 8 To remove a full-width or half-width cantilevered shelf: (see fig. # 8) 1. dial...
... light in the fresh food section for any period of time wait 24 hours before adjusting the temperature to OFF stops cooling in both the refrigeration and freezer sections. Your model may have full-width or half-width shelves. fig. # 8 To remove a full-width or half-width cantilevered shelf: (see fig. # 8) 1. dial...
Product Manual
Page 19
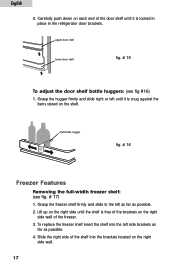
... until it is free of the shelf into the left side brackets as far as possible. 2. English 2. Carefully push down on each end of the door shelf until the shelf is locked in place in the refrigerator door brackets. shelf bottle hugger fig. # 16 Freezer Features Removing the ...full-width freezer shelf: (see fig #16) 1. Grasp the hugger firmly and slide right or left as far as possible....
... until it is free of the shelf into the left side brackets as far as possible. 2. English 2. Carefully push down on each end of the door shelf until the shelf is locked in place in the refrigerator door brackets. shelf bottle hugger fig. # 16 Freezer Features Removing the ...full-width freezer shelf: (see fig #16) 1. Grasp the hugger firmly and slide right or left as far as possible....
Product Manual
Page 20
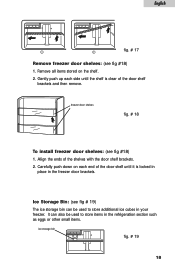
... of the door shelf until the shelf is locked in place in the refrigeration section such as eggs or other small items. ice storage bin fig. # 19 18 freezer door shelves fig. # 18 To install freezer door shelves: (see fig #18) 1. Ice Storage Bin: (see fig # 19) The ice storage ...bin can also be used to store additional ice cubes in your freezer. English fig. # 17 1 2 Remove freezer door shelves: (see fig...
... of the door shelf until the shelf is locked in place in the refrigeration section such as eggs or other small items. ice storage bin fig. # 19 18 freezer door shelves fig. # 18 To install freezer door shelves: (see fig #18) 1. Ice Storage Bin: (see fig # 19) The ice storage ...bin can also be used to store additional ice cubes in your freezer. English fig. # 17 1 2 Remove freezer door shelves: (see fig...

Product Manual
Page 21
...odors and tastes. • Wipe containers before storing in airtight and moisture proof material unless otherwise noted. English Ice Cube Trays: Your refrigerator is not prepackaged, be allowed to cool before storing to avoid needless spills. • Eggs should be stored in an upright position ... do not have purchased. This will ensure proper shelf life and prevent the transfer of storage are required, store immediately in the freezer section. 19 Follow the suggestions below for low humidity. If you have humidity controlled crispers place the items in sealed plastic bags...
...odors and tastes. • Wipe containers before storing in airtight and moisture proof material unless otherwise noted. English Ice Cube Trays: Your refrigerator is not prepackaged, be allowed to cool before storing to avoid needless spills. • Eggs should be stored in an upright position ... do not have purchased. This will ensure proper shelf life and prevent the transfer of storage are required, store immediately in the freezer section. 19 Follow the suggestions below for low humidity. If you have humidity controlled crispers place the items in sealed plastic bags...
Product Manual
Page 22
... marked on the packaging. 20 Improper storage will result in odor and taste transfer and will result in , or out. English Frozen Food • Proper freezer storage requires correct packaging.
... marked on the packaging. 20 Improper storage will result in odor and taste transfer and will result in , or out. English Frozen Food • Proper freezer storage requires correct packaging.
Product Manual
Page 25
...appliance type light bulb rated at any time. When power has been restored, replug power cord to thunderstorms or other causes. Possible damage to refrigerator. 2. Allow light bulb to "General cleaning" section. Remove bulb by screwing it out counter-clockwise. 5. If outage is for a prolonged ... off power to the sealed system could occur. 23 Remove the highest shelf. 3. Remove the power cord from refrigerator and freezer, move the refrigerator vertically. English Light Bulb Replacement 1. Always replace with the unit lying down. Vacation and Moving Care • For long ...
...appliance type light bulb rated at any time. When power has been restored, replug power cord to thunderstorms or other causes. Possible damage to refrigerator. 2. Allow light bulb to "General cleaning" section. Remove bulb by screwing it out counter-clockwise. 5. If outage is for a prolonged ... off power to the sealed system could occur. 23 Remove the highest shelf. 3. Remove the power cord from refrigerator and freezer, move the refrigerator vertically. English Light Bulb Replacement 1. Always replace with the unit lying down. Vacation and Moving Care • For long ...
Product Manual
Page 26
... Allow time for recently added warm food to reach fresh food or freezer temperature. • Check gaskets for proper seal. • Clean condenser coils (for air duct blockage from frozen food packages. English TroubleShooting Refrigerator Does Not Operate • Check thermostat control is not in the "...• Wait for 30-40 minutes to colder setting. • Check freezer compartment for models with exposed condenser coils). • Adjust temperature control to see if doors are completely closed. 24 Refrigerator runs too frequently • This may have been opened frequently or for ...
... Allow time for recently added warm food to reach fresh food or freezer temperature. • Check gaskets for proper seal. • Clean condenser coils (for air duct blockage from frozen food packages. English TroubleShooting Refrigerator Does Not Operate • Check thermostat control is not in the "...• Wait for 30-40 minutes to colder setting. • Check freezer compartment for models with exposed condenser coils). • Adjust temperature control to see if doors are completely closed. 24 Refrigerator runs too frequently • This may have been opened frequently or for ...
Product Manual
Page 27
... an odor: • Interior needs cleaning. • Foods improperly wrapped or sealed are giving off odors. Refrigerator/Freezer door does not shut properly: • Level the refrigerator. • Re align refrigerator/freezer door. • Check for proper seal. Refrigerator light does not work: • Check power supply. • Tighten bulb in socket. • Replace burned out...
... an odor: • Interior needs cleaning. • Foods improperly wrapped or sealed are giving off odors. Refrigerator/Freezer door does not shut properly: • Level the refrigerator. • Re align refrigerator/freezer door. • Check for proper seal. Refrigerator light does not work: • Check power supply. • Tighten bulb in socket. • Replace burned out...


