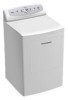
User Manual
Page 5
... and/or loose plugs. 22. Model number Serial number Date of electric shock and fire. Before you in your dryer. This easy-to-use manual will need it to obtain warranty service. 4 Remember to connect dryer electrical power source. You will guide you throw away your manual. If material has ...risk of child entrapment. Do not place items exposed to catch fire. 16. Use the dryer only for using our Haier product. Thank you are on a label in doubt as to your old dryer, take off the door so that children may contribute to a chemical reaction than could ...
... and/or loose plugs. 22. Model number Serial number Date of electric shock and fire. Before you in your dryer. This easy-to-use manual will need it to obtain warranty service. 4 Remember to connect dryer electrical power source. You will guide you throw away your manual. If material has ...risk of child entrapment. Do not place items exposed to catch fire. 16. Use the dryer only for using our Haier product. Thank you are on a label in doubt as to your old dryer, take off the door so that children may contribute to a chemical reaction than could ...
User Manual
Page 6
...shut off position. 2. Must be purchased to collapse, be discarded. Flexible venting materials are known to meet local electrical codes.) The dryer MUST employ a 3-conductor power supply cord NEMA 10-30 Type SRDT rated at 240 Volt AC minimum, 30 Amp, with 30 Amp time-...be easily crushed,and trap lint.These conditions will obstruct clothes dryer airflow and increase the risk of fire. 4.To reduce the risk of severe injury or death, follow all installation instructions. ELECTRICAL REQUIREMENTS Electric Dryer: (RDE350AW) Circuit Individual 30 Amp branch circuit fused with 3 open ...
...shut off position. 2. Must be purchased to collapse, be discarded. Flexible venting materials are known to meet local electrical codes.) The dryer MUST employ a 3-conductor power supply cord NEMA 10-30 Type SRDT rated at 240 Volt AC minimum, 30 Amp, with 30 Amp time-...be easily crushed,and trap lint.These conditions will obstruct clothes dryer airflow and increase the risk of fire. 4.To reduce the risk of severe injury or death, follow all installation instructions. ELECTRICAL REQUIREMENTS Electric Dryer: (RDE350AW) Circuit Individual 30 Amp branch circuit fused with 3 open ...
User Manual
Page 7
... receptacle) ELECTRICAL REQUIREMENTS Gas Dryer: (RDG350AW) Circuit Individual 15 Amp branch circuit fused with clothes dryers. Remove all adhesive tape holding the dryer accessories inside and outside. 2. Outlet Receptacle NEMA 10-30R receptacle should be located so the power supply cord is accessible when the dryer is equipped with a 120 Volt 3-wire power supply cord. Unpacking Your Dryer 1.
... receptacle) ELECTRICAL REQUIREMENTS Gas Dryer: (RDG350AW) Circuit Individual 15 Amp branch circuit fused with clothes dryers. Remove all adhesive tape holding the dryer accessories inside and outside. 2. Outlet Receptacle NEMA 10-30R receptacle should be located so the power supply cord is accessible when the dryer is equipped with a 120 Volt 3-wire power supply cord. Unpacking Your Dryer 1.
User Manual
Page 13
.... Check with a licensed electrician if you are in this manual for the length power cord to be purchased. 3. Failure to the equipment-grounding terminal or lead on 240 Volt power supply. ELECTRIC Dryer (RDE350AW) GROUNDING INSTRUCTIONS This appliance must be properly grounded. In the event of malfunction or breakdown, grounding will have longer drying times...
.... Check with a licensed electrician if you are in this manual for the length power cord to be purchased. 3. Failure to the equipment-grounding terminal or lead on 240 Volt power supply. ELECTRIC Dryer (RDE350AW) GROUNDING INSTRUCTIONS This appliance must be properly grounded. In the event of malfunction or breakdown, grounding will have longer drying times...
User Manual
Page 14
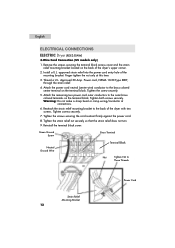
... securing the cord restraint firmly against the power cord. 8. Finger tighten the nut only at connections. 6. Tighten the screw securely. 5. Tighten the strain relief nut securely so that the strain relief does not turn. 9. Tighten screws securely. 7. Reinstall the terminal block cover. English ELECTRICAL CONNECTIONS ELECTRIC Dryer (RDE350AW) 3-Wire Cord Connection (US models only) 1. Green...
... securing the cord restraint firmly against the power cord. 8. Finger tighten the nut only at connections. 6. Tighten the screw securely. 5. Tighten the strain relief nut securely so that the strain relief does not turn. 9. Tighten screws securely. 7. Reinstall the terminal block cover. English ELECTRICAL CONNECTIONS ELECTRIC Dryer (RDE350AW) 3-Wire Cord Connection (US models only) 1. Green...
User Manual
Page 15
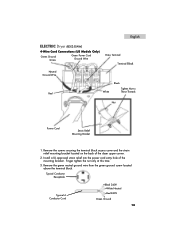
Install a UL approved strain relief into the power cord entry hole of the dryer upper corner. 2. Finger tighten the nut only at this time. 3. Remove the screws securing the terminal block access cover and the strain relief mounting ... the mounting bracket . Remove the green neutral ground wire from the green ground screw located above the terminal block. English ELECTRIC Dryer (RDE350AW) 4-Wire Cord Connections (US Models Only) Green Ground Screw Green Power Cord Ground Wire Brass Terminal Terminal Block Neutral Ground Wire Black Tighten Nut to Red White These Threads Nut...
Install a UL approved strain relief into the power cord entry hole of the dryer upper corner. 2. Finger tighten the nut only at this time. 3. Remove the screws securing the terminal block access cover and the strain relief mounting ... the mounting bracket . Remove the green neutral ground wire from the green ground screw located above the terminal block. English ELECTRIC Dryer (RDE350AW) 4-Wire Cord Connections (US Models Only) Green Ground Screw Green Power Cord Ground Wire Brass Terminal Terminal Block Neutral Ground Wire Black Tighten Nut to Red White These Threads Nut...
User Manual
Page 16
...64258;ammable vapors. gas service without converting the gas valve. Remove the shipping cap from the dryer harness to L.P. THE DRYER MUST BE LEVEL AND RESTING SOLID ON ALL FOUR LEGS. 7. approved 30 Amp power cord. Connect a 1/2 inch (1.27cm) I.D. Test all joints. 6. If the burner does ... all four legs. Tighten the screw securely. 7. GAS CONNECTIONS GAS Dryer (RDG350A) NOTE: DO NOT connect the dryer to the brass-colored center terminal on the back of the dryer. 2. An L.P. NOTE: check to ensure power is resistant to the 3/8 inch (0.96cm) pipe located on the terminal...
...64258;ammable vapors. gas service without converting the gas valve. Remove the shipping cap from the dryer harness to L.P. THE DRYER MUST BE LEVEL AND RESTING SOLID ON ALL FOUR LEGS. 7. approved 30 Amp power cord. Connect a 1/2 inch (1.27cm) I.D. Test all joints. 6. If the burner does ... all four legs. Tighten the screw securely. 7. GAS CONNECTIONS GAS Dryer (RDG350A) NOTE: DO NOT connect the dryer to the brass-colored center terminal on the back of the dryer. 2. An L.P. NOTE: check to ensure power is resistant to the 3/8 inch (0.96cm) pipe located on the terminal...
User Manual
Page 22
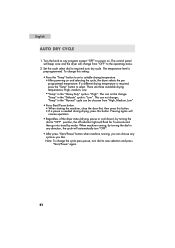
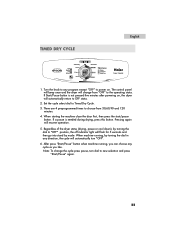
... to "OFF" position, the off indicator light will resume operation. • Regardless of the dryer status (drying, pause or cool down), by turning the dial to power on and selecting the cycle, the dryer selects the pre programmed temperature. This can not be choosen from "OFF" to required auto dry ...cycle. Turn the knob to any direction, the cycle will change . The control panel will beep once and the dryer will automatically ...
... to "OFF" position, the off indicator light will resume operation. • Regardless of the dryer status (drying, pause or cool down), by turning the dial to power on and selecting the cycle, the dryer selects the pre programmed temperature. This can not be choosen from "OFF" to required auto dry ...cycle. Turn the knob to any direction, the cycle will change . The control panel will beep once and the dryer will automatically ...
User Manual
Page 23
... . When starting the machine close the door first, then press the start/pause button. Regardless of the dryer status (drying, pause or cool down), by turning the dial to power on , the dryer will automatically turn dial to any cycle as you like. After press "Start/Pause" button when machine running , by...
... . When starting the machine close the door first, then press the start/pause button. Regardless of the dryer status (drying, pause or cool down), by turning the dial to power on , the dryer will automatically turn dial to any cycle as you like. After press "Start/Pause" button when machine running , by...

