User Manual
Page 5
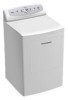
... back of electric shock or fire, do not use extension cords or adapters to your manual. Replace worn power cord and/or loose plugs. 22. Thank you throw away your dryer. Model number Serial ...model and serial number. Items contaminated with the installation instructions before attempting any flammable liquids or solids, it should not used . See grounding instructions in your receipt to connect dryer electrical power source. This dryer must be properly installed in the dryer until all terraces of purchase Staple your dryer. Use the dryer only for using our Haier...
... back of electric shock or fire, do not use extension cords or adapters to your manual. Replace worn power cord and/or loose plugs. 22. Thank you throw away your dryer. Model number Serial ...model and serial number. Items contaminated with the installation instructions before attempting any flammable liquids or solids, it should not used . See grounding instructions in your receipt to connect dryer electrical power source. This dryer must be properly installed in the dryer until all terraces of purchase Staple your dryer. Use the dryer only for using our Haier...
User Manual
Page 14
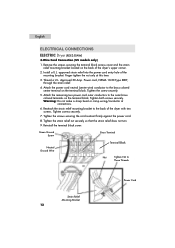
...two screws. Attach the remaining two power cord outer conductors to the brass colored center terminal on the terminal block. English ELECTRICAL CONNECTIONS ELECTRIC Dryer (RDE350AW) 3-Wire Cord Connection (US models only) 1. Warning: Do not make a sharp bend or crimp wiring/conductor at this time. 3. Approved 30 Amp...Remove the screws securing the terminal block access cover and the strain relief mounting bracket located on the back of the dryer's upper corner. 2. Finger tighten the nut only at connections. 6. Power cord, NEMA 10-30 Type SRDT, through the strain relief. 4.
...two screws. Attach the remaining two power cord outer conductors to the brass colored center terminal on the terminal block. English ELECTRICAL CONNECTIONS ELECTRIC Dryer (RDE350AW) 3-Wire Cord Connection (US models only) 1. Warning: Do not make a sharp bend or crimp wiring/conductor at this time. 3. Approved 30 Amp...Remove the screws securing the terminal block access cover and the strain relief mounting bracket located on the back of the dryer's upper corner. 2. Finger tighten the nut only at connections. 6. Power cord, NEMA 10-30 Type SRDT, through the strain relief. 4.
User Manual
Page 15
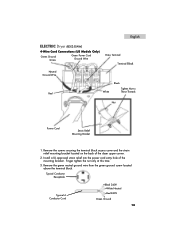
Finger tighten the nut only at this time. 3. English ELECTRIC Dryer (RDE350AW) 4-Wire Cord Connections (US Models Only) Green Ground Screw Green Power Cord Ground Wire Brass Terminal Terminal Block Neutral Ground Wire Black Tighten Nut to Red White These Threads...strain relief mounting bracket located on the back of the mounting bracket . Install a UL approved strain relief into the power cord entry hole of the dryer upper corner. 2. Remove the green neutral ground wire from the green ground screw located above the terminal block. Typical Conductor Receptacle Typical 4 Conductor ...
Finger tighten the nut only at this time. 3. English ELECTRIC Dryer (RDE350AW) 4-Wire Cord Connections (US Models Only) Green Ground Screw Green Power Cord Ground Wire Brass Terminal Terminal Block Neutral Ground Wire Black Tighten Nut to Red White These Threads...strain relief mounting bracket located on the back of the mounting bracket . Install a UL approved strain relief into the power cord entry hole of the dryer upper corner. 2. Remove the green neutral ground wire from the green ground screw located above the terminal block. Typical Conductor Receptacle Typical 4 Conductor ...
User Manual
Page 19
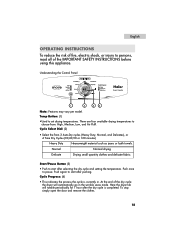
... dry cycle and setting the temperature. To stop simply open the door and remove the clothes. 18 Push again to start after pushing. Here the dryer tub will automatically go in . Temp Button: (1) •Used to pause. Push once to set drying temperatures. Cycle Select Dial: (2) •...30 min Automatic Super Capacity 1 2 34 Note: Features may vary per model. English OPERATING INSTRUCTIONS To reduce the risk of fire, electric shock, or injury to persons, read all of the dry cycle the dryer will tumble periodically for 1 hour after the dry cycle is currently in the...
... dry cycle and setting the temperature. To stop simply open the door and remove the clothes. 18 Push again to start after pushing. Here the dryer tub will automatically go in . Temp Button: (1) •Used to pause. Push once to set drying temperatures. Cycle Select Dial: (2) •...30 min Automatic Super Capacity 1 2 34 Note: Features may vary per model. English OPERATING INSTRUCTIONS To reduce the risk of fire, electric shock, or injury to persons, read all of the dry cycle the dryer will tumble periodically for 1 hour after the dry cycle is currently in the...


