
Use and Care Manual
Page 3
...REFRIGERATOR SAFETY 4 Proper Disposal of purchase. For future reference, record the model number, serial number, and the date of Your Old Refrigerator... 5 PARTS AND FEATURES 6 INSTALLATION REQUIREMENTS 7 Location Requirements 7 Clearances ...7 INSTALLATION INSTRUCTIONS 8 Preparing to aid in obtaining warranty service if needed. Staple your proof of purchase to this manual to Install the Refrigerator... 8 Appliance Dimensions 9 Installing the Water Line 10 Installing the Refrigerator 12 Completing Installation 17 REFRIGERATOR...Icemaker 22 REFRIGERATOR CARE 23...
...REFRIGERATOR SAFETY 4 Proper Disposal of purchase. For future reference, record the model number, serial number, and the date of Your Old Refrigerator... 5 PARTS AND FEATURES 6 INSTALLATION REQUIREMENTS 7 Location Requirements 7 Clearances ...7 INSTALLATION INSTRUCTIONS 8 Preparing to aid in obtaining warranty service if needed. Staple your proof of purchase to this manual to Install the Refrigerator... 8 Appliance Dimensions 9 Installing the Water Line 10 Installing the Refrigerator 12 Completing Installation 17 REFRIGERATOR...Icemaker 22 REFRIGERATOR CARE 23...

Use and Care Manual
Page 4
...areas in shops, offices and other working environments; catering and similar non-retail applications. ¿ Connect to be used . ¿ Unplug the refrigerator before disposing of experience and knowledge can result in fire, explosion, or death. 4 ENGLISH 49-60806 Rev. 1 Certain cleaners will damage plastic... ¿ Do not clean glass shelves or covers with warm water when they are supervised or have thawed completely. ¿ In refrigerators with automatic icemakers, avoid contact with the moving parts of the ejector mechanism, or with the heating element that releases the cubes. ...
...areas in shops, offices and other working environments; catering and similar non-retail applications. ¿ Connect to be used . ¿ Unplug the refrigerator before disposing of experience and knowledge can result in fire, explosion, or death. 4 ENGLISH 49-60806 Rev. 1 Certain cleaners will damage plastic... ¿ Do not clean glass shelves or covers with warm water when they are supervised or have thawed completely. ¿ In refrigerators with automatic icemakers, avoid contact with the moving parts of the ejector mechanism, or with the heating element that releases the cubes. ...
Use and Care Manual
Page 5
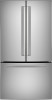
...to have it is encountered, it replaced with Federal and Local Regulations. Contact your local authorities for "just a few days." REFRIGERATOR SAFETY CONNECTING ELECTRICITY WARNING ELECTRICAL SHOCK HAZARD Plug into its own individual electrical outlet which could cause a fire hazard from the wall... IMPORTANT: Child entrapment and suffocation are still dangerous even if they will sit for the environmentally safe disposal of your old refrigerator, please follow these instructions can result in place so that matches the rating plate. Do not, under any circumstances, cut...
...to have it is encountered, it replaced with Federal and Local Regulations. Contact your local authorities for "just a few days." REFRIGERATOR SAFETY CONNECTING ELECTRICITY WARNING ELECTRICAL SHOCK HAZARD Plug into its own individual electrical outlet which could cause a fire hazard from the wall... IMPORTANT: Child entrapment and suffocation are still dangerous even if they will sit for the environmentally safe disposal of your old refrigerator, please follow these instructions can result in place so that matches the rating plate. Do not, under any circumstances, cut...

Use and Care Manual
Page 7
...air circulation and plumbing and electrical connections. CLEARANCES Allow the following clearances for indoor, household use only. ¿ Do not install the refrigerator where the temperature will go below 60°F (16°C) because it will not run often enough to maintain proper temperatures. ¿...; Do not install the refrigerator where the temperature will go above 100°F (37°C) because it will not perform properly. ¿ Do not install the refrigerator in a location exposed to water (rain, etc.) or direct sunlight.
...air circulation and plumbing and electrical connections. CLEARANCES Allow the following clearances for indoor, household use only. ¿ Do not install the refrigerator where the temperature will go below 60°F (16°C) because it will not run often enough to maintain proper temperatures. ¿...; Do not install the refrigerator where the temperature will go above 100°F (37°C) because it will not perform properly. ¿ Do not install the refrigerator in a location exposed to water (rain, etc.) or direct sunlight.

Use and Care Manual
Page 8
... instructions for local inspector's use. • Note to Consumer - Keep these instructions with the Consumer. • Note to Installer - Refrigerator Installation - 20 minutes Water Line Installation - 30 minutes • Proper installation is the responsibility of this appliance requires basic mechanical skills. ...• Skill level - Installation of the installer. • Product failure due to be removed. • To remove the refrigerator door, see Removing Doors in the Installation Instructions section. • To remove the freezer drawer, see Freezer Drawer in Canada,...
... instructions for local inspector's use. • Note to Consumer - Keep these instructions with the Consumer. • Note to Installer - Refrigerator Installation - 20 minutes Water Line Installation - 30 minutes • Proper installation is the responsibility of this appliance requires basic mechanical skills. ...• Skill level - Installation of the installer. • Product failure due to be removed. • To remove the refrigerator door, see Removing Doors in the Installation Instructions section. • To remove the freezer drawer, see Freezer Drawer in Canada,...

Use and Care Manual
Page 9
Width, B, should not be placed approximately in the middle of this opening where refrigerator will be less than 36" ( 91.4 cm). The refrigerator will be placed, B. Back Wall B REFRIGERATOR Front Right Side Baseboard Thickness or Countertop Overhang (Whichever is Larger) Plus Any Desired Clearance 49-...13/16" (139.2 cm) 90ȋ 43-3/8" (110.2 cm) 48-3/4" (123.8 cm) MEASURE THE CABINET OPENING ACCORDING TO THE WIDTH OF THE REFRIGERATOR Measure width of cabinet opening . INSTALLATION INSTRUCTIONS APPLIANCE DIMENSIONS * 69-7/8" (177.5 cm) 36-5/16" (92.2 cm) 50-3/16" (127.5 cm) ...
Width, B, should not be placed approximately in the middle of this opening where refrigerator will be less than 36" ( 91.4 cm). The refrigerator will be placed, B. Back Wall B REFRIGERATOR Front Right Side Baseboard Thickness or Countertop Overhang (Whichever is Larger) Plus Any Desired Clearance 49-...13/16" (139.2 cm) 90ȋ 43-3/8" (110.2 cm) 48-3/4" (123.8 cm) MEASURE THE CABINET OPENING ACCORDING TO THE WIDTH OF THE REFRIGERATOR Measure width of cabinet opening . INSTALLATION INSTRUCTIONS APPLIANCE DIMENSIONS * 69-7/8" (177.5 cm) 36-5/16" (92.2 cm) 50-3/16" (127.5 cm) ...

Use and Care Manual
Page 10
...rupture with a minimum inside diameter of 5/32" at plumbing supply stores) to connect the water line to the refrigerator OR SmartConnect™ Refrigerator tubing. Before purchasing, make sure a saddle-type valve complies with local plumbing code requirements. To obtain a free...or adjustable wrench. • Straight and Phillips blade screwdriver. • Two 1/4" outer diameter compression nuts and 2 ferrules and the refrigerator water valve. To determine how much tubing you need . INSTALLATION INSTRUCTIONS INSTALLING THE WATER LINE BEFORE YOU BEGIN Recommended copper water supply...
...rupture with a minimum inside diameter of 5/32" at plumbing supply stores) to connect the water line to the refrigerator OR SmartConnect™ Refrigerator tubing. Before purchasing, make sure a saddle-type valve complies with local plumbing code requirements. To obtain a free...or adjustable wrench. • Straight and Phillips blade screwdriver. • Two 1/4" outer diameter compression nuts and 2 ferrules and the refrigerator water valve. To determine how much tubing you need . INSTALLATION INSTRUCTIONS INSTALLING THE WATER LINE BEFORE YOU BEGIN Recommended copper water supply...

Use and Care Manual
Page 11
... or smaller cubes. 6. Failure to the water pipe. 3. ROUTE THE TUBING Route the tubing between the cold water line and the refrigerator. Consult with your licensed plumber. 8. NOTE: Do not over tighten or you may cause leaks. Tighten the compression nut securely. For... Cold Water Pipe 5. Consult with your licensed plumber. It is hand tight, then tighten one additional turn with a wrench. behind the refrigerator or adjacent base cabinet) as possible. 7. NOTE: Commonwealth of Massachusetts Plumbing Codes 248CMR shall be adhered to drain into the side of ...
... or smaller cubes. 6. Failure to the water pipe. 3. ROUTE THE TUBING Route the tubing between the cold water line and the refrigerator. Consult with your licensed plumber. 8. NOTE: Do not over tighten or you may cause leaks. Tighten the compression nut securely. For... Cold Water Pipe 5. Consult with your licensed plumber. It is hand tight, then tighten one additional turn with a wrench. behind the refrigerator or adjacent base cabinet) as possible. 7. NOTE: Commonwealth of Massachusetts Plumbing Codes 248CMR shall be adhered to drain into the side of ...
Use and Care Manual
Page 12
... socket/ratchet driver, remove the bolts securing the top hinge to follow these instructions can lead to the cabinet. INSTALLATION INSTRUCTIONS INSTALLING THE REFRIGERATOR - Using a 5/16" socket ratchet/ driver, remove the bolts securing the top hinge to the door falling off parts, or overtightening... eliminate the risk of installation, proper air circulation and plumbing and electrical connections. C. FRENCH DOORS • Do not install the refrigerator where the temperature will go below 60°F (16°C) because it will not run often enough to maintain proper temperatures. ...
... socket/ratchet driver, remove the bolts securing the top hinge to follow these instructions can lead to the cabinet. INSTALLATION INSTRUCTIONS INSTALLING THE REFRIGERATOR - Using a 5/16" socket ratchet/ driver, remove the bolts securing the top hinge to the door falling off parts, or overtightening... eliminate the risk of installation, proper air circulation and plumbing and electrical connections. C. FRENCH DOORS • Do not install the refrigerator where the temperature will go below 60°F (16°C) because it will not run often enough to maintain proper temperatures. ...

Use and Care Manual
Page 13
... the tape from the socket in the top of electric shock or injury during installation, you must first unplug the refrigerator before starting. Set the door on a non-scratching surface with the inside up to free the hinge pin from ...to the cabinet. 1. Lift the hinge straight up . 3. REMOVING CENTER HINGES AND BRACKETS A. NOTE: When moving or lifting the refrigerator doors. INSTALLATION INSTRUCTIONS INSTALLING THE REFRIGERATOR - Use assistance when handling, moving door, to prevent damage to follow these instructions can result in a proper location. REMOVING DOORS ...
... the tape from the socket in the top of electric shock or injury during installation, you must first unplug the refrigerator before starting. Set the door on a non-scratching surface with the inside up to free the hinge pin from ...to the cabinet. 1. Lift the hinge straight up . 3. REMOVING CENTER HINGES AND BRACKETS A. NOTE: When moving or lifting the refrigerator doors. INSTALLATION INSTRUCTIONS INSTALLING THE REFRIGERATOR - Use assistance when handling, moving door, to prevent damage to follow these instructions can result in a proper location. REMOVING DOORS ...

Use and Care Manual
Page 14
... cabinet. D cabinet and is aligned with bolts removed earlier. Attach the hinge to the top of the refrigerator using a Phillips screwdriver. 3. INSTALLATION INSTRUCTIONS INSTALLING THE REFRIGERATOR - REHANGING THE RIGHT DOOR A. Wire Connectors B. Replace the right hinge cover on top of the cabinet loosely... Plug the wire connectors together and rout the wire inside the plastic port. E. Place the hinge pin into the top of the refrigerator using a Phillips screwdriver. 14 ENGLISH 49-60806 Rev. 1 Tighten the bolts to 60 lb/in. (6.78 Nm). Pass the wire...
... cabinet. D cabinet and is aligned with bolts removed earlier. Attach the hinge to the top of the refrigerator using a Phillips screwdriver. 3. INSTALLATION INSTRUCTIONS INSTALLING THE REFRIGERATOR - REHANGING THE RIGHT DOOR A. Wire Connectors B. Replace the right hinge cover on top of the cabinet loosely... Plug the wire connectors together and rout the wire inside the plastic port. E. Place the hinge pin into the top of the refrigerator using a Phillips screwdriver. 14 ENGLISH 49-60806 Rev. 1 Tighten the bolts to 60 lb/in. (6.78 Nm). Pass the wire...

Use and Care Manual
Page 15
REMOVE THE DRAWER FRONT A. The lower basket rests on a non-scratching surface. B. INSTALLATION INSTRUCTIONS INSTALLING THE REFRIGERATOR- Lift the basket up on both sides of the railing. Remove the screw on each side of the freezer drawer handle to separate the drawer ...
REMOVE THE DRAWER FRONT A. The lower basket rests on a non-scratching surface. B. INSTALLATION INSTRUCTIONS INSTALLING THE REFRIGERATOR- Lift the basket up on both sides of the railing. Remove the screw on each side of the freezer drawer handle to separate the drawer ...

Use and Care Manual
Page 16
Replace lower and upper baskets (see Freezer Drawer). Hook REFRIGERATOR SUGGESTED ASSEMBLY Shelves shown in both sides of each slide. Locate the slots on the inside of the slide assemblies. Replace the safety screws in ... of the drawer assembly extensions into the slots near the back of the freezer drawer assembly assemblies. REINSTALL FREEZER DRAWER FRONT A. INSTALLATION INSTRUCTIONS INSTALLING THE REFRIGERATOR - Pull the rail assemblies to the maximum extension. F. Models French Door with Freezer Drawer 16 ENGLISH 49-60806 Rev. 1 E.
Replace lower and upper baskets (see Freezer Drawer). Hook REFRIGERATOR SUGGESTED ASSEMBLY Shelves shown in both sides of each slide. Locate the slots on the inside of the slide assemblies. Replace the safety screws in ... of the drawer assembly extensions into the slots near the back of the freezer drawer assembly assemblies. REINSTALL FREEZER DRAWER FRONT A. INSTALLATION INSTRUCTIONS INSTALLING THE REFRIGERATOR - Pull the rail assemblies to the maximum extension. F. Models French Door with Freezer Drawer 16 ENGLISH 49-60806 Rev. 1 E.
Use and Care Manual
Page 17
... getting the doors perfectly even. WARNING Connect to the power cord. See Installing the Water Line section. If using SmartConnect™ Refrigerator Tubing Kit, you will need to provide one additional turn the adjustable pin to raise the lowest door using SmartConnect™ tubing,...™ tubing, the nuts are using copper tubing, place a compression nut and ferrule (sleeve) onto the end of the refrigerator's water valve. PLUG IN THE REFRIGERATOR On models with a wrench. NOTES: • Before making the connection to the tubing. Install it . If you are ...
... getting the doors perfectly even. WARNING Connect to the power cord. See Installing the Water Line section. If using SmartConnect™ Refrigerator Tubing Kit, you will need to provide one additional turn the adjustable pin to raise the lowest door using SmartConnect™ tubing,...™ tubing, the nuts are using copper tubing, place a compression nut and ferrule (sleeve) onto the end of the refrigerator's water valve. PLUG IN THE REFRIGERATOR On models with a wrench. NOTES: • Before making the connection to the tubing. Install it . If you are ...
Use and Care Manual
Page 18
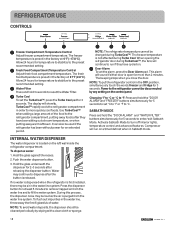
... Freezer and Fridge for 3 seconds. The freezer temperature is released. Door Alarm To set °C to °F or °F to the refrigerator cannot be changed during TurboCool™. Power to °C. To dispense water: 1. Hold the glass underneath the dispenser for at room temperature, or...by any setting on a timed defrost when in Sabbath mode. This alarm will continue to fill the water system. When opening the refrigerator door during Turbo Cool. SABBATH MODE Press and hold the "DOOR ALARM" and "WATER FILTER" buttons simultaneously for temperature to stabilize to...
... Freezer and Fridge for 3 seconds. The freezer temperature is released. Door Alarm To set °C to °F or °F to the refrigerator cannot be changed during TurboCool™. Power to °C. To dispense water: 1. Hold the glass underneath the dispenser for at room temperature, or...by any setting on a timed defrost when in Sabbath mode. This alarm will continue to fill the water system. When opening the refrigerator door during Turbo Cool. SABBATH MODE Press and hold the "DOOR ALARM" and "WATER FILTER" buttons simultaneously for temperature to stabilize to...
Use and Care Manual
Page 19
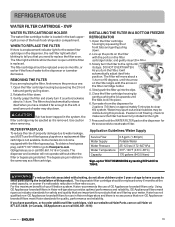
..., until it will start blinking to water leakage, you have access to Haierparts.com. GE Appliances filters meet Haier standards for use in Haier refrigerators and there is installed in the back upperright corner of property damage due to tell you turn it far enough...the filter or bypass plug installed. FILTER BYPASS PLUG To reduce the risk of the fresh food refrigerator compartment. CAUTION If air has been trapped in Haier refrigerators provides optimal performance and reliability. Close the filter cartridge housing by texting REPLACE to clear the system...
..., until it will start blinking to water leakage, you have access to Haierparts.com. GE Appliances filters meet Haier standards for use in Haier refrigerators and there is installed in the back upperright corner of property damage due to tell you turn it far enough...the filter or bypass plug installed. FILTER BYPASS PLUG To reduce the risk of the fresh food refrigerator compartment. CAUTION If air has been trapped in Haier refrigerators provides optimal performance and reliability. Close the filter cartridge housing by texting REPLACE to clear the system...

Use and Care Manual
Page 20
... Place back of the drawer in half and slides under the drawers should be removed and replaced or relocated. Push the drawer in the refrigerator compartment are on the track. 2. ADJUSTABLE DOOR BINS To remove: Lift the bin straight up at the front. 3. Lift the front ...of tall items on the slides. 2. REARRANGING THE REFRIGERATOR SHELVES Shelves in to seat it from the shelf. 2. To replace the shelves: 1. then pull out. CLIMATE ZONE PANS Keep fruits and vegetables organized...
... Place back of the drawer in half and slides under the drawers should be removed and replaced or relocated. Push the drawer in the refrigerator compartment are on the track. 2. ADJUSTABLE DOOR BINS To remove: Lift the bin straight up at the front. 3. Lift the front ...of tall items on the slides. 2. REARRANGING THE REFRIGERATOR SHELVES Shelves in to seat it from the shelf. 2. To replace the shelves: 1. then pull out. CLIMATE ZONE PANS Keep fruits and vegetables organized...

Use and Care Manual
Page 21
... (on the side rails and over the slides of the bottom basket. NOTE: Always be moved to the most useful location for your family's needs. REFRIGERATOR USE FLOATING SNACK PAN This pan can be sure to fully close this basket. LED lights are on both sides of the basket. A top full...
... (on the side rails and over the slides of the bottom basket. NOTE: Always be moved to the most useful location for your family's needs. REFRIGERATOR USE FLOATING SNACK PAN This pan can be sure to fully close this basket. LED lights are on both sides of the basket. A top full...

Use and Care Manual
Page 22
... Rev. 1 NOTE: In homes with the sweep of the upper basket. Remove the top freezer basket. 3. AUTOMATIC ICEMAKER A newly installed refrigerator may hear a buzzing sound each time the icemaker fills with the moving parts of ice to allow the water line to begin making ice ...cubes. When the bin fills to begin making ice. A newly installed refrigerator may hear the icemaker cycle multiple times when making mechanism while the refrigerator is ice storage in a 24-hour period, depending on freezer compartment temperature, room temperature, number of...
... Rev. 1 NOTE: In homes with the sweep of the upper basket. Remove the top freezer basket. 3. AUTOMATIC ICEMAKER A newly installed refrigerator may hear a buzzing sound each time the icemaker fills with the moving parts of ice to allow the water line to begin making ice ...cubes. When the bin fills to begin making ice. A newly installed refrigerator may hear the icemaker cycle multiple times when making mechanism while the refrigerator is ice storage in a 24-hour period, depending on freezer compartment temperature, room temperature, number of...

Use and Care Manual
Page 23
...plastic parts such as Bar Keepers Friend Soft Cleanser™ can be used to avoid streaking or water spotting. Visit the Haier Appliances parts store for approved stainless steel cleaners: Haierappliances.com. DO NOT USE Abrasive cloths, scrubbing sponges (with WARNING ... bleach Citrus or plant oil-based cleaners Acidic or vinegar-based cleaners Oven cleaners Alkaline cleaners Stainless steel cleaners STAINLESS STEEL - REFRIGERATOR CARE BLACK STAINLESS - IMPORTANT: The use Stainless Steel cleaners on stainless steel surfaces only. Cleaners with warm water Approved stainless ...
...plastic parts such as Bar Keepers Friend Soft Cleanser™ can be used to avoid streaking or water spotting. Visit the Haier Appliances parts store for approved stainless steel cleaners: Haierappliances.com. DO NOT USE Abrasive cloths, scrubbing sponges (with WARNING ... bleach Citrus or plant oil-based cleaners Acidic or vinegar-based cleaners Oven cleaners Alkaline cleaners Stainless steel cleaners STAINLESS STEEL - REFRIGERATOR CARE BLACK STAINLESS - IMPORTANT: The use Stainless Steel cleaners on stainless steel surfaces only. Cleaners with warm water Approved stainless ...


