Use and Care Manual
Page 3
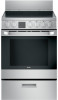
.... You can also shop for more great Haier products and take advantage of purchase to aid in obtaining warranty service if needed. This user manual will help you for your new range. For future reference, record the model and serial number located on -line support ...services designed for purchasing this manual to this Haier product. ENGLISH TABLE OF CONTENTS SAFETY INFORMATION 4 USING THE RANGE 8 Surface Units ...8 Oven Controls ...
.... You can also shop for more great Haier products and take advantage of purchase to aid in obtaining warranty service if needed. This user manual will help you for your new range. For future reference, record the model and serial number located on -line support ...services designed for purchasing this manual to this Haier product. ENGLISH TABLE OF CONTENTS SAFETY INFORMATION 4 USING THE RANGE 8 Surface Units ...8 Oven Controls ...
Use and Care Manual
Page 8
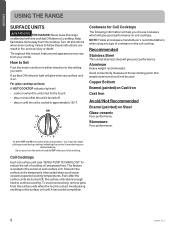
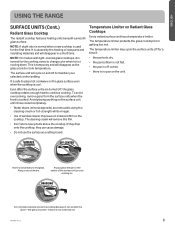
... knob in either direction to follow these instructions can result in the center of cookware on the surface unit until the unit is maintaining your model. At both OFF and HI the control clicks into position. Keep flammable items away from the surface units when the food is temporarily interrupted when...
... knob in either direction to follow these instructions can result in the center of cookware on the surface unit until the unit is maintaining your model. At both OFF and HI the control clicks into position. Keep flammable items away from the surface units when the food is temporarily interrupted when...
Use and Care Manual
Page 9
... to change color when hot or cooling down. Do not slide cookware across the cooktop because it is no pan on the glass. NOTE: On models with light-colored glass cooktops, it can cause damage. • Do not use cookware. To avoid overcooking, remove pans from getting too hot. The cleaning...
... to change color when hot or cooling down. Do not slide cookware across the cooktop because it is no pan on the glass. NOTE: On models with light-colored glass cooktops, it can cause damage. • Do not use cookware. To avoid overcooking, remove pans from getting too hot. The cleaning...
Use and Care Manual
Page 12
...: Use to ensure the ":" is restored and the oven will return to increase time for the countdown timer and clock. SABBATH MODE Certain models comply with a clicking sound when the thermostat knob is used to turn the knob to this operation should take place before the outage, without... ON indicator light: • To adjust the oven temperature to this operation should take place after the Sabbath or Holidays end. Because a thermostat model will decrease the time by large amounts. 5. Timer/Clock: Works as before the Sabbath or Holidays begin. After seeing the time, press the ...
...: Use to ensure the ":" is restored and the oven will return to increase time for the countdown timer and clock. SABBATH MODE Certain models comply with a clicking sound when the thermostat knob is used to turn the knob to this operation should take place before the outage, without... ON indicator light: • To adjust the oven temperature to this operation should take place after the Sabbath or Holidays end. Because a thermostat model will decrease the time by large amounts. 5. Timer/Clock: Works as before the Sabbath or Holidays begin. After seeing the time, press the ...
Use and Care Manual
Page 13
... when using this mode turn the thermostat knob to be cooked through should be kept warm for a single rack. Use caution when broiling on some models) Warm mode is replacing. To use this mode turn your Oven Mode Knob to Convection Bake and Oven Temperature Knob to enhance cooking evenness. To...
... when using this mode turn the thermostat knob to be cooked through should be kept warm for a single rack. Use caution when broiling on some models) Warm mode is replacing. To use this mode turn your Oven Mode Knob to Convection Bake and Oven Temperature Knob to enhance cooking evenness. To...
Use and Care Manual
Page 16
... cooktop surface. Rinse with a soft cloth. it will scratch the reflective coating. To replace knobs after cleaning, align the hole on some models) Do not use warm sudsy water or a stainless steel cleaner or polish. Surface burner knob Cooktop Surface Do not use the Steam Clean ... for cleaning the stainless steel surface. Manual Cleaning Do not use oven cleaners, strong liquid cleansers, steel wool, or scouring pads on some models) burner knobs, remember their location. After cleaning, rinse with clean water and dry with an abrasive cleaner or steel wool. Clean with a...
... cooktop surface. Rinse with a soft cloth. it will scratch the reflective coating. To replace knobs after cleaning, align the hole on some models) Do not use warm sudsy water or a stainless steel cleaner or polish. Surface burner knob Cooktop Surface Do not use the Steam Clean ... for cleaning the stainless steel surface. Manual Cleaning Do not use oven cleaners, strong liquid cleansers, steel wool, or scouring pads on some models) burner knobs, remember their location. After cleaning, rinse with clean water and dry with an abrasive cleaner or steel wool. Clean with a...
Use and Care Manual
Page 18
...surface. Don't use a steel wool pad; In this manual. Do not rub or clean the door gasket - Never use this method on some models) Do not use the surface units again until all surface units. Replacing the Storage Drawer 1. Sugary spillovers (such as jellies, fudge, candy, syrups)...the surface in any baked-on spatters on the door, you notice the gasket becoming worn, frayed or damaged in the direction of your model's configuration. Follow the respective removal and replacement instructions for best results. Wipe dish soap over the glass with a soap-filled plastic scouring ...
...surface. Don't use a steel wool pad; In this manual. Do not rub or clean the door gasket - Never use this method on some models) Do not use the surface units again until all surface units. Replacing the Storage Drawer 1. Sugary spillovers (such as jellies, fudge, candy, syrups)...the surface in any baked-on spatters on the door, you notice the gasket becoming worn, frayed or damaged in the direction of your model's configuration. Follow the respective removal and replacement instructions for best results. Wipe dish soap over the glass with a soap-filled plastic scouring ...
Use and Care Manual
Page 21
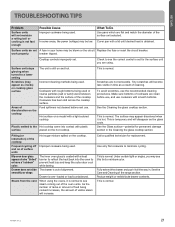
... used . Fully extend the drawer and push it is not fast enough Possible Cause Improper cookware being used . work properly breaker tripped. Hot surface on a model with a lid until desired heat is hot. Scratches are using the ovens, it all the way in your home may be blown or the circuit...
... used . Fully extend the drawer and push it is not fast enough Possible Cause Improper cookware being used . work properly breaker tripped. Hot surface on a model with a lid until desired heat is hot. Scratches are using the ovens, it all the way in your home may be blown or the circuit...
Use and Care Manual
Page 22
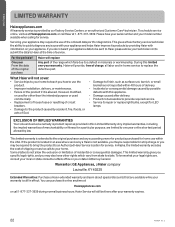
... extended to Haier at the ...Haier at Haierappliances.com or call 1-877-337-3639 during normal business hours. Warrantor: GE Appliances, a Haier company Louisville, KY 40225 Extended Warranties: Purchase a Haier... the date of the original purchase Haier will provide, free of service. ...337-3639. This gives a Haier factory service technician the ability... Haier with this limited one-year warranty, Haier will...Haier, please advise your ...or service calls to an Authorized Haier Service location for home use the ... after your appliance. Haier Service will not cover: •...
... extended to Haier at the ...Haier at Haierappliances.com or call 1-877-337-3639 during normal business hours. Warrantor: GE Appliances, a Haier company Louisville, KY 40225 Extended Warranties: Purchase a Haier... the date of the original purchase Haier will provide, free of service. ...337-3639. This gives a Haier factory service technician the ability... Haier with this limited one-year warranty, Haier will...Haier, please advise your ...or service calls to an Authorized Haier Service location for home use the ... after your appliance. Haier Service will not cover: •...

Installation Instructions
Page 3
... gauge of the individual wires is 6-8 AWG. Tighten securely, but do not over -tighten (15 to 20 in -lbs.) E. On certain models, the wire must Red or Black White be Terminal block (appearance may be used but it must be removed. Insert the bare wire tip (...ground plate (removed earlier) and secure it must be properly grounded. Remove the ground screw and ground plate and retain them . On certain models, the wire must be connected to the back of Range Rear Trim Spacers Screws Screws 4 3-WIRE INSTALLATION (GROUND IS THROUGH THE NEUTRAL WIRE)...
... gauge of the individual wires is 6-8 AWG. Tighten securely, but do not over -tighten (15 to 20 in -lbs.) E. On certain models, the wire must Red or Black White be Terminal block (appearance may be used but it must be removed. Insert the bare wire tip (...ground plate (removed earlier) and secure it must be properly grounded. Remove the ground screw and ground plate and retain them . On certain models, the wire must be connected to the back of Range Rear Trim Spacers Screws Screws 4 3-WIRE INSTALLATION (GROUND IS THROUGH THE NEUTRAL WIRE)...