
User Manual
Page 3
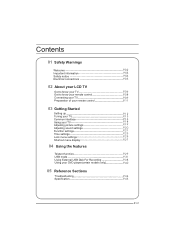
... Preparation of your remote control P.11 03 Getting Started Setting up P.12 Tuning your TV P.13 Common interface P.16 Using your TV P.18 Adjusting picture settings P.19 Adjusting sound settings P.20 Function settings P.21 Time settings P.23 Lock menu settings P.25 Shortcut menu display P.27 04 Using ...
... Preparation of your remote control P.11 03 Getting Started Setting up P.12 Tuning your TV P.13 Common interface P.16 Using your TV P.18 Adjusting picture settings P.19 Adjusting sound settings P.20 Function settings P.21 Time settings P.23 Lock menu settings P.25 Shortcut menu display P.27 04 Using ...
User Manual
Page 4
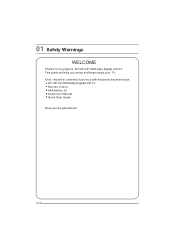
01 Safety Warnings WELCOME Thanks for buying this 26"/32"/42" HD Ready Digital LCD TV. First, check the contents of your box with the parts checklist below: 26"/32"/42"HD Ready Digital LCD TV Remote control AAA battery x2 Instruction Manual Quick Start Guide Now you set up and begin using your TV. This guide will help you can get started!
01 Safety Warnings WELCOME Thanks for buying this 26"/32"/42" HD Ready Digital LCD TV. First, check the contents of your box with the parts checklist below: 26"/32"/42"HD Ready Digital LCD TV Remote control AAA battery x2 Instruction Manual Quick Start Guide Now you set up and begin using your TV. This guide will help you can get started!

User Manual
Page 8
ANTENNA input 5. SCART1 input 13. SCART2 input 15. DVI AUDIO input 4. S-VIDEO input 7. AV-VIDEO input 11. VGA AUDIO input 14. VGA input 16. USB EARPHONE output 8. HDMI2 input 17.OPTICAL 10. YPbPr input 2. YPbPr AUDIO input 3. HDMI1 input 9. HDMI3 input 6. Common Interface 12. About your LCD TV GET TO KNOW YOUR TV Front control panel Rear Terminals Control Source button Menu button Volume up/down button Program up/down button Power button ANT IN USB 2 1REC COMPONENT IN HDMI3 VGA IN 1.
ANTENNA input 5. SCART1 input 13. SCART2 input 15. DVI AUDIO input 4. S-VIDEO input 7. AV-VIDEO input 11. VGA AUDIO input 14. VGA input 16. USB EARPHONE output 8. HDMI2 input 17.OPTICAL 10. YPbPr input 2. YPbPr AUDIO input 3. HDMI1 input 9. HDMI3 input 6. Common Interface 12. About your LCD TV GET TO KNOW YOUR TV Front control panel Rear Terminals Control Source button Menu button Volume up/down button Program up/down button Power button ANT IN USB 2 1REC COMPONENT IN HDMI3 VGA IN 1.

User Manual
Page 9
ANTENNA input 5. YPbPr AUDIO input 3. S-VIDEO input 7. DVI AUDIO input 4. HDMI1 input 9. Common Interface 12.SCART1 input 13.VGA AUDIO input 14.SCART2 input 15.VGA input 16.USB 17.OPTICAL HDMI3 input 6. HDMI2 input 10.AV-VIDEO input 11. EARPHONE output 8. GET TO KNOW YOUR TV WITH DVD Front control panel Source button Menu button Volume up/down button Program up/down button Power button Rear Terminals Control ANT IN USB 2 1REC COMPONENT IN HDMI3 VGA IN 1. YPbPr input 2.
ANTENNA input 5. YPbPr AUDIO input 3. S-VIDEO input 7. DVI AUDIO input 4. HDMI1 input 9. Common Interface 12.SCART1 input 13.VGA AUDIO input 14.SCART2 input 15.VGA input 16.USB 17.OPTICAL HDMI3 input 6. HDMI2 input 10.AV-VIDEO input 11. EARPHONE output 8. GET TO KNOW YOUR TV WITH DVD Front control panel Source button Menu button Volume up/down button Program up/down button Power button Rear Terminals Control ANT IN USB 2 1REC COMPONENT IN HDMI3 VGA IN 1. YPbPr input 2.

User Manual
Page 10
... button (only for USB) Exit Screen Display REPEAT (only for DVD , USB , REC & Timeshift) / CANCEL button Zoom (only for DVD &USB)/Teletext index(only for TV) / REC index Play / Pause button (only for DVD &USB) / Timeshift Stop (only for DVD, USB, REC & Timeshift) Fast Reverse (only for DVD, USB, REC & Timeshift... / Teletext Mode DVD Angle /Teletext Time GET TO KNOW YOUR REMOTE CONTROL When using the remote control, aim it towards the remote sensor on the TV .
... button (only for USB) Exit Screen Display REPEAT (only for DVD , USB , REC & Timeshift) / CANCEL button Zoom (only for DVD &USB)/Teletext index(only for TV) / REC index Play / Pause button (only for DVD &USB) / Timeshift Stop (only for DVD, USB, REC & Timeshift) Fast Reverse (only for DVD, USB, REC & Timeshift... / Teletext Mode DVD Angle /Teletext Time GET TO KNOW YOUR REMOTE CONTROL When using the remote control, aim it towards the remote sensor on the TV .
User Manual
Page 11
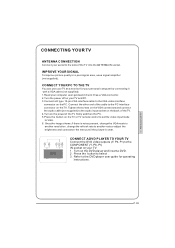
...the menu until the picture is noise present, change the VGA mode to another resolution, change the refresh rate to select . 3 . CONNECTING YOUR TV ANTENNA CONNECTION Connect your aerial to the DVD player user guide for your personal computer by connecting it with a VGAcable (not supplied). 1.Read your ... set the video input mode to the COMPONENT (Y, Pb, Pr) IN socket on the TV. CONNECT YOUR PC TO THE TV You can use a signal amplifier (not supplied). L R Y Pb Pr DVD CONNECT A DVD PLAYER TO YOUR TV Connect the DVD video outputs (Y, Pb, Pr) to VGA. 6. IMPROVE YOUR SIGNAL To...
...the menu until the picture is noise present, change the VGA mode to another resolution, change the refresh rate to select . 3 . CONNECTING YOUR TV ANTENNA CONNECTION Connect your aerial to the DVD player user guide for your personal computer by connecting it with a VGAcable (not supplied). 1.Read your ... set the video input mode to the COMPONENT (Y, Pb, Pr) IN socket on the TV. CONNECT YOUR PC TO THE TV You can use a signal amplifier (not supplied). L R Y Pb Pr DVD CONNECT A DVD PLAYER TO YOUR TV Connect the DVD video outputs (Y, Pb, Pr) to VGA. 6. IMPROVE YOUR SIGNAL To...

User Manual
Page 12
... you connect them. Connection Option 1 1.Connect the audio and S-VIDEO cables from the external device (DVD player, Set-top box or games console) to the TV scart socket. 2.Press the SOURCE button to S-VIDEO. SCART INPUT 1.Connect the scart lead from the VCR output jacks to the... into the VCR and press PLAY on the VCR. 3.Turn on the power of the TV first, then the VCR. 4.Press the SOURCE button on the TV to set the video input mode to AV. MOUNT YOUR TV ONTO THE WALL You can connect a DVD player or VCR to the AV IN socket...
... you connect them. Connection Option 1 1.Connect the audio and S-VIDEO cables from the external device (DVD player, Set-top box or games console) to the TV scart socket. 2.Press the SOURCE button to S-VIDEO. SCART INPUT 1.Connect the scart lead from the VCR output jacks to the... into the VCR and press PLAY on the VCR. 3.Turn on the power of the TV first, then the VCR. 4.Press the SOURCE button on the TV to set the video input mode to AV. MOUNT YOUR TV ONTO THE WALL You can connect a DVD player or VCR to the AV IN socket...

User Manual
Page 13
... of the battery must match with the signal sent by the remote control. BATTERY CAUTION Confirm there is to be stored for a period of the TV set to avoid the direct light source. Do not put the remote control in direct heat or in a damp place as you may damage the... strong light will interfere with the marks on the remote). 3.Close the cover of the battery compartment. 2.Install two AAA batteries. (The + and- If your TV is no object between the remote control and the remote sensor of time, remove the batteries from the remote control. Please use rechargeable batteries. Do...
... of the battery must match with the signal sent by the remote control. BATTERY CAUTION Confirm there is to be stored for a period of the TV set to avoid the direct light source. Do not put the remote control in direct heat or in a damp place as you may damage the... strong light will interfere with the marks on the remote). 3.Close the cover of the battery compartment. 2.Install two AAA batteries. (The + and- If your TV is no object between the remote control and the remote sensor of time, remove the batteries from the remote control. Please use rechargeable batteries. Do...

User Manual
Page 14
...Select your plug socket (so the power cable can comfortably reach) and within reach of the screen. 2.Press STANDBY on the right side of the TV. 2. 03 Getting Started Setting up LOCATION You will need to confirm. Ared flashing light will turn blue. Insert the batteries into the Antenna input at...the list that will appear on and the red light will turn on screen. SWITCHING YOUR TV ON 1.Press the STANDBY button on the remote control. The TV will appear in the corner of your TV aerial lead into the remote control. Insert your aerial socket or extension lead. Make sure they...
...Select your plug socket (so the power cable can comfortably reach) and within reach of the screen. 2.Press STANDBY on the right side of the TV. 2. 03 Getting Started Setting up LOCATION You will need to confirm. Ared flashing light will turn blue. Insert the batteries into the Antenna input at...the list that will appear on and the red light will turn on screen. SWITCHING YOUR TV ON 1.Press the STANDBY button on the remote control. The TV will appear in the corner of your TV aerial lead into the remote control. Insert your aerial socket or extension lead. Make sure they...

User Manual
Page 15
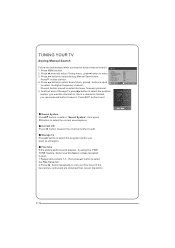
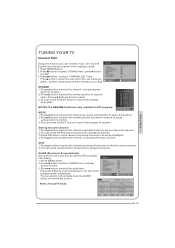
... item, press OK button to select Country item. Press button to complete the Auto Search. Once a channel is located, you can choose to skip the TV /DTV Search or not. 5. Press the MENU button ,you can press OK button to save it . DIGITAL MANUAL SEARCH 1. Simply press SOURCE which will ... OK MENU Press button to exit. Press EXIT button to select you needed. 4. TUNING YOUR TV SWITCHING TO AN EXTERNAL SOURCE OTHER THAT TV If you have attached a DVD player or similar external device to the TV, you will bring up the source menu in other equipment see GET TO KNOW YOUR...
... item, press OK button to select Country item. Press button to complete the Auto Search. Once a channel is located, you can choose to skip the TV /DTV Search or not. 5. Press the MENU button ,you can press OK button to save it . DIGITAL MANUAL SEARCH 1. Simply press SOURCE which will ... OK MENU Press button to exit. Press EXIT button to select you needed. 4. TUNING YOUR TV SWITCHING TO AN EXTERNAL SOURCE OTHER THAT TV If you have attached a DVD player or similar external device to the TV, you will bring up the source menu in other equipment see GET TO KNOW YOUR...
User Manual
Page 16
... TUNE feature. Do not use this feature unless reception is located, you can press red button to select the correct sound system. OK 4. TUNING YOUR TV Analog Manual Search Follow the below steps when you need to edit. OK 2. Menu 1. Current CH Press button to select the channel number to have...
... TUNE feature. Do not use this feature unless reception is located, you can press red button to select the correct sound system. OK 4. TUNING YOUR TV Analog Manual Search Follow the below steps when you need to edit. OK 2. Menu 1. Current CH Press button to select the channel number to have...
User Manual
Page 17
... the submenu, the electronic program guide is only available in the analogue mode. NOTES:The RENAME function is displayed. Notes: Only DTV mode. TUNING YOUR TV Channel Edit Using this function ,you want to remove to, press yellow button to confirm. 3.You can press the EXIT button to cancel the changes...
... the submenu, the electronic program guide is only available in the analogue mode. NOTES:The RENAME function is displayed. Notes: Only DTV mode. TUNING YOUR TV Channel Edit Using this function ,you want to remove to, press yellow button to confirm. 3.You can press the EXIT button to cancel the changes...
User Manual
Page 18
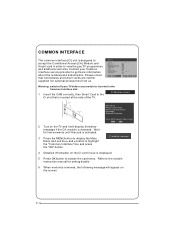
... to display the Main Menu and use is displayed. 5 Press OK button to view the pay TV programmes OK OK OK and additional services. CI module removed 4 Detailed information on the TV and it will appear on the screen. Main Menu Module information Smart card information Language Software Download...and button to the CI Module Insert CI slot that CA modules and smart cards are neither supplied nor optional accessories from us. Contact your TV before any module is inserted in the Common Interface slot. 1 Insert the CAM correctly, then Smart Card to highlight the "Common Interface" ...
... to display the Main Menu and use is displayed. 5 Press OK button to view the pay TV programmes OK OK OK and additional services. CI module removed 4 Detailed information on the TV and it will appear on the screen. Main Menu Module information Smart card information Language Software Download...and button to the CI Module Insert CI slot that CA modules and smart cards are neither supplied nor optional accessories from us. Contact your TV before any module is inserted in the Common Interface slot. 1 Insert the CAM correctly, then Smart Card to highlight the "Common Interface" ...
User Manual
Page 19
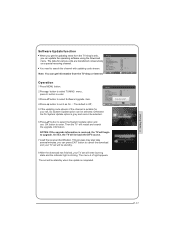
.... The set will enter burning state and the indicator light is received, the TV will be selected. The data for your set, Do System Update option can press EXIT button to ...cancel the download and your TV set will be standby when the update is suitable for various units are transferred consecutively OK on ...: If the upgrade information is shining. you can be standby. 8 After the download has finished, your TV set it as On. OK Note: You can update the operating software using the Download OK menu. Otherwise...
.... The set will enter burning state and the indicator light is received, the TV will be selected. The data for your set, Do System Update option can press EXIT button to ...cancel the download and your TV set will be standby when the update is suitable for various units are transferred consecutively OK on ...: If the upgrade information is shining. you can be standby. 8 After the download has finished, your TV set it as On. OK Note: You can update the operating software using the Download OK menu. Otherwise...

User Manual
Page 20
button on the remote control. 2.Using P+/P- HOW to adjust the volume level. button to enter. Press button to select the channel, and then press OK button to select a channel number. CH.LIST function Press CH.LIST button on the remote control will display Channel List menu, and then press button to select the TV program 1.Using Program number button Enter the channel number with the number keypad on the remote control or the side of the TV to adjust volume Press V+/V- button Press the P+/P- USING YOUR TV How to enter.
button on the remote control. 2.Using P+/P- HOW to adjust the volume level. button to enter. Press button to select the channel, and then press OK button to select a channel number. CH.LIST function Press CH.LIST button on the remote control will display Channel List menu, and then press button to select the TV program 1.Using Program number button Enter the channel number with the number keypad on the remote control or the side of the TV to adjust volume Press V+/V- button Press the P+/P- USING YOUR TV How to enter.

User Manual
Page 25
Close When the off the TV in ATV mode,then turn on the TV. Menu NOTE: In DTV mode, because the time information is from the signal,the Clock and ...press OK button to set it on automatically. Activate OKOK Hour Minute < 00 > Close When the on time has arrived, the TV set will switch on . Press button to select hour or minute, Press button to Menu enter setting. Press button to select ... Press button to select Date item, press button to change the time, turn off time has arrived, the TV set will enter into standby mode. If you want to enter setting.
Close When the off the TV in ATV mode,then turn on the TV. Menu NOTE: In DTV mode, because the time information is from the signal,the Clock and ...press OK button to set it on automatically. Activate OKOK Hour Minute < 00 > Close When the on time has arrived, the TV set will switch on . Press button to select hour or minute, Press button to Menu enter setting. Press button to select ... Press button to select Date item, press button to change the time, turn off time has arrived, the TV set will enter into standby mode. If you want to enter setting.

User Manual
Page 26
... select the Sleep. 3 Press the button and then use button to select the number of minutes selected. Sleep The sleep timer automatically shuts off the TV after a preset time (from the number of minutes.Select Off, 5Min, 10Min, 15Min, 30Min, Menu OK 45Min,60Min,90Min, 120Min, 180Min, 240Min OK OK 4 When...
... select the Sleep. 3 Press the button and then use button to select the number of minutes selected. Sleep The sleep timer automatically shuts off the TV after a preset time (from the number of minutes.Select Off, 5Min, 10Min, 15Min, 30Min, Menu OK 45Min,60Min,90Min, 120Min, 180Min, 240Min OK OK 4 When...
User Manual
Page 27
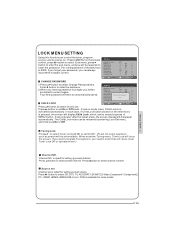
... Lock Set menu, set Tuner Lock Off or operate unlock.) Channel NO. is opted for setting up preset channel. Press button to select Off, DTV, TV, AV,SCART1,SCART2,S-Video,Component1,Component2, PC, HDMI1,HDMI2,HDMI3,USB in activated automatically. Press button to select channel number. OK 2.When you have inputted...
... Lock Set menu, set Tuner Lock Off or operate unlock.) Channel NO. is opted for setting up preset channel. Press button to select Off, DTV, TV, AV,SCART1,SCART2,S-Video,Component1,Component2, PC, HDMI1,HDMI2,HDMI3,USB in activated automatically. Press button to select channel number. OK 2.When you have inputted...

User Manual
Page 28
... Volume Press button to OK correspondingsource and will stay unchanged. Source Lock Source Lock will control the On or Off of children who will watch TV. OK Press button to off . When the source lock is set , when volume is below maximum volume, customer set as on the..., when lock set menu is set, current volume will be the volume when turn on , TV source will display, at this time, when press SOURCE button, the TV can not exceed maximum volume value. Initial Volume The TV will remember it after your setting,that will become set maximum volume, if current volume...
... Volume Press button to OK correspondingsource and will stay unchanged. Source Lock Source Lock will control the On or Off of children who will watch TV. OK Press button to off . When the source lock is set , when volume is below maximum volume, customer set as on the..., when lock set menu is set, current volume will be the volume when turn on , TV source will display, at this time, when press SOURCE button, the TV can not exceed maximum volume value. Initial Volume The TV will remember it after your setting,that will become set maximum volume, if current volume...

User Manual
Page 30
Use this Time, the sound of the screen. Press Q.view button, and the TV will display on the remote control and "Mute" type face will be back to the TV source, expect in the USB and DVD source. 1 Suppose the channel number you used last Timer. Quick program view This function enables quick... or there are some guests visiting you, the sound elimination (mute) function is very convenient. 1 Press the MUTE button on the lower part of the TV set is turned off. 2 If you want to return to the last watched program. SHORTCUT MENU DISPLAY Eliminate Sound When you need to pay attention...
Use this Time, the sound of the screen. Press Q.view button, and the TV will display on the remote control and "Mute" type face will be back to the TV source, expect in the USB and DVD source. 1 Suppose the channel number you used last Timer. Quick program view This function enables quick... or there are some guests visiting you, the sound elimination (mute) function is very convenient. 1 Press the MUTE button on the lower part of the TV set is turned off. 2 If you want to return to the last watched program. SHORTCUT MENU DISPLAY Eliminate Sound When you need to pay attention...


