
User Manual
Page 2
CONTENTS IMPORTANT SAFETY INSTRUCTIONS P.02 REMOTE CONTROL P.04 KNOW YOUR MACHINE P.07 WALL MOUNTING P.09 ANTENNA CONNECTION P.11 TUNING MENU OPTIONS P.12 OTHER CONNECTIONS P.14 BASIC OPERATION P.19 MENU OPERATION P.23 TELETEXT P.36 COMMON INTERFACE MODULE P.38 OAD OPERATION P.40 TROUBLESHOOTING P.41 SPECIFICATIONS P.42 APPENDIX P.43 INFORMATION P.45 PRODUCT GUARANTEE P.47 BUSH | HD Ready LED LCD | User Manual | Customer Helpline 0845 604 0105 P.01
CONTENTS IMPORTANT SAFETY INSTRUCTIONS P.02 REMOTE CONTROL P.04 KNOW YOUR MACHINE P.07 WALL MOUNTING P.09 ANTENNA CONNECTION P.11 TUNING MENU OPTIONS P.12 OTHER CONNECTIONS P.14 BASIC OPERATION P.19 MENU OPERATION P.23 TELETEXT P.36 COMMON INTERFACE MODULE P.38 OAD OPERATION P.40 TROUBLESHOOTING P.41 SPECIFICATIONS P.42 APPENDIX P.43 INFORMATION P.45 PRODUCT GUARANTEE P.47 BUSH | HD Ready LED LCD | User Manual | Customer Helpline 0845 604 0105 P.01
User Manual
Page 3
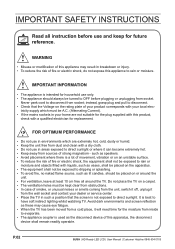
... ventilation, leave at least 10 cm free all instruction before plugging or unplugging from socket. tricity supply which are not suitable for future reference. P.02 BUSH | HD Ready LED LCD | User Manual | Customer Helpline 0845 604 0105 WARNING • Misuse or modification of this appliance may cause eye fatigue. • When...
... ventilation, leave at least 10 cm free all instruction before plugging or unplugging from socket. tricity supply which are not suitable for future reference. P.02 BUSH | HD Ready LED LCD | User Manual | Customer Helpline 0845 604 0105 WARNING • Misuse or modification of this appliance may cause eye fatigue. • When...
User Manual
Page 4
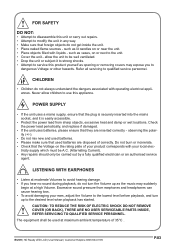
... disposed of 35°C . LISTENING WITH EARPHONES • Listen at moderate Volumes to avoid hearing damage. • If you to dangerous Voltage or other hazards. BUSH | HD Ready LED LCD | User Manual | Customer Helpline 0845 604 0105 P.03 Check the power lead periodically, and replace if damaged. • If the unit...
... disposed of 35°C . LISTENING WITH EARPHONES • Listen at moderate Volumes to avoid hearing damage. • If you to dangerous Voltage or other hazards. BUSH | HD Ready LED LCD | User Manual | Customer Helpline 0845 604 0105 P.03 Check the power lead periodically, and replace if damaged. • If the unit...

User Manual
Page 5
REMOTE CONTROL A POWER B SOURCE C Numerical Keys D PRE CH E EPG F VIDEO G YPbPr H PC I L N P Y b d hf j l n p x EPG YPbPr Vol DUAL MENU /EXIT INFO FAV CH-LIST USB FREEZE D F H J K M O Q X a c eg i k m o q o FREEZE p FAV q USB x CH-LIST BUSH | HD Ready LED LCD | User Manual | Customer Helpline 0845 604 0105 L Vol + - M VIDEO ADJ N AUDIO ADJ O SLEEP P DUAL Q ZOOM X CURSOR Y OK a INFO b MENU/EXIT c Yellow Button d Green Button e Blue Button f Red Button g SIZE h MIX i SUBPAGE j TELETEXT k HOLD l SUBTITLE m REVEAL n INDEX P.04 B A C E G I HDMI J MUTE K CH .
REMOTE CONTROL A POWER B SOURCE C Numerical Keys D PRE CH E EPG F VIDEO G YPbPr H PC I L N P Y b d hf j l n p x EPG YPbPr Vol DUAL MENU /EXIT INFO FAV CH-LIST USB FREEZE D F H J K M O Q X a c eg i k m o q o FREEZE p FAV q USB x CH-LIST BUSH | HD Ready LED LCD | User Manual | Customer Helpline 0845 604 0105 L Vol + - M VIDEO ADJ N AUDIO ADJ O SLEEP P DUAL Q ZOOM X CURSOR Y OK a INFO b MENU/EXIT c Yellow Button d Green Button e Blue Button f Red Button g SIZE h MIX i SUBPAGE j TELETEXT k HOLD l SUBTITLE m REVEAL n INDEX P.04 B A C E G I HDMI J MUTE K CH .

User Manual
Page 6
... Battery Cover from remote control handset when it could cause corrosion or battery leakage and may suffer damage: • Never mix used for a long period. BUSH | HD Ready LED LCD | User Manual | Customer Helpline 0845 604 0105 P.05 fig. 1 REMOTE CONTROL 1. Please read the following instructions and handle the remote cont...
... Battery Cover from remote control handset when it could cause corrosion or battery leakage and may suffer damage: • Never mix used for a long period. BUSH | HD Ready LED LCD | User Manual | Customer Helpline 0845 604 0105 P.05 fig. 1 REMOTE CONTROL 1. Please read the following instructions and handle the remote cont...
User Manual
Page 7
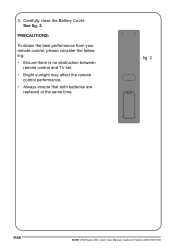
fig. 3 P.06 BUSH | HD Ready LED LCD | User Manual | Customer Helpline 0845 604 0105 See fig. 3. PRECAUTIONS: To obtain the best performance from your remote control, please consider the following: • Ensure there is no obstruction between remote control and TV set. • Bright sunlight may affect the remote control performance. • Always ensure that both batteries are replaced at the same time. 3. Carefully close the Battery Cover.
fig. 3 P.06 BUSH | HD Ready LED LCD | User Manual | Customer Helpline 0845 604 0105 See fig. 3. PRECAUTIONS: To obtain the best performance from your remote control, please consider the following: • Ensure there is no obstruction between remote control and TV set. • Bright sunlight may affect the remote control performance. • Always ensure that both batteries are replaced at the same time. 3. Carefully close the Battery Cover.

User Manual
Page 8
... decrease a setting. In Menu mode, press to increase the Volume. C Source: Use this TV set is Red, which means this button to open the on . BUSH | HD Ready LED LCD | User Manual | Customer Helpline 0845 604 0105 P.07 If the LED color is power on -screen menu. D MENU: Press to toggle...
... decrease a setting. In Menu mode, press to increase the Volume. C Source: Use this TV set is Red, which means this button to open the on . BUSH | HD Ready LED LCD | User Manual | Customer Helpline 0845 604 0105 P.07 If the LED color is power on -screen menu. D MENU: Press to toggle...
User Manual
Page 9
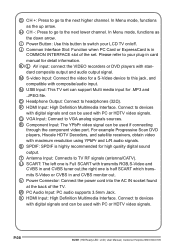
... and CVBS tuner out,the right one is Full SCART with PC or HDTV video signals. W PC Audio Input: PC audio supports 3.5mm Jack. P.08 BUSH | HD Ready LED LCD | User Manual | Customer Helpline 0845 604 0105 In Menu mode, functions as the up arrow. H CH -: Press to go to the...
... and CVBS tuner out,the right one is Full SCART with PC or HDTV video signals. W PC Audio Input: PC audio supports 3.5mm Jack. P.08 BUSH | HD Ready LED LCD | User Manual | Customer Helpline 0845 604 0105 In Menu mode, functions as the up arrow. H CH -: Press to go to the...
User Manual
Page 10
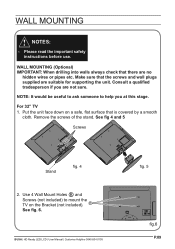
See fig 4 and 5 Screws Stand fig. 4 2. BUSH | HD Ready LED LCD | User Manual | Customer Helpline 0845 604 0105 fig. 5 fig.6 P.09 Consult a qualified tradesperson if you at this stage. For 32" TV 1. ...
See fig 4 and 5 Screws Stand fig. 4 2. BUSH | HD Ready LED LCD | User Manual | Customer Helpline 0845 604 0105 fig. 5 fig.6 P.09 Consult a qualified tradesperson if you at this stage. For 32" TV 1. ...

User Manual
Page 11
Refer to the user instructions supplied with the wall bracket (not included). See fig. 7 W H TV Screen Size (inches) VESA-Compatible Wall bracket (W x H mm) Screw Type 32" 200 x 200 mm Metric 4 x 14 mm fig. 7 P.10 BUSH | HD Ready LED LCD | User Manual | Customer Helpline 0845 604 0105 3. For the Wall Bracket -
Refer to the user instructions supplied with the wall bracket (not included). See fig. 7 W H TV Screen Size (inches) VESA-Compatible Wall bracket (W x H mm) Screw Type 32" 200 x 200 mm Metric 4 x 14 mm fig. 7 P.10 BUSH | HD Ready LED LCD | User Manual | Customer Helpline 0845 604 0105 3. For the Wall Bracket -

User Manual
Page 12
... may use a a signal amplifier (not included). AC POWER CORD CONNECTION NOTE: Make sure your local Voltage is 230V/240V~, 50Hz. 1. See fig. 8 fig. 8 T Antenna Plug BUSH | HD Ready LED LCD | User Manual | Customer Helpline 0845 604 0105 P.11 Connect the Antenna Plug to the mains socket. ANTENNA CONNECTION WARNING: - CONNECTING THE...
... may use a a signal amplifier (not included). AC POWER CORD CONNECTION NOTE: Make sure your local Voltage is 230V/240V~, 50Hz. 1. See fig. 8 fig. 8 T Antenna Plug BUSH | HD Ready LED LCD | User Manual | Customer Helpline 0845 604 0105 P.11 Connect the Antenna Plug to the mains socket. ANTENNA CONNECTION WARNING: - CONNECTING THE...

User Manual
Page 13
... and the Power LED A will change from red to proceed with the installation. Please press [OK] to red. See fig. 9. fig. 11 OK Next P.12 BUSH | HD Ready LED LCD | User Manual | Customer Helpline 0845 604 0105 NOTE: If you can not find this screen, you may press MENU b . See fig...
... and the Power LED A will change from red to proceed with the installation. Please press [OK] to red. See fig. 9. fig. 11 OK Next P.12 BUSH | HD Ready LED LCD | User Manual | Customer Helpline 0845 604 0105 NOTE: If you can not find this screen, you may press MENU b . See fig...
User Manual
Page 14
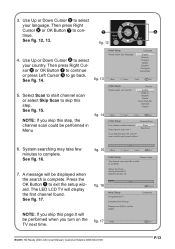
... Channel Scan First, please connect antenna. Analog Channels: 0 Digital Channels: 10 10% fig. 16 Initial Setup Congratulations !! EXIT Cancel Completed fig. 17 Back OK Exit BUSH | HD Ready LED LCD | User Manual | Customer Helpline 0845 604 0105 P.13 Then press Right Cursor X or OK Button Y to complete. System searching may take...
... Channel Scan First, please connect antenna. Analog Channels: 0 Digital Channels: 10 10% fig. 16 Initial Setup Congratulations !! EXIT Cancel Completed fig. 17 Back OK Exit BUSH | HD Ready LED LCD | User Manual | Customer Helpline 0845 604 0105 P.13 Then press Right Cursor X or OK Button Y to complete. System searching may take...
User Manual
Page 15
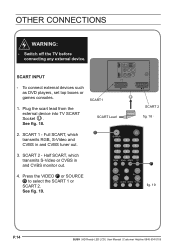
... the SCART 1 or DUAL SCART 2. U SCART1 1. Plug the scart lead from the external device into TV SCART Socket U . SCART 1 - SCART 2 fifgig. .1280 F fig. 19 P.14 BUSH | HD Ready LED LCD | User Manual | Customer Helpline 0845 604 0105
... the SCART 1 or DUAL SCART 2. U SCART1 1. Plug the scart lead from the external device into TV SCART Socket U . SCART 1 - SCART 2 fifgig. .1280 F fig. 19 P.14 BUSH | HD Ready LED LCD | User Manual | Customer Helpline 0845 604 0105

User Manual
Page 16
Connect the (Y, Pb, Pr) cables and audio cables to select the YPbPr input. B See fig. 21. R ffiigg.. 2202 Y Pr Pb EPG YPbPr G fig. 21 BUSH | HD Ready LED LCD | User Manual | Customer Helpline 0845 604 0105 P.15 YPbPr INPUT - See fig. 20. 3. Make sure that the power of the AV device. 4. Turn on the power of the LED LCDTV first and then turn on the TV. Press the YPbPr G or SOURCE B to the Component and Audio Input R on the power of the LED LCD-TV and the AV device are off. 2. For connecting devices such as video cameras. 1.
Connect the (Y, Pb, Pr) cables and audio cables to select the YPbPr input. B See fig. 21. R ffiigg.. 2202 Y Pr Pb EPG YPbPr G fig. 21 BUSH | HD Ready LED LCD | User Manual | Customer Helpline 0845 604 0105 P.15 YPbPr INPUT - See fig. 20. 3. Make sure that the power of the AV device. 4. Turn on the power of the LED LCDTV first and then turn on the TV. Press the YPbPr G or SOURCE B to the Component and Audio Input R on the power of the LED LCD-TV and the AV device are off. 2. For connecting devices such as video cameras. 1.

User Manual
Page 17
... (not supplied) to Audio Input W on the LED LCD-TV. Press the PC H or SOURCE B to external equipment operating guide.) EPG YPbPr H fig. 23 P.16 BUSH | HD Ready LED LCD | User Manual | Customer Helpline 0845 604 0105 See fig. 22. 2. Operate the corresponding external equipment. (Refer to select the PC input...
... (not supplied) to Audio Input W on the LED LCD-TV. Press the PC H or SOURCE B to external equipment operating guide.) EPG YPbPr H fig. 23 P.16 BUSH | HD Ready LED LCD | User Manual | Customer Helpline 0845 604 0105 See fig. 22. 2. Operate the corresponding external equipment. (Refer to select the PC input...

User Manual
Page 18
... AV input. See fig. 24. 3. Turn on the LED LCD-TV first and then turn on the LED LCD-TV first ; ffigig. .2246 EPG YPbPr BUSH | HD Ready LED LCD | User Manual | Customer Helpline 0845 604 0105 F fig. 25 P.17 Connect the audio cables from the AV device's output jacks to...
... AV input. See fig. 24. 3. Turn on the LED LCD-TV first and then turn on the LED LCD-TV first ; ffigig. .2246 EPG YPbPr BUSH | HD Ready LED LCD | User Manual | Customer Helpline 0845 604 0105 F fig. 25 P.17 Connect the audio cables from the AV device's output jacks to...

User Manual
Page 19
... Output O for more detailed information. IMPORTANT: When using headphones always set of stereo headphones (not included) to the COMMON INTERFACE section for private listening. P.18 BUSH | HD Ready LED LCD | User Manual | Customer Helpline 0845 604 0105 Connect a set the Volume control to a low O level before you put the headphones on...
... Output O for more detailed information. IMPORTANT: When using headphones always set of stereo headphones (not included) to the COMMON INTERFACE section for private listening. P.18 BUSH | HD Ready LED LCD | User Manual | Customer Helpline 0845 604 0105 Connect a set the Volume control to a low O level before you put the headphones on...

User Manual
Page 20
...+ L to increase the I , YPbPr G , VIDEO F , PC H or SOURCE B to select the source. to mute the sound temporarily. See fig. 27. A number will disappear. fig. 27 BUSH | HD Ready LED LCD | User Manual | Customer Helpline 0845 604 0105 P.19 Vol See fig. 27. The mute icon will appear on L screen indicating the...
...+ L to increase the I , YPbPr G , VIDEO F , PC H or SOURCE B to select the source. to mute the sound temporarily. See fig. 27. A number will disappear. fig. 27 BUSH | HD Ready LED LCD | User Manual | Customer Helpline 0845 604 0105 P.19 Vol See fig. 27. The mute icon will appear on L screen indicating the...
User Manual
Page 21
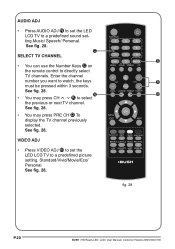
....Music/ Speech/ Personal. VIDEO ADJ • Press VIDEO ADJ M to select the previous or next TV channel. FAV CH-LIST USB FREEZE fig. 28 P.20 BUSH | HD Ready LED LCD | User Manual | Customer Helpline 0845 604 0105
....Music/ Speech/ Personal. VIDEO ADJ • Press VIDEO ADJ M to select the previous or next TV channel. FAV CH-LIST USB FREEZE fig. 28 P.20 BUSH | HD Ready LED LCD | User Manual | Customer Helpline 0845 604 0105

