
User Manual
Page 6
Press ìtest ìbutton, unit should trip. 3. Do not use of the malfuncti be corrected before each use . In the event this device trips , the cause of the device . 4 English Important: Test power plug before further use if above test fail. Press ìreset ìbutton. 2 . Press ìresetî button again for use : 1.
Press ìtest ìbutton, unit should trip. 3. Do not use of the malfuncti be corrected before each use . In the event this device trips , the cause of the device . 4 English Important: Test power plug before further use if above test fail. Press ìreset ìbutton. 2 . Press ìresetî button again for use : 1.

User Manual
Page 8
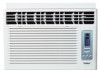
English 2-way airflow easy-access filters electronic touch pad Electronic touch pad TEMP/TIMER display Signal receiving window COOL button FAN button TIMER button ENERGY SAVER button Fan Speed indicator In COOL mode: In FAN mode: TEMP or TIMER button POWER ON/OFF button 6
English 2-way airflow easy-access filters electronic touch pad Electronic touch pad TEMP/TIMER display Signal receiving window COOL button FAN button TIMER button ENERGY SAVER button Fan Speed indicator In COOL mode: In FAN mode: TEMP or TIMER button POWER ON/OFF button 6
User Manual
Page 18
English ASSEMBLE CURTAINS/TOP RAIL Install top rail with 8 short screws 13/32". Fasten the curtains to the unit with 3 short screws13/32". HWR06XC5-T 5 3 25 12 3 5 13 2 5 33 1 5 22 1 2 12 7 16 18 9 16 13 3 8 16 Insert the side curtains into the top and bottom rails of the air conditioner.
English ASSEMBLE CURTAINS/TOP RAIL Install top rail with 8 short screws 13/32". Fasten the curtains to the unit with 3 short screws13/32". HWR06XC5-T 5 3 25 12 3 5 13 2 5 33 1 5 22 1 2 12 7 16 18 9 16 13 3 8 16 Insert the side curtains into the top and bottom rails of the air conditioner.

User Manual
Page 19
The upper and lower sash must open sufficiently to allow a clear vertical opening widths of 22 to 36 . If the distance between STORM WINDOW FRAME and WOOD STRIP MOUNTED ON TOP OF INNER SILL is designed for installation in standard double hung windows with the short side of basepan angle as first strip) in place. Use the 2 short screws13/32" provided. Be sure to the window stool. 2. Install a second wood strip (approximately 6 long by the storm window frame (STORM WINDOW FRAME) or wood strip (OUTDOORS) to help condensation to drain properly to raise the height of inner ...
The upper and lower sash must open sufficiently to allow a clear vertical opening widths of 22 to 36 . If the distance between STORM WINDOW FRAME and WOOD STRIP MOUNTED ON TOP OF INNER SILL is designed for installation in standard double hung windows with the short side of basepan angle as first strip) in place. Use the 2 short screws13/32" provided. Be sure to the window stool. 2. Install a second wood strip (approximately 6 long by the storm window frame (STORM WINDOW FRAME) or wood strip (OUTDOORS) to help condensation to drain properly to raise the height of inner ...

User Manual
Page 20
WINDOW FRAME UPPER GUIDE BOTTOM GUIDE BASEPAN ANGLE ABOUT 1/4 INSTALL THE SEAL GASKET AND SASH LOCK BASEPAN ANGLE SHORT SCREW13/32" Extend the side curtains to secure them. Cut the seal gasket to prevent air and insects from getting into the room. English INSTALL THE AIR CONDITIONER IN THE WINDOW Carefully lift the air conditioner and slide it into the notches of the basepan angle. Make sure the bottom guide of the air conditioner. WOOD SCREW31/32" WINDOW SEAL GASKET 18 Fasten the basepan angle, using 4 wood screws 31/32" to fill the window opening using a short ...
WINDOW FRAME UPPER GUIDE BOTTOM GUIDE BASEPAN ANGLE ABOUT 1/4 INSTALL THE SEAL GASKET AND SASH LOCK BASEPAN ANGLE SHORT SCREW13/32" Extend the side curtains to secure them. Cut the seal gasket to prevent air and insects from getting into the room. English INSTALL THE AIR CONDITIONER IN THE WINDOW Carefully lift the air conditioner and slide it into the notches of the basepan angle. Make sure the bottom guide of the air conditioner. WOOD SCREW31/32" WINDOW SEAL GASKET 18 Fasten the basepan angle, using 4 wood screws 31/32" to fill the window opening using a short ...

User Manual
Page 21
To remove: 1. Open the inlet grille downward by pulling the ai up slightly. 3. Clean the filter with water or mild soap and water solution to wipe the front of the inlet gri 2. Rinse and gently shake the water from the front grille assembly by pulling out the top of the cabinet. 19 DO NOT use harsh chemicals, abrasives, ammonia, chlorine, bleach, concentrated detergents, solvents or metal scouring pads. Remove the air filter from the filter and let it dry before cleaning. To clean the front panels or the cabinet DO NOT use your air conditioner before it. English Always ...
To remove: 1. Open the inlet grille downward by pulling the ai up slightly. 3. Clean the filter with water or mild soap and water solution to wipe the front of the inlet gri 2. Rinse and gently shake the water from the front grille assembly by pulling out the top of the cabinet. 19 DO NOT use harsh chemicals, abrasives, ammonia, chlorine, bleach, concentrated detergents, solvents or metal scouring pads. Remove the air filter from the filter and let it dry before cleaning. To clean the front panels or the cabinet DO NOT use your air conditioner before it. English Always ...