User Manual
Page 1
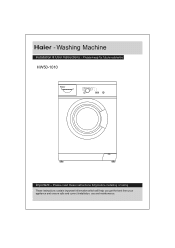
Please read these instructions fully before installing or using These instructions contain important information which will help you get the best from your appliance and ensure safe and correct installation, use and maintenance. - Please keep for future reference HW50-1010 。 30 C 90。C 。 40 C 。 60 C 。 40 C Important - Washing Machine Installation & User Instructions -
Please read these instructions fully before installing or using These instructions contain important information which will help you get the best from your appliance and ensure safe and correct installation, use and maintenance. - Please keep for future reference HW50-1010 。 30 C 90。C 。 40 C 。 60 C 。 40 C Important - Washing Machine Installation & User Instructions -
User Manual
Page 2
... 11 12-13 13 13 14 15-16 15 15 15 16 17 18 18 1 。 30 C 90。C 40。C 60。C 40。C HW50-1010
... 11 12-13 13 13 14 15-16 15 15 15 16 17 18 18 1 。 30 C 90。C 40。C 60。C 40。C HW50-1010
User Manual
Page 3
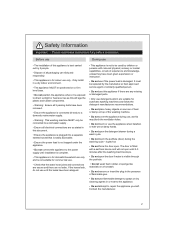
Only install in a dry indoor environment. • The appliance MUST be positioned on a hot wash. • Do not remove or insert the plug in the presence of experience and knowledge, unless they have been removed. • Ensur e the appliance is connected dir ectly to a domestic mains water supply . • Warning: This washing machine MUST only be connected to a cold water supply . • Ensur e all electrical connections ar e as this will not open until 2-3 minutes after the washing machine stops. • Do not open the door if water is visible through the porthole. • Do not...
Only install in a dry indoor environment. • The appliance MUST be positioned on a hot wash. • Do not remove or insert the plug in the presence of experience and knowledge, unless they have been removed. • Ensur e the appliance is connected dir ectly to a domestic mains water supply . • Warning: This washing machine MUST only be connected to a cold water supply . • Ensur e all electrical connections ar e as this will not open until 2-3 minutes after the washing machine stops. • Do not open the door if water is visible through the porthole. • Do not...
User Manual
Page 4
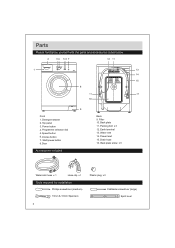
... Parts Please familiarise yourself with the parts and accessories listed below 2 34 56 7 12 11 1 30。C 90。C 。 40C 。 60C 。 40C HW50-1010 8 13 14 15 16 11 11 10 9 Front 1. Detergent drawer 2. Speed button 6. Start/pause button 8. Power button 4. Packing bolt x 3 12. Door Accessories included Back 9. Earth...
... Parts Please familiarise yourself with the parts and accessories listed below 2 34 56 7 12 11 1 30。C 90。C 。 40C 。 60C 。 40C HW50-1010 8 13 14 15 16 11 11 10 9 Front 1. Detergent drawer 2. Speed button 6. Start/pause button 8. Power button 4. Packing bolt x 3 12. Door Accessories included Back 9. Earth...

User Manual
Page 5
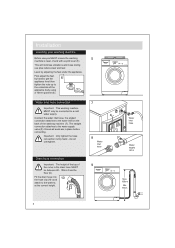
Note: When opened, water droplets may be removed before use . b: Remove the drain hose and power cable from inside the back of the washing machine (4). c: Replace the back cover plate and refit the screws. Installation Unpacking your washing machine Caution: 2 people are worn. this is normal as each appliance is recommended that gloves are required to support the internal components during transit, these MUST be visible in a safe place for possible later use . Remove the 3 rubber spacers from the clips on the back of corr ectly . Hose/ cable clips 3 4 Note: Keep the...
Note: When opened, water droplets may be removed before use . b: Remove the drain hose and power cable from inside the back of the washing machine (4). c: Replace the back cover plate and refit the screws. Installation Unpacking your washing machine Caution: 2 people are worn. this is normal as each appliance is recommended that gloves are required to support the internal components during transit, these MUST be visible in a safe place for possible later use . Remove the 3 rubber spacers from the clips on the back of corr ectly . Hose/ cable clips 3 4 Note: Keep the...
User Manual
Page 6
... 10 attach to the water supply valve (8). at the correct height. 5 30。C 90。C 40。C 60。C 40。C HW50-1010 7 Water inlet hose 8 Water inlet hose Water supply valve 9 HW50-1010W 。 30C 90。C 40。C 60。C 40。C Max. 100cm Min. 80cm 5 Connect the water inlet hose...
... 10 attach to the water supply valve (8). at the correct height. 5 30。C 90。C 40。C 60。C 40。C HW50-1010 7 Water inlet hose 8 Water inlet hose Water supply valve 9 HW50-1010W 。 30C 90。C 40。C 60。C 40。C Max. 100cm Min. 80cm 5 Connect the water inlet hose...
User Manual
Page 7
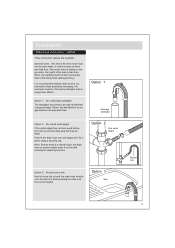
Push fit the drain hose onto the spigot and fix in the drain hose to hook the drain hose directly over the side of approximately 38mm, this will continuously drain while being filled (self-syphoning). Option 2 Sink outlet spigot Option 3: Directly into a sink Use the hose clip to prevent waste water from the sink entering the washing machine. Option 1: Into a drainage standpipe The standpipe should have an internal diameter of a sink (ensuring the hose is a raised loop in place using a securing clip. Option 3 Sink Raised loop 6 It is recommended that may be fitted....
Push fit the drain hose onto the spigot and fix in the drain hose to hook the drain hose directly over the side of approximately 38mm, this will continuously drain while being filled (self-syphoning). Option 2 Sink outlet spigot Option 3: Directly into a sink Use the hose clip to prevent waste water from the sink entering the washing machine. Option 1: Into a drainage standpipe The standpipe should have an internal diameter of a sink (ensuring the hose is a raised loop in place using a securing clip. Option 3 Sink Raised loop 6 It is recommended that may be fitted....
User Manual
Page 8
... in the technical specifi cations (page 18) and the appliance rating plate (located where shown). 30。C 90。C 。 40C 。 60C 。 40C HW50-1010 • The appliance should be removed and the plug disposed of the wir es in the power cable may not correspond with the letter N. Earth...
... in the technical specifi cations (page 18) and the appliance rating plate (located where shown). 30。C 90。C 。 40C 。 60C 。 40C HW50-1010 • The appliance should be removed and the plug disposed of the wir es in the power cable may not correspond with the letter N. Earth...
User Manual
Page 9
... 5. Press it again to switch on . 4. Speed button 4 Touch this button to switch it off. 30。C 90。C 。 40 C 60。C 。 40 C HW50-1010 2 3 45 6 1 2 30。C 90。C 。 40 C 。 60 C 。 40 C 3. Programme knob 4.
... 5. Press it again to switch on . 4. Speed button 4 Touch this button to switch it off. 30。C 90。C 。 40 C 60。C 。 40 C HW50-1010 2 3 45 6 1 2 30。C 90。C 。 40 C 。 60 C 。 40 C 3. Programme knob 4.
User Manual
Page 10
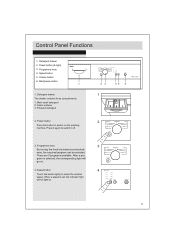
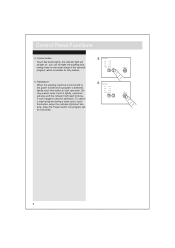
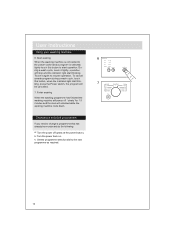
Control Panel Functions 5. Du- To cancel a wash program during a wash cycle, touch this button, when the indicator light start blinking. ring a wash cycle, touch it again to start operation. king, press the Power switch, the program will stop and the indicator light start blin- Start/pause 6 When the washing machine is connected to the power socket and a program is suitable for dirty clothes. 6. you can increase the washing time, rinsing times in main wash stage of the selected program, which is selected, lightly touch this button lightly, the indicator light ...
Control Panel Functions 5. Du- To cancel a wash program during a wash cycle, touch this button, when the indicator light start blinking. ring a wash cycle, touch it again to start operation. king, press the Power switch, the program will stop and the indicator light start blin- Start/pause 6 When the washing machine is connected to the power socket and a program is suitable for dirty clothes. 6. you can increase the washing time, rinsing times in main wash stage of the selected program, which is selected, lightly touch this button lightly, the indicator light ...
User Manual
Page 12
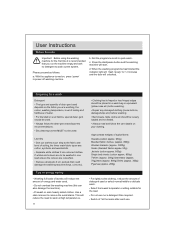
Please proceed as follows: a: With the appliance turned on energy saving • Washing full loads of laundry will start /pause button and the washing machine will r educe the amount of energy and water used . Laundry • Sort out clothes accor ding to the fabric and level of soiling, the three main fabric types are colourfast. • Remove all objects fr om pockets that could damage the washing machine (keys, coins etc). • Clothing that is recommended that you ar e washing, the colour, washing temperature, level of soiling and hardness of f at the mains after each use...
Please proceed as follows: a: With the appliance turned on energy saving • Washing full loads of laundry will start /pause button and the washing machine will r educe the amount of energy and water used . Laundry • Sort out clothes accor ding to the fabric and level of soiling, the three main fabric types are colourfast. • Remove all objects fr om pockets that could damage the washing machine (keys, coins etc). • Clothing that is recommended that you ar e washing, the colour, washing temperature, level of soiling and hardness of f at the mains after each use...
User Manual
Page 13
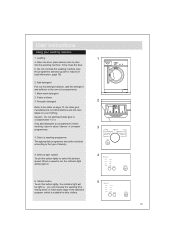
Only add detergent to select the desired speed. Select a spin speed Touch this button lightly, the indicator light will be selected according to the type of the selected program, which is set, the indicator light will be light on . 1 。 30C 。 90C 40。C 60。C 40。C 2 3 。 30C 。 90C 40。C 60。C 40。C 4 5. User Instructions Using your clothing. Caution: Do not add liquid deter gent to the table on page 10, the deter gent manufacturers recommendations and the care labels on your washing machine 1. Intense ...
Only add detergent to select the desired speed. Select a spin speed Touch this button lightly, the indicator light will be selected according to the type of the selected program, which is set, the indicator light will be light on . 1 。 30C 。 90C 40。C 60。C 40。C 2 3 。 30C 。 90C 40。C 60。C 40。C 4 5. User Instructions Using your clothing. Caution: Do not add liquid deter gent to the table on page 10, the deter gent manufacturers recommendations and the care labels on your washing machine 1. Intense ...
User Manual
Page 14
Finish washing When the washing programme has finished the washing machine will power off (press at the power button). c: Set the programme selection dial to change a programme that has already been selected do the following: a: Turn the power off 'slowly' for 1-3 minutes and the door will stop and the indicator light start blinking. b: Turn the power back on. Du- Changing a selected programme If you need to the new programme as required. 13 Touch it lightly ,operation will unlocked while the washing machine cools down. User Instructions Using your washing machine 6....
Finish washing When the washing programme has finished the washing machine will power off (press at the power button). c: Set the programme selection dial to change a programme that has already been selected do the following: a: Turn the power off 'slowly' for 1-3 minutes and the door will stop and the indicator light start blinking. b: Turn the power back on. Du- Changing a selected programme If you need to the new programme as required. 13 Touch it lightly ,operation will unlocked while the washing machine cools down. User Instructions Using your washing machine 6....
User Manual
Page 15
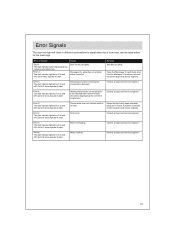
Error message Error 1: The start indicator lighted on 0.2s and off 0.2s for 5 times,repeate 4s later . Clean the filter (page 15) and check drain hose for 7 times,repeate 4s later . Error 5: The start indicator wasn't lighted,and the buzzer sound abnormaly. Timer error. Error 8: The start indicator lighted on 0.2s and off 0.2s for 8 times,repeate 4s later . Error 2: The start indicator lighted on 0.2s and off 0.2s for twice,repeate 4s later . Error 3: The start indicator lighted on 0.2s and off 0.2s for the meanings. Contact an appr oved service engineer. ...
Error message Error 1: The start indicator lighted on 0.2s and off 0.2s for 5 times,repeate 4s later . Clean the filter (page 15) and check drain hose for 7 times,repeate 4s later . Error 5: The start indicator wasn't lighted,and the buzzer sound abnormaly. Timer error. Error 8: The start indicator lighted on 0.2s and off 0.2s for 8 times,repeate 4s later . Error 2: The start indicator lighted on 0.2s and off 0.2s for twice,repeate 4s later . Error 3: The start indicator lighted on 0.2s and off 0.2s for the meanings. Contact an appr oved service engineer. ...
User Manual
Page 16
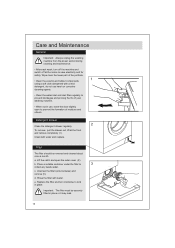
Wipe clean the lower part of the porthole. • Clean the exterior and rubber components using a soft cloth dampened with a mild 1 detergent, do not use , leave the door slightly open the outer cover (2). Filter The filter should be securely fitted in place or it may leak. 15 WM-1050 30。C 40。C 90。6C0。C 40。C Place a suitable container under the filter to pr event the formation of moisture and odours. Unscrew the filter (anti-clockwise) and remove (3). To remove: pull the drawer out, lift at the mains to prevent blockages and pr olong ...
Wipe clean the lower part of the porthole. • Clean the exterior and rubber components using a soft cloth dampened with a mild 1 detergent, do not use , leave the door slightly open the outer cover (2). Filter The filter should be securely fitted in place or it may leak. 15 WM-1050 30。C 40。C 90。6C0。C 40。C Place a suitable container under the filter to pr event the formation of moisture and odours. Unscrew the filter (anti-clockwise) and remove (3). To remove: pull the drawer out, lift at the mains to prevent blockages and pr olong ...

User Manual
Page 17
b: Remove the plastic plugs fr om the 3 packing bolt holes (insert - 6). e: Replace the back cover plate and refit the screws. 16 c: Position all 3 packing bolts and tighten using a 13mm spanner or large 6 flatblade screwdriver (6). a: Remove the back cover plate, by removing the 3 screws shown and sliding down the back cover plate (4 & 5). d: Line up the holes and insert all 3 rubber spacers inside the back of the washing machine (6). Care and Maintenance Transporting the washing machine If the washing machine is to be transported, the packing bolts and rubber spacers ...
b: Remove the plastic plugs fr om the 3 packing bolt holes (insert - 6). e: Replace the back cover plate and refit the screws. 16 c: Position all 3 packing bolts and tighten using a 13mm spanner or large 6 flatblade screwdriver (6). a: Remove the back cover plate, by removing the 3 screws shown and sliding down the back cover plate (4 & 5). d: Line up the holes and insert all 3 rubber spacers inside the back of the washing machine (6). Care and Maintenance Transporting the washing machine If the washing machine is to be transported, the packing bolts and rubber spacers ...
User Manual
Page 18
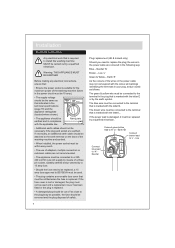
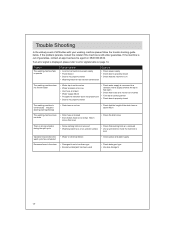
Problem The washing machine fails to operate Possible causes Solutions • Incorrect connection to power supply • Power failur e • Door is not properly closed • Washing machine has not been switched on • Check power supply • Check door is properly closed The washing machine is continuously lling and draining (self-syphoning) The washing machine does not drain • Drain hose is too low • Drain hose is blocked • End of drain hose is mor e than 100cm above floor level • Check that the height of the drain hose is above 80cm • ...
Problem The washing machine fails to operate Possible causes Solutions • Incorrect connection to power supply • Power failur e • Door is not properly closed • Washing machine has not been switched on • Check power supply • Check door is properly closed The washing machine is continuously lling and draining (self-syphoning) The washing machine does not drain • Drain hose is too low • Drain hose is blocked • End of drain hose is mor e than 100cm above floor level • Check that the height of the drain hose is above 80cm • ...
User Manual
Page 19
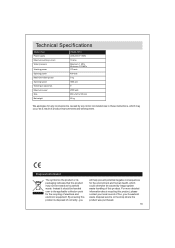
... Power supply Maximum working current Water pr essure Washing power Spinning power Maximum washing load Spinning speed Washing pr ogrammes Maximum power Size Net weight HW50-1010 (220-240) V~/50Hz 10 amp Maximum: 1 MPa Minimum: 0.03 MPa 170 watt 400 watt 5 kg 1000 rpm 9 2000 watt 850 x 520 x 595 mm 65 kg...
... Power supply Maximum working current Water pr essure Washing power Spinning power Maximum washing load Spinning speed Washing pr ogrammes Maximum power Size Net weight HW50-1010 (220-240) V~/50Hz 10 amp Maximum: 1 MPa Minimum: 0.03 MPa 170 watt 400 watt 5 kg 1000 rpm 9 2000 watt 850 x 520 x 595 mm 65 kg...