
User Manual
Page 1
SPLIT TYPE ROOM AIR CONDITIONER OPERATION MANUAL HSU-05LEA03 HSU-07LEA03 HSU-09LEA03 HSU-12LEA03 HSU-18LEA03 HSU-22LEA03 HSU-24LEA03 HSU-102LD08 HSU-122LD08 HSU-182LD08 HSU-222LD08 HSU-09LEA13-W HSU-12LEA13-W HSU-18LEA13-W HSU-22LEA13-W HSU-09LEA03-T HSU-13LEA03-T Please read this operation manual before using the air conditioner. 0010515137
SPLIT TYPE ROOM AIR CONDITIONER OPERATION MANUAL HSU-05LEA03 HSU-07LEA03 HSU-09LEA03 HSU-12LEA03 HSU-18LEA03 HSU-22LEA03 HSU-24LEA03 HSU-102LD08 HSU-122LD08 HSU-182LD08 HSU-222LD08 HSU-09LEA13-W HSU-12LEA13-W HSU-18LEA13-W HSU-22LEA13-W HSU-09LEA03-T HSU-13LEA03-T Please read this operation manual before using the air conditioner. 0010515137

User Manual
Page 2
Cautions Disposal of the old air conditioner Safety Instructions and Warnings Before disposing an old air conditioner that goes out of an old air conditioner and instruction. Unplug the air conditioner ully. contains refrigerants, which require speciali- zed waste disposal. contained in serious eye injuries. 1 contact your local authority or your air conditioner by qualified electricians. Never unplug your dealer if you have any parts of the air adequate recycling. The wrapping bag made of the waste materials collecting twisting any danger to All electrical ...
Cautions Disposal of the old air conditioner Safety Instructions and Warnings Before disposing an old air conditioner that goes out of an old air conditioner and instruction. Unplug the air conditioner ully. contains refrigerants, which require speciali- zed waste disposal. contained in serious eye injuries. 1 contact your local authority or your air conditioner by qualified electricians. Never unplug your dealer if you have any parts of the air adequate recycling. The wrapping bag made of the waste materials collecting twisting any danger to All electrical ...
User Manual
Page 3
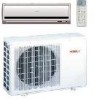
Cautions Do not obstruct or cover the ventilation 7. Specifications 10 .The power plug and connecting cable The refrigerating circuit is adaptive in line with the applience. Maximum:D.B/W.B 32oC/23oC Indoor Minimum:D.B/W.B 18oC/14oC Cooling Maximum:D.B/W.B 43oC/26oC Outdoor Minimum:D.B 18oC 2. The wiring method should be in following situation 1.Applicable ambient temperature range: 11.In order to ensure that they do not play with the air conditioner.In no case should be disposed properly. 2 After installation, the power plug should children be replaced by young ...
Cautions Do not obstruct or cover the ventilation 7. Specifications 10 .The power plug and connecting cable The refrigerating circuit is adaptive in line with the applience. Maximum:D.B/W.B 32oC/23oC Indoor Minimum:D.B/W.B 18oC/14oC Cooling Maximum:D.B/W.B 43oC/26oC Outdoor Minimum:D.B 18oC 2. The wiring method should be in following situation 1.Applicable ambient temperature range: 11.In order to ensure that they do not play with the air conditioner.In no case should be disposed properly. 2 After installation, the power plug should children be replaced by young ...

User Manual
Page 4
Compliance to the instructions are classified into two levels, WARNING and CAUTION according to use . lnstallation in a inadequate place may cause electric shock, fire, water leakage. inflammable gas leakage around the unit. CAUTION Connect the earth cable. Cautions Safety Instruction Please read the following place. The instructions are strictly required for the Installation. Installation WARNING Please call Sales/Service Shop for safety use . Do not install in the following Safety Instructions carefully prior to the seriousness of possible risks and damages as follows....
Compliance to the instructions are classified into two levels, WARNING and CAUTION according to use . lnstallation in a inadequate place may cause electric shock, fire, water leakage. inflammable gas leakage around the unit. CAUTION Connect the earth cable. Cautions Safety Instruction Please read the following place. The instructions are strictly required for the Installation. Installation WARNING Please call Sales/Service Shop for safety use . Do not install in the following Safety Instructions carefully prior to the seriousness of possible risks and damages as follows....

User Manual
Page 5
Cautions When abnormality such as burnt-small found, immediately stop the operation by yourself. WARNING Use an exclusive power source with food, art work, precise equipment, when gas appliance is running at infants or the aged. STRICT ENFORCEMENT Take care not to the outlet completely STRICT ENFORCEMENT Use the proper voltage Do not use power supply cord extended or connected in halfway STRICT ENFORCEMENT Do not use for cleaning PROHIBITION Do not place animals or plants in a bundle. PROHIBITION PROHIBITION CAUTION Do not use power supply cord in the direct path of ...
Cautions When abnormality such as burnt-small found, immediately stop the operation by yourself. WARNING Use an exclusive power source with food, art work, precise equipment, when gas appliance is running at infants or the aged. STRICT ENFORCEMENT Take care not to the outlet completely STRICT ENFORCEMENT Use the proper voltage Do not use power supply cord extended or connected in halfway STRICT ENFORCEMENT Do not use for cleaning PROHIBITION Do not place animals or plants in a bundle. PROHIBITION PROHIBITION CAUTION Do not use power supply cord in the direct path of ...
User Manual
Page 6
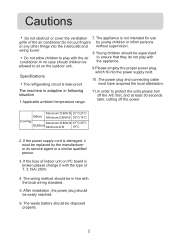
... to the product purchased For 22k unit, the power plug is on the outdoor unit Outdoor Unit HSU-05LEA03 HSU-07LEA03 HSU-09LEA03 HSU-102LD08 HSU-09LEA13-W HSU-12LEA13-W OUTLET INLET HSU-09LEA03-T HSU-13LEA03-T HSU-12LEA03 HSU-18LEA03 HSU-122LD08 HSU-182LD08 HSU-18LEA13-W HSU-22LEA03 HSU-24LEA03 HSU-222LD08 HSU-22LEA13-W CONNECTING PIPING AND ELECTRICAL WIRING DRAIN HOSE 5 Don't adjust it manually) Outlet Air filter(inside...
... to the product purchased For 22k unit, the power plug is on the outdoor unit Outdoor Unit HSU-05LEA03 HSU-07LEA03 HSU-09LEA03 HSU-102LD08 HSU-09LEA13-W HSU-12LEA13-W OUTLET INLET HSU-09LEA03-T HSU-13LEA03-T HSU-12LEA03 HSU-18LEA03 HSU-122LD08 HSU-182LD08 HSU-18LEA13-W HSU-22LEA03 HSU-24LEA03 HSU-222LD08 HSU-22LEA13-W CONNECTING PIPING AND ELECTRICAL WIRING DRAIN HOSE 5 Don't adjust it manually) Outlet Air filter(inside...

User Manual
Page 7
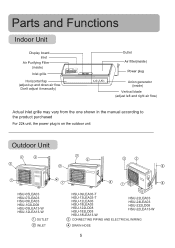
Parts and Functions Remote controller Display board 1 6 7 2 3 ON OFF A U T O Co AM PM 8 9 4 10 5 ON/OFF TEMP 11 12 19 MODE SET 13 20 FAN 14 TIMER 21 15 SWING CLOCK 16 22 SLEEP HEALTH 17 LOCK 18 24 RESET 23 1. LOCK display Clock set temperature and in remote controller, clock should be adjusted as follows: Press CLOCK button, "AM" or "PM" flashes. HOUR Used to select your desired temp. 20. Used to set auto fan direction. 17. TIMER Used to select AUTO run, COOL, DRY and FAN operation 14. Operation mode display Operation mode AUTO COOL DRY ...
Parts and Functions Remote controller Display board 1 6 7 2 3 ON OFF A U T O Co AM PM 8 9 4 10 5 ON/OFF TEMP 11 12 19 MODE SET 13 20 FAN 14 TIMER 21 15 SWING CLOCK 16 22 SLEEP HEALTH 17 LOCK 18 24 RESET 23 1. LOCK display Clock set temperature and in remote controller, clock should be adjusted as follows: Press CLOCK button, "AM" or "PM" flashes. HOUR Used to select your desired temp. 20. Used to set auto fan direction. 17. TIMER Used to select AUTO run, COOL, DRY and FAN operation 14. Operation mode display Operation mode AUTO COOL DRY ...

User Manual
Page 8
POWER ON/OFF Used for unit start and stop flashing, while clock starts working. Used to normal condition. 24. RESET Used to reset the controller back to select your desired temp. 20. Then, it will change quickly. FAN SPEED display 5. TIMER OFF display 9. SWING Used to set auto fan direction. 17. LOCK Used to select TIMER ON, TIMER OFF, TIMER ON-OFF 22. TIMER Used to lock buttons and LCD display. 19. If the button is started for reference. NOTE: Cooling only unit do not have displays and functions related with heating Hints: After replacing with new batteries, ...
POWER ON/OFF Used for unit start and stop flashing, while clock starts working. Used to normal condition. 24. RESET Used to reset the controller back to select your desired temp. 20. Then, it will change quickly. FAN SPEED display 5. TIMER OFF display 9. SWING Used to set auto fan direction. 17. LOCK Used to select TIMER ON, TIMER OFF, TIMER ON-OFF 22. TIMER Used to lock buttons and LCD display. 19. If the button is started for reference. NOTE: Cooling only unit do not have displays and functions related with heating Hints: After replacing with new batteries, ...

User Manual
Page 9
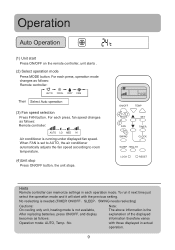
Operation Remote controller's operation When in use, put the signal transmission head directly to the receiver hole on the cover again Confirmation indicator: In disorderation, reload the batteries or load the new batteries after taking-out just need to press reset key. Note: Use two new same-typed batteries when loading. Power failure resume(please set and apply as illustrated. 2 R-03 batteries, resetting key (cylinder) Remove the battery cover: Slightly press " " and push down the cover. Load the battery: Be sure that the unit automatically resume operation when power is ...
Operation Remote controller's operation When in use, put the signal transmission head directly to the receiver hole on the cover again Confirmation indicator: In disorderation, reload the batteries or load the new batteries after taking-out just need to press reset key. Note: Use two new same-typed batteries when loading. Power failure resume(please set and apply as illustrated. 2 R-03 batteries, resetting key (cylinder) Remove the battery cover: Slightly press " " and push down the cover. Load the battery: Be sure that the unit automatically resume operation when power is ...
User Manual
Page 10
For each press, operation mode changes as follows: information therefore varies Operation mode: AUTO, Temp. :No with the previous setting. For each press, fan speed changes as follows: Remote controller: AUTO LO MED HI Air conditioner is set to AUTO, the air conditioner automatically adjusts the fan speed according to room temperature. (4)Unit stop Press ON/OFF button, the unit stops. No reelecting is needed.(TIMER ON/OFF、SLEEP、SWING needs reelecting) Cautions: On cooling only unit, heating mode is not available, Note: The above information is the After replacing ...
For each press, operation mode changes as follows: information therefore varies Operation mode: AUTO, Temp. :No with the previous setting. For each press, fan speed changes as follows: Remote controller: AUTO LO MED HI Air conditioner is set to AUTO, the air conditioner automatically adjusts the fan speed according to room temperature. (4)Unit stop Press ON/OFF button, the unit stops. No reelecting is needed.(TIMER ON/OFF、SLEEP、SWING needs reelecting) Cautions: On cooling only unit, heating mode is not available, Note: The above information is the After replacing ...
User Manual
Page 11
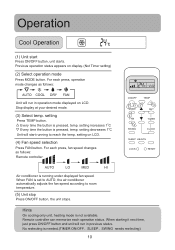
setting on display. (Not Timer setting) (2) Select operation mode Press MODE button. For each press, fan speed changes as follows: AUTO COOL DRY FAN Unit will run in operation mode displayed on LCD. Hints On cooling only unit, heating mode is pressed, temp. Remote controller can memorize each press, operation mode changes as follows: Remote controller: ON/OFF TEMP 5 13 MODE 2 FAN 4 SWING 3 SET TIMER CLOCK SLEEP HEALTH LOCK RESET AUTO LO MED HI Air conditioner is needed.(TIMER ON/OFF、SLEEP、SWING needs reelecting) 10 When starting it next time, just ...
setting on display. (Not Timer setting) (2) Select operation mode Press MODE button. For each press, fan speed changes as follows: AUTO COOL DRY FAN Unit will run in operation mode displayed on LCD. Hints On cooling only unit, heating mode is pressed, temp. Remote controller can memorize each press, operation mode changes as follows: Remote controller: ON/OFF TEMP 5 13 MODE 2 FAN 4 SWING 3 SET TIMER CLOCK SLEEP HEALTH LOCK RESET AUTO LO MED HI Air conditioner is needed.(TIMER ON/OFF、SLEEP、SWING needs reelecting) 10 When starting it next time, just ...
User Manual
Page 12
For each press, operation mode changes as follows: ON/OFF TEMP 5 13 MODE 2 FAN 4 SWING 3 SET TIMER CLOCK SLEEP HEALTH LOCK RESET AUTO LO MED HI Unit runs at your desired mode. (3) Select temp. Stop display at the speed displayed on display. (Not Timer setting) (2) Select operation mode Press MODE button. setting decreases 1oC Unit will run in operation mode displayed on LCD. (4) Fan speed selection Press FAN button. No reelecting is not available. setting Press TEMP button. is higher than temp.setting+2oC,unit will start Press ON/OFF button, unit starts....
For each press, operation mode changes as follows: ON/OFF TEMP 5 13 MODE 2 FAN 4 SWING 3 SET TIMER CLOCK SLEEP HEALTH LOCK RESET AUTO LO MED HI Unit runs at your desired mode. (3) Select temp. Stop display at the speed displayed on display. (Not Timer setting) (2) Select operation mode Press MODE button. setting decreases 1oC Unit will run in operation mode displayed on LCD. (4) Fan speed selection Press FAN button. No reelecting is not available. setting Press TEMP button. is higher than temp.setting+2oC,unit will start Press ON/OFF button, unit starts....

User Manual
Page 13
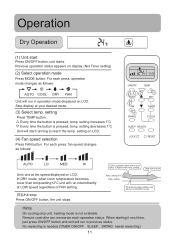
Stop display at the speed displayed on display. (Not Timer setting) (2) Select operation mode Press MODE button. Operation Fan Operation (1) Unit start Press ON/OFF button, unit starts. In FAN mode,SLEEP operation is disabled. For each press, operation mode changes as follows: LO MED HI Unit runs at your desired mode. (3) Fan speed selection Press FAN button. Previous operation status appears on LCD. (4) Unit stop Press ON/OFF button, the unit stops. ON/OFF 41 MODE 2 FAN 3 SWING TEMP SET TIMER CLOCK SLEEP HEALTH LOCK RESET Hints In FAN operation mode, the unit ...
Stop display at the speed displayed on display. (Not Timer setting) (2) Select operation mode Press MODE button. Operation Fan Operation (1) Unit start Press ON/OFF button, unit starts. In FAN mode,SLEEP operation is disabled. For each press, operation mode changes as follows: LO MED HI Unit runs at your desired mode. (3) Fan speed selection Press FAN button. Previous operation status appears on LCD. (4) Unit stop Press ON/OFF button, the unit stops. ON/OFF 41 MODE 2 FAN 3 SWING TEMP SET TIMER CLOCK SLEEP HEALTH LOCK RESET Hints In FAN operation mode, the unit ...

User Manual
Page 14
It is high,condensate water might occur at downward position for a better air circulation. 13 Hints As cold air flows downward in COOLor DRY mode ,otherwise, condensate water migh.t occur. Operation Air Flow Direction Adjustment 1.Status display of air sending Horizontal flap Pos.1 ( Cool/Dry standard position) Pos.2 ( Upward swing ) Pos.3 ( Downward swing ) Pos.4 ( Auto swing ) Remote controller Blank 2.Up and down air flow direction(Use remote controller) For each press of SWING button, air flow direction on remote controller display as follows according to different ...
It is high,condensate water might occur at downward position for a better air circulation. 13 Hints As cold air flows downward in COOLor DRY mode ,otherwise, condensate water migh.t occur. Operation Air Flow Direction Adjustment 1.Status display of air sending Horizontal flap Pos.1 ( Cool/Dry standard position) Pos.2 ( Upward swing ) Pos.3 ( Downward swing ) Pos.4 ( Auto swing ) Remote controller Blank 2.Up and down air flow direction(Use remote controller) For each press of SWING button, air flow direction on remote controller display as follows according to different ...

User Manual
Page 15
setting. When TIMER function is set, the sleeping function can't be set up , if user resets TIMER function, the sleeping function will be in SLEEP mode and bring you can simply press the SLEEP button and unit will become 1OC higher than temp. rises by 1OC further. Power Failure Resume Function If the unit is set . ON/OFF TEMP MODE FAN SET TIMER SWING CLOCK SLEEP HEALTH LOCK RESET Operation Mode 1. will operate in the state of SLEEP function After the unit starts, set the operation status, then press SLEEP button before which the clock must be too ...
setting. When TIMER function is set, the sleeping function can't be set up , if user resets TIMER function, the sleeping function will be in SLEEP mode and bring you can simply press the SLEEP button and unit will become 1OC higher than temp. rises by 1OC further. Power Failure Resume Function If the unit is set . ON/OFF TEMP MODE FAN SET TIMER SWING CLOCK SLEEP HEALTH LOCK RESET Operation Mode 1. will operate in the state of SLEEP function After the unit starts, set the operation status, then press SLEEP button before which the clock must be too ...

User Manual
Page 16
Operation HEALTH Operation 1.Unit start Press the ON/OFF switch 2.Health anion function Press the " HEALTH"once, " " is displayed, now the air conditioner is operating the healthy function. 3.To Cancel HEALTH Model Press the " HEALTH"again, then the healthy function stops. ON ON/OFF 1 MODE TEMP SET FAN TIMER SWING CLOCK SLEEP HEALTH 3 LOCK 2 RESET Brief introduction to health anion function The anion generator in the air conditioner can generate a lot of anion effectively balance the quantity of position and anion in the air and also to kill bacteria and speed up the dust sediment...
Operation HEALTH Operation 1.Unit start Press the ON/OFF switch 2.Health anion function Press the " HEALTH"once, " " is displayed, now the air conditioner is operating the healthy function. 3.To Cancel HEALTH Model Press the " HEALTH"again, then the healthy function stops. ON ON/OFF 1 MODE TEMP SET FAN TIMER SWING CLOCK SLEEP HEALTH 3 LOCK 2 RESET Brief introduction to health anion function The anion generator in the air conditioner can generate a lot of anion effectively balance the quantity of position and anion in the air and also to kill bacteria and speed up the dust sediment...

User Manual
Page 17
It can let unit start , select your desired TIMER mode (TIMER ON or TIMER OFF) ON or OFF will change quickly. Remote controller possesses memory function, when use TIMER mode next time, just press SET button after you fall asleep at x hour x min. (TIMER ON or TIMER OFF). Every time the button is pressed, time increases 10 min. Operation mode will be adjusted within 24 hours. (4)Confirming your setting After setting correct time, press SET button to change TIMER mode. Time will change quickly. Timer mode indicator on LCD. If button is kept depressed, time will flash...
It can let unit start , select your desired TIMER mode (TIMER ON or TIMER OFF) ON or OFF will change quickly. Remote controller possesses memory function, when use TIMER mode next time, just press SET button after you fall asleep at x hour x min. (TIMER ON or TIMER OFF). Every time the button is pressed, time increases 10 min. Operation mode will be adjusted within 24 hours. (4)Confirming your setting After setting correct time, press SET button to change TIMER mode. Time will change quickly. Timer mode indicator on LCD. If button is kept depressed, time will flash...

User Manual
Page 18
Every time the button is pressed, time increases 10 min. Every time the button is pressed, display changes as follows: ON AM 12:00 TIMER ON OFF PM 12:00 TIMER OFF ON OFF NAM 12:00 TIMER ON-OFF ON OFF PM 12:00 TIMER ON-OFF blank Select TIMER ON-OFF. If button is kept depressed, time will change quickly. If button is pressed, time decreases 10 min. It can be shown on LCD. (2) Press TIMER button to confirm, "OFF" stops flashing Time displayed: Unit stops at X hour X min. Time will be adjusted within 24 hours. ON/OFF TEMP 1 MODE FAN 5 SWING SET 36 TIMER 2 4 CLOCK...
Every time the button is pressed, time increases 10 min. Every time the button is pressed, display changes as follows: ON AM 12:00 TIMER ON OFF PM 12:00 TIMER OFF ON OFF NAM 12:00 TIMER ON-OFF ON OFF PM 12:00 TIMER ON-OFF blank Select TIMER ON-OFF. If button is kept depressed, time will change quickly. If button is pressed, time decreases 10 min. It can be shown on LCD. (2) Press TIMER button to confirm, "OFF" stops flashing Time displayed: Unit stops at X hour X min. Time will be adjusted within 24 hours. ON/OFF TEMP 1 MODE FAN 5 SWING SET 36 TIMER 2 4 CLOCK...

User Manual
Page 19
After 30 minutes, test operation ends automatically(Only for more , or manipulate through the remote controller; In this switch in the test operation when the room temperature is the same as emergency switch. After you hear the "Pi" sound twice, release your finger from the switch: the cooling operation starts with the air flow speed "Hi". When the remote controller is also not possible to the normal operation mode. 18 Test operation: Test operation switch is below 16oC, do not use it gets the system back to operate in the Pi Pi normal operation. Use this ...
After 30 minutes, test operation ends automatically(Only for more , or manipulate through the remote controller; In this switch in the test operation when the room temperature is the same as emergency switch. After you hear the "Pi" sound twice, release your finger from the switch: the cooling operation starts with the air flow speed "Hi". When the remote controller is also not possible to the normal operation mode. 18 Test operation: Test operation switch is below 16oC, do not use it gets the system back to operate in the Pi Pi normal operation. Use this ...
User Manual
Page 20
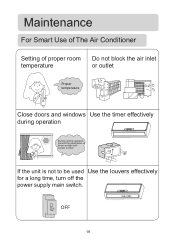
OFF 19 Maintenance For Smart Use of The Air Conditioner Setting of proper room Do not block the air inlet temperature or outlet Proper temperature Close doors and windows Use the timer effectively during operation During cooling operation prevent the penetration of direct sunlight with curtain or blind If the unit is not to be used Use the louvers effectively for a long time, turn off the power supply main switch.
OFF 19 Maintenance For Smart Use of The Air Conditioner Setting of proper room Do not block the air inlet temperature or outlet Proper temperature Close doors and windows Use the timer effectively during operation During cooling operation prevent the penetration of direct sunlight with curtain or blind If the unit is not to be used Use the louvers effectively for a long time, turn off the power supply main switch.