User Manual
Page 5
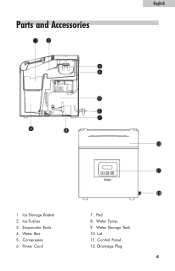
Water Box 5. Water Storage Tank 10. Ice Pusher 3. Compressor 6. Power Cord 7. Lid 11. Ice Storage Basket 2. Evaporator Rods 4. Drainage Plug 4 Control Panel 12. English Parts and Accessories 1. Pad 8. Water Pump 9.
Water Box 5. Water Storage Tank 10. Ice Pusher 3. Compressor 6. Power Cord 7. Lid 11. Ice Storage Basket 2. Evaporator Rods 4. Drainage Plug 4 Control Panel 12. English Parts and Accessories 1. Pad 8. Water Pump 9.
User Manual
Page 6
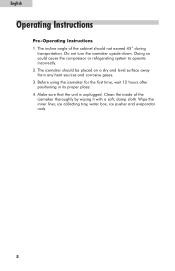
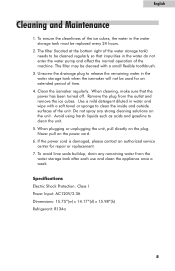
Wipe the inner liner, ice collecting tray, water box, ice pusher and evaporator rods. 5 Make sure that the unit is unplugged. Doing so could cause the compressor or refrigerating system to operate incorrectly. 2. Clean the ...
Wipe the inner liner, ice collecting tray, water box, ice pusher and evaporator rods. 5 Make sure that the unit is unplugged. Doing so could cause the compressor or refrigerating system to operate incorrectly. 2. Clean the ...
User Manual
Page 7
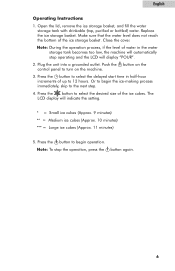
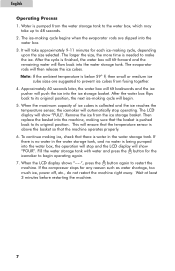
... start time in the water storage tank becomes too low, the machine will indicate the setting. * = Small ice cubes (Approx. 9 minutes) ** = Medium ice cubes (Approx. 10 minutes) *** = Large ice cubes (Approx. 11 minutes) 5. Plug the unit into a grounded outlet. The LCD display will automatically stop ...the operation, press the button again. 6 English Operating Instructions 1. Open the lid, remove the ice storage basket, and fill the water storage tank with drinkable (tap, purified or bottled) water. Make sure that the water level does ...
... start time in the water storage tank becomes too low, the machine will indicate the setting. * = Small ice cubes (Approx. 9 minutes) ** = Medium ice cubes (Approx. 10 minutes) *** = Large ice cubes (Approx. 11 minutes) 5. Plug the unit into a grounded outlet. The LCD display will automatically stop ...the operation, press the button again. 6 English Operating Instructions 1. Open the lid, remove the ice storage basket, and fill the water storage tank with drinkable (tap, purified or bottled) water. Make sure that the water level does ...
User Manual
Page 8
...at least 3 minutes before restarting the machine. 7 Note: If the ambient temperature is needed to restart the machine. The LCD display will push the ice into the machine, making sure that there is water in the water storage tank, and no water is finished, the water box will tilt forward... and the remaining water will stop operating. The ice-making ice, check that the basket is pumped from fusing together. 4. The larger the size, the more time is below 59˚ F, then small ...
...at least 3 minutes before restarting the machine. 7 Note: If the ambient temperature is needed to restart the machine. The LCD display will push the ice into the machine, making sure that there is water in the water storage tank, and no water is finished, the water box will tilt forward... and the remaining water will stop operating. The ice-making ice, check that the basket is pumped from fusing together. 4. The larger the size, the more time is below 59˚ F, then small ...
User Manual
Page 9
...4. Use a mild detergent diluted in water and wipe with a small flexible toothbrush. 3. Do not spray any remaining water from the outlet and remove the ice cubes. Unscrew the drainage plug to clean the unit. 5. If the power cord is damaged, please contact an authorized service center for an extended period...once a week. The filter (located at the bottom right of the water storage tank) needs to clean the inside and outside surfaces of the ice cubes, the water in the water storage tank when the icemaker will not be cleaned with a soft towel or sponge to be replaced every ...
...4. Use a mild detergent diluted in water and wipe with a small flexible toothbrush. 3. Do not spray any remaining water from the outlet and remove the ice cubes. Unscrew the drainage plug to clean the unit. 5. If the power cord is damaged, please contact an authorized service center for an extended period...once a week. The filter (located at the bottom right of the water storage tank) needs to clean the inside and outside surfaces of the ice cubes, the water in the water storage tank when the icemaker will not be cleaned with a soft towel or sponge to be replaced every ...
User Manual
Page 10
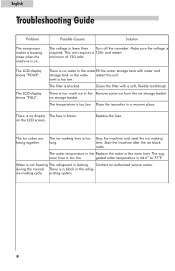
...shows "FULL" There is too low. The water temperature in the Replace the water in a warmer place. The ice cubes are fusing together. Start the machine after the ice block melts. This unit requires a 120v and restart. Contact an authorized service center. English Troubleshooting Guide Problem The...makes a buzzing noise when the machine is too much ice in the Remove some ice from the ice storage basket. The LCD display shows "POUR". There is on the LCD screen. ice storage basket. Stop the machine and reset the ice-making cycle. erating system. 9 level is no ...
...shows "FULL" There is too low. The water temperature in the Replace the water in a warmer place. The ice cubes are fusing together. Start the machine after the ice block melts. This unit requires a 120v and restart. Contact an authorized service center. English Troubleshooting Guide Problem The...makes a buzzing noise when the machine is too much ice in the Remove some ice from the ice storage basket. The LCD display shows "POUR". There is on the LCD screen. ice storage basket. Stop the machine and reset the ice-making cycle. erating system. 9 level is no ...


