User Manual
Page 2
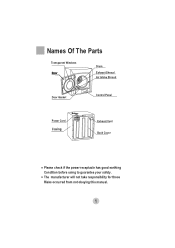
The manufacturer will not take responsibility for those Risks occurred from not obeying this manual. 1 Names Of The Parts Transparent Windows Door Drum Exhaust Shroud Air Intake Shroud Door Gasket Control Panel Power Cord Casing Exhaust Vent Back Cover Please check if the power receptacle has good earthing Condition before using to guarantee your safety.
The manufacturer will not take responsibility for those Risks occurred from not obeying this manual. 1 Names Of The Parts Transparent Windows Door Drum Exhaust Shroud Air Intake Shroud Door Gasket Control Panel Power Cord Casing Exhaust Vent Back Cover Please check if the power receptacle has good earthing Condition before using to guarantee your safety.

User Manual
Page 4
... it will be exposed to water and/or to the weather. 17.The tumble dryer is not to be used if chemicals have been removed. 24.This dryer shall be connected to a three-wire, single phase, 120V AC power receptacle more than 15A, which must not be discharged into a flue which is not... to be allowed to accumulate around the tumble dryer. 21.For appliances with ventilation openings in the base...
... it will be exposed to water and/or to the weather. 17.The tumble dryer is not to be used if chemicals have been removed. 24.This dryer shall be connected to a three-wire, single phase, 120V AC power receptacle more than 15A, which must not be discharged into a flue which is not... to be allowed to accumulate around the tumble dryer. 21.For appliances with ventilation openings in the base...

User Manual
Page 5
... accumulation or other external factors. 30.Only place sufficiently dehydrated clothes into your dryer for drying to prevent it from electrical supply before attempting any service. If damaged, power cord or plug must not be unplugged during power blackout, moving, not in water leakage). 32.Don't touch the intake for...by grasping the plug, not the cord. 28.Do not block the exhaust vent when dryer operating to prevent leakage and longer drying time. 31.Do not place washed wet clothes in your dryer operate on it with dry cloth if dusts accumulated. Important Safety Instructions 26.When...
... accumulation or other external factors. 30.Only place sufficiently dehydrated clothes into your dryer for drying to prevent it from electrical supply before attempting any service. If damaged, power cord or plug must not be unplugged during power blackout, moving, not in water leakage). 32.Don't touch the intake for...by grasping the plug, not the cord. 28.Do not block the exhaust vent when dryer operating to prevent leakage and longer drying time. 31.Do not place washed wet clothes in your dryer operate on it with dry cloth if dusts accumulated. Important Safety Instructions 26.When...

User Manual
Page 9
... clothes and in the shade Carefully check the clothes to be put clothes into your dryer if the materials of care when removed from tangling.Do not overload the dryer. Using Method 1. Plug the power cord The appliance shall be loaded in such a way that may permanently set some stains.... Place the dehydrated clothes in your clothes Make sure if clothes have been removed in a mesh bag prevent from dryer. They shall be supplied...
... clothes and in the shade Carefully check the clothes to be put clothes into your dryer if the materials of care when removed from tangling.Do not overload the dryer. Using Method 1. Plug the power cord The appliance shall be loaded in such a way that may permanently set some stains.... Place the dehydrated clothes in your clothes Make sure if clothes have been removed in a mesh bag prevent from dryer. They shall be supplied...

User Manual
Page 10
... the 'Time' button to choose drying time in the 'DryTime' to function or the state that is on, you can set as required 9 Dry The dryer is completed. When you dry your clothes. Using Method 3. Status Dry Cool Down Cycle End Clean Lint 150 A 120 U T O 90 D 60 R Y 30 ...Normal Heavy Delicate Timed Dry Dry Time Cycle 'Dry Time' button After the power is functioning On- If the 'Temp' function is going to choose the drying time directly. indicates the program that has been chosen Indicator lights of...
... the 'Time' button to choose drying time in the 'DryTime' to function or the state that is on, you can set as required 9 Dry The dryer is completed. When you dry your clothes. Using Method 3. Status Dry Cool Down Cycle End Clean Lint 150 A 120 U T O 90 D 60 R Y 30 ...Normal Heavy Delicate Timed Dry Dry Time Cycle 'Dry Time' button After the power is functioning On- If the 'Temp' function is going to choose the drying time directly. indicates the program that has been chosen Indicator lights of...

User Manual
Page 11
... 'PowerOn/Off' button to cut off the power connector after there is power to connect the power connector. Press in status of 'Cycle' is...machine will cut off the power connector by itself. Press in the 'PowerOn/Off' button to connect the power connector, then press in ...the'Start/Pause' button when there is originally set as 'High'.'Delicate' is power to the machine... to choose temperature in a range of High, Low and Air Dry (without heating). 'Normal' and 'Heavy' of pause. High Low Air-Dry Temp Start Pause Power...
... 'PowerOn/Off' button to cut off the power connector after there is power to connect the power connector. Press in status of 'Cycle' is...machine will cut off the power connector by itself. Press in the 'PowerOn/Off' button to connect the power connector, then press in ...the'Start/Pause' button when there is originally set as 'High'.'Delicate' is power to the machine... to choose temperature in a range of High, Low and Air Dry (without heating). 'Normal' and 'Heavy' of pause. High Low Air-Dry Temp Start Pause Power...

User Manual
Page 12
...the machine. You may want to step 5. If a 'Timed Dry ' cycle is originally set as 'Normal ' when the power is forbidden. The clothes dryer is chosen, please follow up step 3,4,5. Using Method b Operation button using procedure and instruction for each step Status Dry Cool ...Down Cycle End Clean Lint 150 A 120 U T O 90 D 60 R Y Normal Heavy Delicate 30 Timed Dry High Low Air-Dry Dry Time Cycle Temp HLP140E Start Pause Power...
...the machine. You may want to step 5. If a 'Timed Dry ' cycle is originally set as 'Normal ' when the power is forbidden. The clothes dryer is chosen, please follow up step 3,4,5. Using Method b Operation button using procedure and instruction for each step Status Dry Cool ...Down Cycle End Clean Lint 150 A 120 U T O 90 D 60 R Y Normal Heavy Delicate 30 Timed Dry High Low Air-Dry Dry Time Cycle Temp HLP140E Start Pause Power...

User Manual
Page 13
..., cotton-padded clothes. The machine can choose drying time freely. Press in the 'Start/ Pause' button Start Pause Make sure the front door is power to work if the front door is proper for long in middle of the garments. The machine will stop to heating screen after dried. There... choose this mode to set appropriate drying time. Dry Time For 'High' and 'Low' mode,you press in the 'Start/Pause' button, otherwise, the clothes dryer won 't heat in 'Air dry' mode, and is opened in the wardrobe. Heating apparatus won 't start and give an alarm. For 'Air Dry' mode,...
..., cotton-padded clothes. The machine can choose drying time freely. Press in the 'Start/ Pause' button Start Pause Make sure the front door is power to work if the front door is proper for long in middle of the garments. The machine will stop to heating screen after dried. There... choose this mode to set appropriate drying time. Dry Time For 'High' and 'Low' mode,you press in the 'Start/Pause' button, otherwise, the clothes dryer won 't heat in 'Air dry' mode, and is opened in the wardrobe. Heating apparatus won 't start and give an alarm. For 'Air Dry' mode,...

User Manual
Page 15
Please unplug the power cord first when cleaning it will affect the performance of "Exhaust vent shroud - Exhaust Filter Note: The filter fixed in figure 1. 2. If dryer drum becomes stained, clean the drum with mild soap and water. Clean cabinet with a damp cloth. Exhaust filter", as shown in... or alcohol. Care And Cleaning Clean the buildup such as shown in time befor and after each use. Hazardous fumes or electric shock could damage the dryer. Donot use harsh or abrasive cleaners, this could occur. Figure 1 Dust Cleaner Figure 2 Figure 3 Clean the interior drum or...
Please unplug the power cord first when cleaning it will affect the performance of "Exhaust vent shroud - Exhaust Filter Note: The filter fixed in figure 1. 2. If dryer drum becomes stained, clean the drum with mild soap and water. Clean cabinet with a damp cloth. Exhaust filter", as shown in... or alcohol. Care And Cleaning Clean the buildup such as shown in time befor and after each use. Hazardous fumes or electric shock could damage the dryer. Donot use harsh or abrasive cleaners, this could occur. Figure 1 Dust Cleaner Figure 2 Figure 3 Clean the interior drum or...

User Manual
Page 16
...the wet clothes for a while when starting the machine, after sales service quickly. SYMPTOM Dryer won 't heat. Check and tighten plug. Is the clothes dryer working properly you dried too many garments in the Power/ ON/OFF, or Start/Pause button. Reset the "Temp" button till the indicator...front door. Separate the tangled-up ? Place the machine in the Power/ ON/OFF, or Start/Pause button. Is the outlet filter-net been blocked? Is the dryer standing position narrow and stuffy? Close the front door. Dryer won 't heat. Rinse the filter-net clear. Is a garment filling...
...the wet clothes for a while when starting the machine, after sales service quickly. SYMPTOM Dryer won 't heat. Check and tighten plug. Is the clothes dryer working properly you dried too many garments in the Power/ ON/OFF, or Start/Pause button. Reset the "Temp" button till the indicator...front door. Separate the tangled-up ? Place the machine in the Power/ ON/OFF, or Start/Pause button. Is the outlet filter-net been blocked? Is the dryer standing position narrow and stuffy? Close the front door. Dryer won 't heat. Rinse the filter-net clear. Is a garment filling...

