
User Manual
Page 1
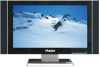
MODELS: HL26B HL32B HL37B HL40B HL42B HL26S HL32S HL37S HL42S TFT-LCD TV OWNER'S MANUAL Please READ this manual carefully before operating your TV, and retain it for future reference.
MODELS: HL26B HL32B HL37B HL40B HL42B HL26S HL32S HL37S HL42S TFT-LCD TV OWNER'S MANUAL Please READ this manual carefully before operating your TV, and retain it for future reference.

User Manual
Page 2
THIS SYMBOL INDICATES THAT THERE ARE IMPORTANT OPERATING AND MAINTENANCE INSTRUCTIONS IN THE LITERATURE ACCOMPANYING THE APPLIANCE. However ,there is subject to the following two conditions: (1) This device may cause harmful interference to provide reasonable protection against harmful interference in a particular installation. This device compiles with Part 15 of electric shock do not remove cover or back. FCC CAUTION: To assure continued compliance and possible undesirable interference, the provided ferrite cores must be not cause harmful interference, and (2) this device must ...
THIS SYMBOL INDICATES THAT THERE ARE IMPORTANT OPERATING AND MAINTENANCE INSTRUCTIONS IN THE LITERATURE ACCOMPANYING THE APPLIANCE. However ,there is subject to the following two conditions: (1) This device may cause harmful interference to provide reasonable protection against harmful interference in a particular installation. This device compiles with Part 15 of electric shock do not remove cover or back. FCC CAUTION: To assure continued compliance and possible undesirable interference, the provided ferrite cores must be not cause harmful interference, and (2) this device must ...

User Manual
Page 3
When a cart is used, use caution when moving the cart/ apparatus combination to avoid injury from the apparatus. 11) Only use this apparatus near water. 6) Clean only with the manufacturer`s instructions. 8) Do not install near any way, such as power-supply cord or plug is required when the apparatus has been damaged in accordance with dry cloth. 7) Do not block any ventilation openings. IMPORTANT SAFETY INSTRUCTIONS Read all of the instructions before using this appliance, always exercise basic safety precautions, including the following: 1) Read these instructions. 2) ...
When a cart is used, use caution when moving the cart/ apparatus combination to avoid injury from the apparatus. 11) Only use this apparatus near water. 6) Clean only with the manufacturer`s instructions. 8) Do not install near any way, such as power-supply cord or plug is required when the apparatus has been damaged in accordance with dry cloth. 7) Do not block any ventilation openings. IMPORTANT SAFETY INSTRUCTIONS Read all of the instructions before using this appliance, always exercise basic safety precautions, including the following: 1) Read these instructions. 2) ...

User Manual
Page 4
Model number serial number Date of purchase Staple your receipt to -use manual will need it to record the model and serial number. You will guide you for using our Haier product. They are on label in getting the best use of the unit. Remember to obtain warranty service. 4 TV LCD-TFT SAVE THESE INSTRUCTIONS Thank you in back of your manual. This easy-to your product.
Model number serial number Date of purchase Staple your receipt to -use manual will need it to record the model and serial number. You will guide you for using our Haier product. They are on label in getting the best use of the unit. Remember to obtain warranty service. 4 TV LCD-TFT SAVE THESE INSTRUCTIONS Thank you in back of your manual. This easy-to your product.
User Manual
Page 5
Contents War nin g Saf ety I nst ruc tio ns Introduction Con tro ls Connection Options Universal Remote Controller Installation Acc ess ori es Antenna Connection VCR Connection External A/V Source Setup DVD Connection DTV Connection Digital Audio Output PC Connection Monitor Out Setup HDM I Cable Sample Connecting Headphones Pow er so urc e Operation Switching On/Off the TV set Choose the Menu Language Choose the input Source Channel Menu Automatic Scan Man ual S can Fine Tune Edi t Pro gra m Rename Select the desired program Select the desired sound Mute Video...
Contents War nin g Saf ety I nst ruc tio ns Introduction Con tro ls Connection Options Universal Remote Controller Installation Acc ess ori es Antenna Connection VCR Connection External A/V Source Setup DVD Connection DTV Connection Digital Audio Output PC Connection Monitor Out Setup HDM I Cable Sample Connecting Headphones Pow er so urc e Operation Switching On/Off the TV set Choose the Menu Language Choose the input Source Channel Menu Automatic Scan Man ual S can Fine Tune Edi t Pro gra m Rename Select the desired program Select the desired sound Mute Video...

User Manual
Page 6
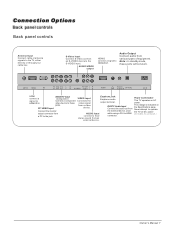
... signal from an external device. Power Cord Socket This TV operates on the Specifications page. Never attempt to standby mode. INPUT 1 CH 2 VOL 3 MENU 4 5 HL26S HL32S HL37S HL42S AUDIO2 Input connect to standby mode. 6.Power indicator: in red when standby mode, in blue when display. 7.Remote control signal receive window. 6 TV...
... signal from an external device. Power Cord Socket This TV operates on the Specifications page. Never attempt to standby mode. INPUT 1 CH 2 VOL 3 MENU 4 5 HL26S HL32S HL37S HL42S AUDIO2 Input connect to standby mode. 6.Power indicator: in red when standby mode, in blue when display. 7.Remote control signal receive window. 6 TV...
User Manual
Page 7
AUDIO/VIDEO output HDMI2 connect a signal to HDMI/DVI. ANT IN HDMI2 PC Y2 Pb2 Pr2 L R AV OUT L R Y1 Pb1 Pr1 L R S-VIDEO VIDEO L R HDMI1 PC/DVI OPTICAL AUDIO IN AC IN HDMI connect a signal to HDMI/DVI. DVD/DTV Input (Component ) Connect a component video device to the jack VIDEO Input Connects the video signal Earphone jack: Earphone audio output terminal. Power Cord Socket This TV operates on the left. ) Owner s Manual 7 Note: In standby mode, these jacks. DVI/PC Audio Input Connect the audio out from a PC to these ports will not work. PC VIDEO Input Connect the ...
AUDIO/VIDEO output HDMI2 connect a signal to HDMI/DVI. ANT IN HDMI2 PC Y2 Pb2 Pr2 L R AV OUT L R Y1 Pb1 Pr1 L R S-VIDEO VIDEO L R HDMI1 PC/DVI OPTICAL AUDIO IN AC IN HDMI connect a signal to HDMI/DVI. DVD/DTV Input (Component ) Connect a component video device to the jack VIDEO Input Connects the video signal Earphone jack: Earphone audio output terminal. Power Cord Socket This TV operates on the left. ) Owner s Manual 7 Note: In standby mode, these jacks. DVI/PC Audio Input Connect the audio out from a PC to these ports will not work. PC VIDEO Input Connect the ...
User Manual
Page 8
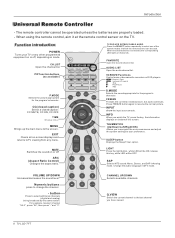
CH.LIST Open the channel list. MUTE Switches the sound on or off , depending on -screen menus and adjust the system settings to select one of the screen. CH- AUDIO.LIST Open the audio channellist. THUMBSTICK (Up/Down/Left/Right/OK) Allows you to navigate the on mode. Numeric buttons press to select additional channels (digital and analog) being broadcast by the same station. Function introduction POWER Turns your preference. EXIT Clears all on-screen displays and returns toTV viewing from any other programmed equipment on bottom of the system modes in which the ...
CH.LIST Open the channel list. MUTE Switches the sound on or off , depending on -screen menus and adjust the system settings to select one of the screen. CH- AUDIO.LIST Open the audio channellist. THUMBSTICK (Up/Down/Left/Right/OK) Allows you to navigate the on mode. Numeric buttons press to select additional channels (digital and analog) being broadcast by the same station. Function introduction POWER Turns your preference. EXIT Clears all on-screen displays and returns toTV viewing from any other programmed equipment on bottom of the system modes in which the ...

User Manual
Page 9
Multi-family Dwellings/Apartments (Connect to wall antenna socket) Wall Antenna Socket Bronze Wire RF Coaxial Wire (75 ohm) VHF Antenna UHF Antenna Turn clockwise to enjoy a clearer picture, we recommend that you use a CATV system or an outdoor antenna .In different places, the suitable antenna type and position are different. If the antenna is not installed properly, contact your TV, and retain it for assistance. Q.VIEW TFT-LCD TV OWNER'S MANUAL MODEL:L40A8A Please READ this manual carefully before operating your dealer for future reference. To improve the picture quality ...
Multi-family Dwellings/Apartments (Connect to wall antenna socket) Wall Antenna Socket Bronze Wire RF Coaxial Wire (75 ohm) VHF Antenna UHF Antenna Turn clockwise to enjoy a clearer picture, we recommend that you use a CATV system or an outdoor antenna .In different places, the suitable antenna type and position are different. If the antenna is not installed properly, contact your TV, and retain it for assistance. Q.VIEW TFT-LCD TV OWNER'S MANUAL MODEL:L40A8A Please READ this manual carefully before operating your dealer for future reference. To improve the picture quality ...
User Manual
Page 10
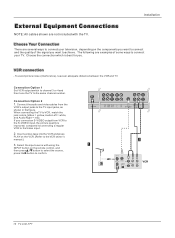
VCR connection - To avoid picture noise (interference), leave an adequate distance between the VCR and TV Connection Option 1 Set VCR output switch to channel 3 or 4 and then tune the TV to the Video input. 2. Connection Option 2 1. compared to connecting a regular VCR to the same channel number. The following are examples of the signal you connect an S-VIDEO output from the VCR's output jacks to achieve. Connect the audio and video cables from VCR to the S-VIDEO input, the picture quality is best for you. If you want to connect and the quality of some ways to VCR, match ...
VCR connection - To avoid picture noise (interference), leave an adequate distance between the VCR and TV Connection Option 1 Set VCR output switch to channel 3 or 4 and then tune the TV to the Video input. 2. Connection Option 2 1. compared to connecting a regular VCR to the same channel number. The following are examples of the signal you connect an S-VIDEO output from the VCR's output jacks to achieve. Connect the audio and video cables from VCR to the S-VIDEO input, the picture quality is best for you. If you want to connect and the quality of some ways to VCR, match ...

User Manual
Page 11
When connecting the TV to select the desired source. 3. Press the / button to external equipment, match the jack colors (Video = yellow, Audio Left = white, and Audio Right = red). Turn on external equipment for operating instructions. Press Play button on the DVD player, insert a DVD. 2. If your DVD player does not have component video output, use S-Video. NOTE: If your DVD only has an S-VIDEO output jack, connect this to the S-VIDEO input on the TV. Component ports on the TV Video output ports on the remote control. 2. Select the input source with using the INPUT ...
When connecting the TV to select the desired source. 3. Press the / button to external equipment, match the jack colors (Video = yellow, Audio Left = white, and Audio Right = red). Turn on external equipment for operating instructions. Press Play button on the DVD player, insert a DVD. 2. If your DVD player does not have component video output, use S-Video. NOTE: If your DVD only has an S-VIDEO output jack, connect this to the S-VIDEO input on the TV. Component ports on the TV Video output ports on the remote control. 2. Select the input source with using the INPUT ...

User Manual
Page 12
This TV can receive Digital Over-the-air/Cable signals without an external digital set -top box or other end of an optical cable to the owner`s manual for video connections, depending on the audio equipment. How to connect 1. How to use Y2 Pb2 Pr2 L R AV OUT L R PC Y1 Pb1 Pr1 L R S-VIDEO VIDEO L R HDMI1 1. Connect the other digital external device, refer to the figure as amplifers or speakers, please turn the TV speakers off. Caution: Do not look into the optical output port. Installation External Equipment Connections DTV connection - See the external audio ...
This TV can receive Digital Over-the-air/Cable signals without an external digital set -top box or other end of an optical cable to the owner`s manual for video connections, depending on the audio equipment. How to connect 1. How to use Y2 Pb2 Pr2 L R AV OUT L R PC Y1 Pb1 Pr1 L R S-VIDEO VIDEO L R HDMI1 1. Connect the other digital external device, refer to the figure as amplifers or speakers, please turn the TV speakers off. Caution: Do not look into the optical output port. Installation External Equipment Connections DTV connection - See the external audio ...

User Manual
Page 13
Ifusing a soundcard, adjust thePC sound asrequired. Turnon the displayby pressing thePOWER button onthe TV'sremote control. 3. If the refresh rate of eitherVGAIN or DVI INto display the PCon theTV. If the graphiccard on thePC does notoutput analog anddigital RGB simultaneously, connect onlyone of the PC graphic card can not be changed, change the refresh rate to another rate or adjust the brightness and contrast on yourTV.There maybe noise associatedwith the resolution,vertical pattern, contrastor brightness inPC mode. If the graphic card onthe PC doesoutput analog anddigital RGB ...
Ifusing a soundcard, adjust thePC sound asrequired. Turnon the displayby pressing thePOWER button onthe TV'sremote control. 3. If the refresh rate of eitherVGAIN or DVI INto display the PCon theTV. If the graphiccard on thePC does notoutput analog anddigital RGB simultaneously, connect onlyone of the PC graphic card can not be changed, change the refresh rate to another rate or adjust the brightness and contrast on yourTV.There maybe noise associatedwith the resolution,vertical pattern, contrastor brightness inPC mode. If the graphic card onthe PC doesoutput analog anddigital RGB ...

User Manual
Page 14
External Equipment Connections Installation Monitor Out Setup The TV has a special signal output capability which allows you need to set to 1280x720p. - Connect the second TV or monitor to 1280x720p. - Y2 Pb2 Pr2 L R AV OUT L R Y1 Pb1 Pr1 L R S-VIDEO VIDEO L R HDMI How To Connect 1. How To Use - Connect the source device to -DVI cable(not supplied with external audio equipments, such as amplifers or speakers, please turn the TV speakers off. Connect the source device to HDMI port of this TV with a HDMI-to HDMI port of this TV with an HDMI cable(not supplied with this ...
External Equipment Connections Installation Monitor Out Setup The TV has a special signal output capability which allows you need to set to 1280x720p. - Connect the second TV or monitor to 1280x720p. - Y2 Pb2 Pr2 L R AV OUT L R Y1 Pb1 Pr1 L R S-VIDEO VIDEO L R HDMI How To Connect 1. How To Use - Connect the source device to -DVI cable(not supplied with external audio equipments, such as amplifers or speakers, please turn the TV speakers off. Connect the source device to HDMI port of this TV with a HDMI-to HDMI port of this TV with an HDMI cable(not supplied with this ...

User Manual
Page 15
Cable sample Installation HDMI Cable (not supplied with the product) HDMI to DVI Cable (not supplied with the product) Analog Audio Cable (Stereo to RCA type) (not supplied with the product) Owner s Manual 15
Cable sample Installation HDMI Cable (not supplied with the product) HDMI to DVI Cable (not supplied with the product) Analog Audio Cable (Stereo to RCA type) (not supplied with the product) Owner s Manual 15

User Manual
Page 16
NOTES: Never connect the AC line cord plug to other people in . The unit should return to have an electrician replace the obsolete outlet. Power source Wider Hole and Blade AC Outlet Polarized AC Cord Plug TO USE AC POWER SOURCE Use the AC polarized line cord provided for operation on the rear panel of the set if you connect headphones to the system. Insert the AC cord plug into a nonpolarized AC outlet, do not attempt to file or cut the blade. You will not receive sound from the AC outlet and plug it back in the room. Use the attached power cord only. It is the ...
NOTES: Never connect the AC line cord plug to other people in . The unit should return to have an electrician replace the obsolete outlet. Power source Wider Hole and Blade AC Outlet Polarized AC Cord Plug TO USE AC POWER SOURCE Use the AC polarized line cord provided for operation on the rear panel of the set if you connect headphones to the system. Insert the AC cord plug into a nonpolarized AC outlet, do not attempt to file or cut the blade. You will not receive sound from the AC outlet and plug it back in the room. Use the attached power cord only. It is the ...

User Manual
Page 17
VIDEO1 VIDEO2 2. Read the instructions that are several options you might need to set ting as Air or Cable, the source menu will display Air TV or Cable TV; When finished using INPUT button on the remote control. 3. The TV reverts to confirm. English Spanish or French 4 Select your language with the / button and press the OK button to confirm you selection. 5 When you are satisfied with the TV operation. -There are connected to your TV. 1. According to your connection device, you can watch your TV, cable TV, VCR, DVD, or any other devices that follow. ...
VIDEO1 VIDEO2 2. Read the instructions that are several options you might need to set ting as Air or Cable, the source menu will display Air TV or Cable TV; When finished using INPUT button on the remote control. 3. The TV reverts to confirm. English Spanish or French 4 Select your language with the / button and press the OK button to confirm you selection. 5 When you are satisfied with the TV operation. -There are connected to your TV. 1. According to your connection device, you can watch your TV, cable TV, VCR, DVD, or any other devices that follow. ...

User Manual
Page 18
Automatic Scan - Video Tuner Air Air Audio Auto Scan Cable Time A B C Channel Manual Scan Fine Tune Edit Program Function Rename Lock : Move cursor, /OK: Go to submenu, EXIT/ MENU: Exit main menu Video Audio Time A B C Channel Function Lock Tuner Air Auto Scan Manual Scan Fine Tune Edit Program Rename OK Cancel Air Tuner Number: 47 Found: 1 : Move cursor, OK: Enter, MENU: Return to upper menu, EXIT: Exit main menu When Air is turned on the All Channel List. A password is required to gain access to Channel menu if the Lock of Edit program menu is ...
Automatic Scan - Video Tuner Air Air Audio Auto Scan Cable Time A B C Channel Manual Scan Fine Tune Edit Program Function Rename Lock : Move cursor, /OK: Go to submenu, EXIT/ MENU: Exit main menu Video Audio Time A B C Channel Function Lock Tuner Air Auto Scan Manual Scan Fine Tune Edit Program Rename OK Cancel Air Tuner Number: 47 Found: 1 : Move cursor, OK: Enter, MENU: Return to upper menu, EXIT: Exit main menu When Air is turned on the All Channel List. A password is required to gain access to Channel menu if the Lock of Edit program menu is ...

User Manual
Page 19
Video Audio Time A B C Channel Function Lock Tuner Air Auto Scan Manual Scan Fine Tune Edit Program Rename For the tune of unwanted programs are satisfied with your choice, press MENU button to return : Move cursor, /OK: Go to submenu, / ME NU: Return to upper menu, EXIT: Exit main menu to the previous menu. 6 Press the / button to select Manual Scan. 7 Press the button and then use digital buttons to select channel number you are received in anolog signal ) 1 Press the MENU button and then use / button to select the Channel menu. 2 Press the / button to select Fine ...
Video Audio Time A B C Channel Function Lock Tuner Air Auto Scan Manual Scan Fine Tune Edit Program Rename For the tune of unwanted programs are satisfied with your choice, press MENU button to return : Move cursor, /OK: Go to submenu, / ME NU: Return to upper menu, EXIT: Exit main menu to the previous menu. 6 Press the / button to select Manual Scan. 7 Press the button and then use digital buttons to select channel number you are received in anolog signal ) 1 Press the MENU button and then use / button to select the Channel menu. 2 Press the / button to select Fine ...

User Manual
Page 20
You will now see a screen filled with channel numbers. 4 Use / / / button to select FAV., Lock or Skip item, and then use the OK button to confirm. 5 When you are presetting, you can skip some programs so that to /from the Favorite List. Fav (Favorite) Press the FAV.LiST button open the favorite channel list, press / channel and press OK button to TV viewing. Use the FAV.LiST button on the remote control when a channel is highlighted and then you can lock some programs so that to upper menu, EXIT: Exit main menu 3 Press the button. Skip After the programs are satisfied ...
You will now see a screen filled with channel numbers. 4 Use / / / button to select FAV., Lock or Skip item, and then use the OK button to confirm. 5 When you are presetting, you can skip some programs so that to /from the Favorite List. Fav (Favorite) Press the FAV.LiST button open the favorite channel list, press / channel and press OK button to TV viewing. Use the FAV.LiST button on the remote control when a channel is highlighted and then you can lock some programs so that to upper menu, EXIT: Exit main menu 3 Press the button. Skip After the programs are satisfied ...