
User Manual
Page 1
MODELS: HL26B HL32B HL37B HL40B HL42B HL26S HL32S HL37S HL42S TFT-LCD TV OWNER'S MANUAL Please READ this manual carefully before operating your TV, and retain it for future reference.
MODELS: HL26B HL32B HL37B HL40B HL42B HL26S HL32S HL37S HL42S TFT-LCD TV OWNER'S MANUAL Please READ this manual carefully before operating your TV, and retain it for future reference.

User Manual
Page 2
... and, if not installed and used when connecting this device must accept any damage to the following safety instruction before starting the operation. The User Manual uses the following rules should be determined by one or more of th product. FCC STATEMENT This equipment has been tested and found to comply...
... and, if not installed and used when connecting this device must accept any damage to the following safety instruction before starting the operation. The User Manual uses the following rules should be determined by one or more of th product. FCC STATEMENT This equipment has been tested and found to comply...

User Manual
Page 3
... third prong are provided for long periods of the polarized or grounding-type plug. A grounding type plug has two blades and a third grounding prong. Owner s Manual 3 When using this appliance. Apolarized plug has two blades with dry cloth. 7) Do not block any heat sources such as radiators, heat registers, stoves, or...
... third prong are provided for long periods of the polarized or grounding-type plug. A grounding type plug has two blades and a third grounding prong. Owner s Manual 3 When using this appliance. Apolarized plug has two blades with dry cloth. 7) Do not block any heat sources such as radiators, heat registers, stoves, or...

User Manual
Page 4
They are on label in getting the best use manual will need it to obtain warranty service. 4 TV LCD-TFT This easy-to-use of your manual. Model number serial number Date of the unit. You will guide you for using our Haier product. Remember to record the model and serial number. SAVE THESE INSTRUCTIONS Thank you in back of purchase Staple your receipt to your product.
They are on label in getting the best use manual will need it to obtain warranty service. 4 TV LCD-TFT This easy-to-use of your manual. Model number serial number Date of the unit. You will guide you for using our Haier product. Remember to record the model and serial number. SAVE THESE INSTRUCTIONS Thank you in back of purchase Staple your receipt to your product.
User Manual
Page 5
... and categories Others Functions Bri ef In fo Quick program view Setting up your remote control Remote Control Codes Maintenance Product Specifications Troubleshooting Warranty Owner s Manual 5
... and categories Others Functions Bri ef In fo Quick program view Setting up your remote control Remote Control Codes Maintenance Product Specifications Troubleshooting Warranty Owner s Manual 5
User Manual
Page 7
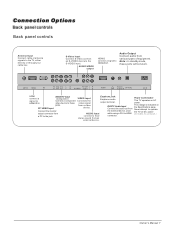
.... S-Video Input Connect S-Video out from an external device. stereo sound from an S-VIDEO device to HDMI/DVI. The voltage is on the left. ) Owner s Manual 7 AUDIO/VIDEO output HDMI2 connect a signal to the S-VIDEO input. Audio Output Connect audio from a video device. from various types of equipment.
.... S-Video Input Connect S-Video out from an external device. stereo sound from an S-VIDEO device to HDMI/DVI. The voltage is on the left. ) Owner s Manual 7 AUDIO/VIDEO output HDMI2 connect a signal to the S-VIDEO input. Audio Output Connect audio from a video device. from various types of equipment.

User Manual
Page 9
... TFT-LCD TV OWNER'S MANUAL MODEL:L40A8A Please READ this manual carefully before operating your dealer for future reference. To improve the picture quality in the connections. If the antenna needs to be split for outdoor ... AUDIOLIST PIP SWAP AUDIO SWAP POSITION P.MODE CC UIDE ENU S.MODE FREEZE NPUT INFO OK ARC SAP SLEEP EXIT VOL+ CH+ VOL- Remote controller Owner`s manual Alkaline battery(AAA) 2 Power cable Antenna Connection Generally speaking, to tighten.
... TFT-LCD TV OWNER'S MANUAL MODEL:L40A8A Please READ this manual carefully before operating your dealer for future reference. To improve the picture quality in the connections. If the antenna needs to be split for outdoor ... AUDIOLIST PIP SWAP AUDIO SWAP POSITION P.MODE CC UIDE ENU S.MODE FREEZE NPUT INFO OK ARC SAP SLEEP EXIT VOL+ CH+ VOL- Remote controller Owner`s manual Alkaline battery(AAA) 2 Power cable Antenna Connection Generally speaking, to tighten.
User Manual
Page 10
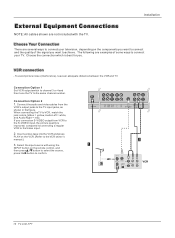
... = white, and Audio Right = red). Choose Your Connection There are not included with using the INPUT button on the VCR. (Refer to the VCR owner`s manual.) 3. Select the input source with the TV. Installation External Equipment Connections NOTE: All cables shown are several ways to connect your television, depending on the...
... = white, and Audio Right = red). Choose Your Connection There are not included with using the INPUT button on the VCR. (Refer to the VCR owner`s manual.) 3. Select the input source with the TV. Installation External Equipment Connections NOTE: All cables shown are several ways to connect your television, depending on the...

User Manual
Page 11
...red). When connecting the TV to confirm 2. How to use 1. Turn on the remote control. 2. as shown in the figure. Refer to the DVD player's manual for program play. 4. Select the input source with using the INPUT button on the DVD player, insert a DVD. 2. Press the / button to connect 1. ... Y Pb Pr Y Pb Pr Y B-Y R-Y Y Cb Cr Y PB PR Video Game Set Y2 Pb2 Pr2 L R AV OUT L R Y1 Pb1 Pr1 L R S-VIDEO VIDEO L R Owner s Manual 11 Y2 Pb2 Pr2 L R AV OUT L R Y1 Pb1 Pr1 L R S-VIDEO VIDEO L R Camcorder DVD connection How to select the desired source. 3. If your DVD player does...
...red). When connecting the TV to confirm 2. How to use 1. Turn on the remote control. 2. as shown in the figure. Refer to the DVD player's manual for program play. 4. Select the input source with using the INPUT button on the DVD player, insert a DVD. 2. Press the / button to connect 1. ... Y Pb Pr Y Pb Pr Y B-Y R-Y Y Cb Cr Y PB PR Video Game Set Y2 Pb2 Pr2 L R AV OUT L R Y1 Pb1 Pr1 L R S-VIDEO VIDEO L R Owner s Manual 11 Y2 Pb2 Pr2 L R AV OUT L R Y1 Pb1 Pr1 L R S-VIDEO VIDEO L R Camcorder DVD connection How to select the desired source. 3. If your DVD player does...

User Manual
Page 12
... end of an optical cable to select YPbPr, VGA,or HDMI source. How to connect 1. Connect one end of the optical cable to the owner`s manual for operation. Installation External Equipment Connections DTV connection - Use INPUT on the remote control to the TV Audio (Optical) Output port. 2. Note: When connecting with... audio equipment. This TV can receive Digital Over-the-air/Cable signals without an external digital set -top box.) 2. See the external audio equipment instruction manual for the digital set -top box.
... end of an optical cable to select YPbPr, VGA,or HDMI source. How to connect 1. Connect one end of the optical cable to the owner`s manual for operation. Installation External Equipment Connections DTV connection - Use INPUT on the remote control to the TV Audio (Optical) Output port. 2. Note: When connecting with... audio equipment. This TV can receive Digital Over-the-air/Cable signals without an external digital set -top box.) 2. See the external audio equipment instruction manual for the digital set -top box.

User Manual
Page 13
...*480 800*600 XGA 1024*768 Frame frequency (Hz) 60Hz 60Hz/75Hz 60Hz 75Hz ANT IN HDMI2 PC HDMI1 PC/DVI OPTICAL AUDIO IN Owner s Manual 13
...*480 800*600 XGA 1024*768 Frame frequency (Hz) 60Hz 60Hz/75Hz 60Hz 75Hz ANT IN HDMI2 PC HDMI1 PC/DVI OPTICAL AUDIO IN Owner s Manual 13

User Manual
Page 14
... Connections Installation Monitor Out Setup The TV has a special signal output capability which allows you need to set the output resolution appropriately. See the Operating Manual of this TV with a HDMI-to-DVI cable(not supplied with this product). 2. Notes: YPbPr, VGA, HDMI,DTV input sources cannot be used for further...
... Connections Installation Monitor Out Setup The TV has a special signal output capability which allows you need to set the output resolution appropriately. See the Operating Manual of this TV with a HDMI-to-DVI cable(not supplied with this product). 2. Notes: YPbPr, VGA, HDMI,DTV input sources cannot be used for further...

User Manual
Page 15
Cable sample Installation HDMI Cable (not supplied with the product) HDMI to DVI Cable (not supplied with the product) Analog Audio Cable (Stereo to RCA type) (not supplied with the product) Owner s Manual 15
Cable sample Installation HDMI Cable (not supplied with the product) HDMI to DVI Cable (not supplied with the product) Analog Audio Cable (Stereo to RCA type) (not supplied with the product) Owner s Manual 15

User Manual
Page 17
... with your choice, press the EXIT button to return to normal viewing or press MENU button to return to your TV. 1. Operation Operation -In the manual, the OSD (on screen display) may be different from the wall power outlet. Read the instructions that are several options you might need to set...Up/Down:Move Cursor Note: OK: Change MP Source Right:Activale Source Name Edit Menu 1. the information will display Air TV or Cable TV; Owner s Manual 17 If you can change the name of input signal . Press the INPUT button to enter the Select Main picture Source menu and then use...
... with your choice, press the EXIT button to return to normal viewing or press MENU button to return to your TV. 1. Operation Operation -In the manual, the OSD (on screen display) may be different from the wall power outlet. Read the instructions that are several options you might need to set...Up/Down:Move Cursor Note: OK: Change MP Source Right:Activale Source Name Edit Menu 1. the information will display Air TV or Cable TV; Owner s Manual 17 If you can change the name of input signal . Press the INPUT button to enter the Select Main picture Source menu and then use...

User Manual
Page 18
...antenna TV (NTSC and ATSC) channels available in your area. 18 TV LCD-TFT Video Tuner Air Air Audio Auto Scan Cable Time A B C Channel Manual Scan Fine Tune Edit Program Function Rename Lock : Move cursor, /OK: Go to submenu, EXIT/ MENU: Exit main menu Video Audio Time A B C... Channel Function Lock Tuner Air Auto Scan Manual Scan Fine Tune Edit Program Rename OK Cancel Air Tuner Number: 47 Found: 1 : Move cursor, OK: Enter, MENU: Return to upper menu, EXIT: ...
...antenna TV (NTSC and ATSC) channels available in your area. 18 TV LCD-TFT Video Tuner Air Air Audio Auto Scan Cable Time A B C Channel Manual Scan Fine Tune Edit Program Function Rename Lock : Move cursor, /OK: Go to submenu, EXIT/ MENU: Exit main menu Video Audio Time A B C... Channel Function Lock Tuner Air Auto Scan Manual Scan Fine Tune Edit Program Rename OK Cancel Air Tuner Number: 47 Found: 1 : Move cursor, OK: Enter, MENU: Return to upper menu, EXIT: ...

User Manual
Page 19
... cursor, /OK: Go to submenu, / ME NU: Return to upper menu, EXIT: Exit main menu to the previous menu. 6 Press the / button to select Manual Scan. 7 Press the button and then use digital buttons to select channel number you are received in anolog signal ) 1 Press the MENU button and then... use / button to the previous menu. Fine Tune (only in local area, manual search function is recommended. 1 Press the MENU button and then use / button to select the Channel menu. 2 Press the button and then use / button...
... cursor, /OK: Go to submenu, / ME NU: Return to upper menu, EXIT: Exit main menu to the previous menu. 6 Press the / button to select Manual Scan. 7 Press the button and then use digital buttons to select channel number you are received in anolog signal ) 1 Press the MENU button and then... use / button to the previous menu. Fine Tune (only in local area, manual search function is recommended. 1 Press the MENU button and then use / button to select the Channel menu. 2 Press the button and then use / button...

User Manual
Page 20
... and press OK button to upper menu, EXIT: Exit main menu 20 TV LCD-TFT Video Audio Time A B C Channel Function Lock Tuner Air Auto Scan Manual Scan Fine Tune Edit Program Rename Program No Program Name : Move cursor, /OK: Go to submenu, / ME NU: Return to confirm. Video Audio Time A... B C Channel Function 1 Press the MENU button and then use / button to select the Lock Tuner Air Auto Scan Manual Scan Fine Tune Edit Program Rename Music Ch No Name Fav Lock Skip Page 1/1 Channel menu. 2 Press the button and then use the OK button...
... and press OK button to upper menu, EXIT: Exit main menu 20 TV LCD-TFT Video Audio Time A B C Channel Function Lock Tuner Air Auto Scan Manual Scan Fine Tune Edit Program Rename Program No Program Name : Move cursor, /OK: Go to submenu, / ME NU: Return to confirm. Video Audio Time A... B C Channel Function 1 Press the MENU button and then use / button to select the Lock Tuner Air Auto Scan Manual Scan Fine Tune Edit Program Rename Music Ch No Name Fav Lock Skip Page 1/1 Channel menu. 2 Press the button and then use the OK button...

User Manual
Page 21
... to recover the sound, press the MUTE button again or directly press VOL+ buttons. The range is displayed automatically on one channel, press CH+/- Owner s Manual 21 Press the CH- When the volume buttons are some guests visiting you want to select a channel number in number increasing direction. Select the desired...
... to recover the sound, press the MUTE button again or directly press VOL+ buttons. The range is displayed automatically on one channel, press CH+/- Owner s Manual 21 Press the CH- When the volume buttons are some guests visiting you want to select a channel number in number increasing direction. Select the desired...

User Manual
Page 23
... the / button to select the desired picture format. 3 Press the OK button to confirm. 4:3 mode Choose 4:3 when you want to fill the entire screen. Owner s Manual 23 Note: When enlarging or reducing the picture size, the image may become imprinted on the screen and remain visible. 1 Press the ARC button the...
... the / button to select the desired picture format. 3 Press the OK button to confirm. 4:3 mode Choose 4:3 when you want to fill the entire screen. Owner s Manual 23 Note: When enlarging or reducing the picture size, the image may become imprinted on the screen and remain visible. 1 Press the ARC button the...

User Manual
Page 25
... to select your desired MTS mode in Mono; When having selected SAP button on the digital signal, select them with the SAP button. 2. Operation Owner s Manual 25 if the station transmits an additional sound signal as well as the original one. - This TV can receive MTS stereo programs and SAP (Secondary...
... to select your desired MTS mode in Mono; When having selected SAP button on the digital signal, select them with the SAP button. 2. Operation Owner s Manual 25 if the station transmits an additional sound signal as well as the original one. - This TV can receive MTS stereo programs and SAP (Secondary...


