Product Manual
Page 3
.... 11. Leave the shelves in the presence of the freezer. It is designed for using our Haier product. You will guide you in an enclosed cabinet. SAVE THESE INSTRUCTIONS For Future Reference Please DANGER Risk of purchase Staple your receipt to record the model and serial number. Do not operate your manual. They...
.... 11. Leave the shelves in the presence of the freezer. It is designed for using our Haier product. You will guide you in an enclosed cabinet. SAVE THESE INSTRUCTIONS For Future Reference Please DANGER Risk of purchase Staple your receipt to record the model and serial number. Do not operate your manual. They...

Product Manual
Page 5
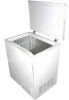
Power-On Indicator (Green) (Not in all models) 3. Vinyl Coated Wire Basket (Not in all models) 4. Exterior Drain Plug 4 English Parts and Features 4 3 5 2 1 1. Temperature Control Adjustment 2. Interior Drain Plug (See Insert) 5.
Power-On Indicator (Green) (Not in all models) 3. Vinyl Coated Wire Basket (Not in all models) 4. Exterior Drain Plug 4 English Parts and Features 4 3 5 2 1 1. Temperature Control Adjustment 2. Interior Drain Plug (See Insert) 5.

Product Manual
Page 8
... light will come on, the green run light will automatically maintain the temperature level you unplug your freezer or experience an electrical outage, allow 24 hours to pass before plugging the unit in all models) temperature control dial 7 Turn on the temperature control knob. Turning the dial to your needs. (Note: If...
... light will come on, the green run light will automatically maintain the temperature level you unplug your freezer or experience an electrical outage, allow 24 hours to pass before plugging the unit in all models) temperature control dial 7 Turn on the temperature control knob. Turning the dial to your needs. (Note: If...

Product Manual
Page 9
...the drain dial in. Defrosting usually takes a few hours. Pull out the drain dial (see fig. # 2) • Depending on your model purchased your freezer may damage the cooling coils. (A punctured coil will let the water flow out in the tray. Re-plug the drain plug inside of ...OFF position and unplug the unit. fig. # 2 Defrosting and Draining • Defrost whenever the frost becomes 1/4" thick. To defrost faster keep the freezer door open. • For draining, place a tray beneath the outer drain plug. Note: monitor the container under the drain to avoid overflow. •...
...the drain dial in. Defrosting usually takes a few hours. Pull out the drain dial (see fig. # 2) • Depending on your model purchased your freezer may damage the cooling coils. (A punctured coil will let the water flow out in the tray. Re-plug the drain plug inside of ...OFF position and unplug the unit. fig. # 2 Defrosting and Draining • Defrost whenever the frost becomes 1/4" thick. To defrost faster keep the freezer door open. • For draining, place a tray beneath the outer drain plug. Note: monitor the container under the drain to avoid overflow. •...

Product Manual
Page 13
Food temperature appears too warm: • Frequent door openings. • Allow time for recently added warm food to reach freezer temperature. • Check gaskets for proper seal. • Clean condenser coils (for temperature to adjust. 12 Food temperature is too cold: •...8226; Check if thermostat control is not in the "OFF" position. • Check if freezer is plugged in. • Check if there is too cold, adjust to a warmer setting and allow several hours for models with exposed condenser coils). • Adjust temperature control to colder setting. Compressor cycle must be...
Food temperature appears too warm: • Frequent door openings. • Allow time for recently added warm food to reach freezer temperature. • Check gaskets for proper seal. • Clean condenser coils (for temperature to adjust. 12 Food temperature is too cold: •...8226; Check if thermostat control is not in the "OFF" position. • Check if freezer is plugged in. • Check if there is too cold, adjust to a warmer setting and allow several hours for models with exposed condenser coils). • Adjust temperature control to colder setting. Compressor cycle must be...

Product Manual
Page 15
... not allow limitations on how long an implied warranty lasts, so the above limitations may have your product serviced, please contact Haier customer service 1-877-337-3639. Haier America New York, NY 10018. 877-337-3639 14 This warranty covers all parts except finish and trim. 2. This includes...of the product or of 12 months. There will be paid for by other remedies. Beyond this period, only the components of purchase, brand, model and serial number for verification prior to be defective in this appliance are covered, labor is covered/Not covered? 1. Damage from misuse, abuse, ...
... not allow limitations on how long an implied warranty lasts, so the above limitations may have your product serviced, please contact Haier customer service 1-877-337-3639. Haier America New York, NY 10018. 877-337-3639 14 This warranty covers all parts except finish and trim. 2. This includes...of the product or of 12 months. There will be paid for by other remedies. Beyond this period, only the components of purchase, brand, model and serial number for verification prior to be defective in this appliance are covered, labor is covered/Not covered? 1. Damage from misuse, abuse, ...


