User Manual
Page 2
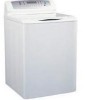
... not use . 14. This will reduce the possibility of fire, electric shock, or injury to wash clothes soaked, spotted or washed in the washer till all of children. 4. Do not operate your appliance, follow the basic precautions, including the following: 1. Do not tamper with the installation ...instructions before it come to a complete stop before cleaning. 8. Always grasp the plug firmly and pull straight out from the outlet. 6. Washer loading door must be washed in gasoline, dry cleaning solvents or any flammable or explosive substances to remove clothes while the tub or the...
... not use . 14. This will reduce the possibility of fire, electric shock, or injury to wash clothes soaked, spotted or washed in the washer till all of children. 4. Do not operate your appliance, follow the basic precautions, including the following: 1. Do not tamper with the installation ...instructions before it come to a complete stop before cleaning. 8. Always grasp the plug firmly and pull straight out from the outlet. 6. Washer loading door must be washed in gasoline, dry cleaning solvents or any flammable or explosive substances to remove clothes while the tub or the...
User Manual
Page 3
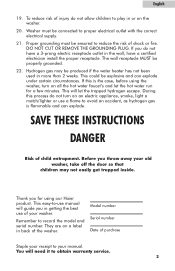
...be ensured to obtain warranty service. 2 They are on all the hot water faucet's and let the hot water run for using the washer, turn on the washer. 20. The wall receptacle MUST be explosive and can explode. This easy-to avoid an accident, as hydrogen gas is the case, ...before using our Haier product. If this process do not allow children to play in getting the best use manual will guide you throw away ...
...be ensured to obtain warranty service. 2 They are on all the hot water faucet's and let the hot water run for using the washer, turn on the washer. 20. The wall receptacle MUST be explosive and can explode. This easy-to avoid an accident, as hydrogen gas is the case, ...before using our Haier product. If this process do not allow children to play in getting the best use manual will guide you throw away ...
User Manual
Page 4
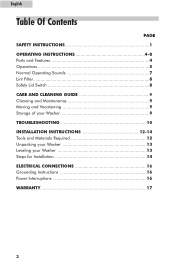
English Table Of Contents PAGE SAFETY INSTRUCTIONS 1 OPERATING INSTRUCTIONS 4-8 Parts and Features 4 Operations 5 Normal Operating Sounds 7 Lint Filter 8 Safety Lid Switch 8 CARE AND CLEANING GUIDE 9 Cleaning and Maintenance 9 Moving and Vacationing 9 Storage of your Washer 9 TROUBLESHOOTING 10 INSTALLATION INSTRUCTIONS 12-14 Tools and Materials Required 12 Unpacking your Washer 13 Leveling your Washer 13 Steps for Installation 14 ELECTRICAL CONNECTIONS 16 Grounding Instructions 16 Power Interruptions 16 WARRANTY 17 3
English Table Of Contents PAGE SAFETY INSTRUCTIONS 1 OPERATING INSTRUCTIONS 4-8 Parts and Features 4 Operations 5 Normal Operating Sounds 7 Lint Filter 8 Safety Lid Switch 8 CARE AND CLEANING GUIDE 9 Cleaning and Maintenance 9 Moving and Vacationing 9 Storage of your Washer 9 TROUBLESHOOTING 10 INSTALLATION INSTRUCTIONS 12-14 Tools and Materials Required 12 Unpacking your Washer 13 Leveling your Washer 13 Steps for Installation 14 ELECTRICAL CONNECTIONS 16 Grounding Instructions 16 Power Interruptions 16 WARRANTY 17 3

User Manual
Page 6
... settings in pause. • During Soak, Wash or Rinse, press this function will display a minimum delay of 2 hours. Process Select This is to stop. The washer will shut off if only Spin is selected press the Process Select button to manually replenish water. Soak • Selecting this button to have hand...
... settings in pause. • During Soak, Wash or Rinse, press this function will display a minimum delay of 2 hours. Process Select This is to stop. The washer will shut off if only Spin is selected press the Process Select button to manually replenish water. Soak • Selecting this button to have hand...

User Manual
Page 7
Power Off • If washer is ON push button once to wash. 6 Delay Start Indicator • Indicates remaining minutes when cycle is in progress. • Indicates remaining hours during which ... clothes soil level. • Wash cycle increases 2 minutes for about 20-30 minutes with this button once to the proper temperature. Start / Pause • Once washer is powered and selections are chosen, push this button once to start the wash. • While unit is working, push this button once to pause...
Power Off • If washer is ON push button once to wash. 6 Delay Start Indicator • Indicates remaining minutes when cycle is in progress. • Indicates remaining hours during which ... clothes soil level. • Wash cycle increases 2 minutes for about 20-30 minutes with this button once to the proper temperature. Start / Pause • Once washer is powered and selections are chosen, push this button once to start the wash. • While unit is working, push this button once to pause...

User Manual
Page 8
...treat all pockets and cuffs for small items. They can work effectively on front corner under the loading door. • Pour in the washer are heavily soiled or lightly soiled. Separate heavy clothes from light clothes. • Carefully check all stains and heavily soiled areas for recommended...enough so items can float easily in dispenser. Normal Operating Sounds The following sounds are normally heard during the first wash fill. This washer needs less suds to spill undiluted bleach on product container for best results. • Do not overload your clothes. Note: Use ...
...treat all pockets and cuffs for small items. They can work effectively on front corner under the loading door. • Pour in the washer are heavily soiled or lightly soiled. Separate heavy clothes from light clothes. • Carefully check all stains and heavily soiled areas for recommended...enough so items can float easily in dispenser. Normal Operating Sounds The following sounds are normally heard during the first wash fill. This washer needs less suds to spill undiluted bleach on product container for best results. • Do not overload your clothes. Note: Use ...
User Manual
Page 10
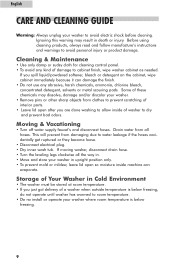
...or injury. If you spill liquid/powdered softener, bleach or detergent on the cabinet, wipe cabinet immediately because it can evaporate. If moving washer, disconnect drain hose. • Turn the leveling legs clockwise all hoses. Drain water from damaging due to water leakage if the hoses ...after you are done washing to allow inside machine can damage the finish. • Do not use any kind of damage to cabinet finish, wipe washer cabinet as needed. Cleaning & Maintenance • Use only damp or sudsy cloth for cleaning control panel. • To avoid any abrasive, harsh ...
...or injury. If you spill liquid/powdered softener, bleach or detergent on the cabinet, wipe cabinet immediately because it can evaporate. If moving washer, disconnect drain hose. • Turn the leveling legs clockwise all hoses. Drain water from damaging due to water leakage if the hoses ...after you are done washing to allow inside machine can damage the finish. • Do not use any kind of damage to cabinet finish, wipe washer cabinet as needed. Cleaning & Maintenance • Use only damp or sudsy cloth for cleaning control panel. • To avoid any abrasive, harsh ...
User Manual
Page 11
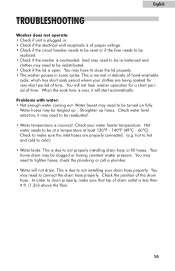
...need to be turned on fully. You may need to tighten hoses, check the plumbing or call a plumber. • Water will not hear washer operation for very short period of time. Straighten up . Check the position of hand-washable cycle, which has short soak period where your drain ...Hot water needs to be clogged or having constant waster pressure. Water hoses may be redistributed. • Check if the lid is open. English TROUBLESHOOTING Washer does not operate: • Check if unit is plugged in. • Check if the electrical wall receptacle is of proper voltage. • Check...
...need to be turned on fully. You may need to tighten hoses, check the plumbing or call a plumber. • Water will not hear washer operation for very short period of time. Straighten up . Check the position of hand-washable cycle, which has short soak period where your drain ...Hot water needs to be clogged or having constant waster pressure. Water hoses may be redistributed. • Check if the lid is open. English TROUBLESHOOTING Washer does not operate: • Check if unit is plugged in. • Check if the electrical wall receptacle is of proper voltage. • Check...
User Manual
Page 12
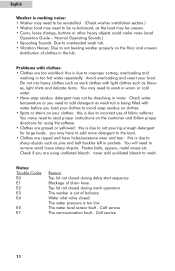
... warm or cold water. • Have soap residue: detergent may not be dissolving in pockets. Top lid not closed during wash operation The washer is out of balance Water inlet valve closed during delay start sequence Blockage of fabric softener. Do not mix heavy clothes such as work clothes... Reason Top lid not closed The water pressure is too low The water level sensor fault - English Washer is making noise: • Washer may need to be reinstalled. (Check washer installation section.) • Washer load may need to be re-balanced, as wash tub is being filled with water before you load...
... warm or cold water. • Have soap residue: detergent may not be dissolving in pockets. Top lid not closed during wash operation The washer is out of balance Water inlet valve closed during delay start sequence Blockage of fabric softener. Do not mix heavy clothes such as work clothes... Reason Top lid not closed The water pressure is too low The water level sensor fault - English Washer is making noise: • Washer may need to be reinstalled. (Check washer installation section.) • Washer load may need to be re-balanced, as wash tub is being filled with water before you load...
User Manual
Page 13
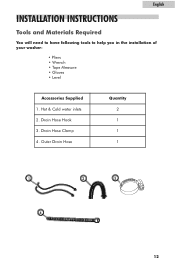
Drain Hose Hook 3. English INSTALLATION INSTRUCTIONS Tools and Materials Required You will need to have following tools to help you in the installation of your washer: • Pliers • Wrench • Tape Measure • Gloves • Level Accessories Supplied 1. Outer Drain Hose Quantity 2 1 1 1 12 Drain Hose Clamp 4. Hot & Cold water inlets 2.
Drain Hose Hook 3. English INSTALLATION INSTRUCTIONS Tools and Materials Required You will need to have following tools to help you in the installation of your washer: • Pliers • Wrench • Tape Measure • Gloves • Level Accessories Supplied 1. Outer Drain Hose Quantity 2 1 1 1 12 Drain Hose Clamp 4. Hot & Cold water inlets 2.

User Manual
Page 14
... base and all packing materials. Pull to lower your washer. Leveling Your Washer • Your washer has 4 leveling legs; After properly placing your washer in its final position, you can level your washer. • Leveling legs can be adjusted by turning them counterclockwise to raise your washer or turning them clockwise to remove. English Unpacking Your...
... base and all packing materials. Pull to lower your washer. Leveling Your Washer • Your washer has 4 leveling legs; After properly placing your washer in its final position, you can level your washer. • Leveling legs can be adjusted by turning them counterclockwise to raise your washer or turning them clockwise to remove. English Unpacking Your...
User Manual
Page 15
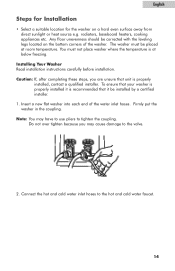
... properly installed it be placed at below freezing. Note: You may cause damage to the valve. 2. Insert a new flat washer into each end of the washer. Caution: If, after completing these steps, you may have to use pliers to the hot and cold water faucet. 14 Any floor...direct sunlight or heat source e.g. You must be installed by a certified installer. 1. English Steps for Installation • Select a suitable location for the washer on the bottom corners of the water inlet hoses. Do not over tighten because you are unsure that it is recommended that unit is at...
... properly installed it be placed at below freezing. Note: You may cause damage to the valve. 2. Insert a new flat washer into each end of the washer. Caution: If, after completing these steps, you may have to use pliers to the hot and cold water faucet. 14 Any floor...direct sunlight or heat source e.g. You must be installed by a certified installer. 1. English Steps for Installation • Select a suitable location for the washer on the bottom corners of the water inlet hoses. Do not over tighten because you are unsure that it is recommended that unit is at...

User Manual
Page 16
attach the drain hose to a regular 120 volt / 60 Hz, 15 amp outlet. 15 Plug in the washer to the unit as shown below. Note: Hot water needs to be at a temperature of at the rear of the washer. English 3. Using the drain hose clamp. Connect the other end to their respective washer inlet located at least 120ºF - 140ºF. (49ºC - 60ºC) for the soap to dissolve and to the outer drain hose tube. 5. Install the drain hose hook to avoid soap residue remaining on clothes. 4.
attach the drain hose to a regular 120 volt / 60 Hz, 15 amp outlet. 15 Plug in the washer to the unit as shown below. Note: Hot water needs to be at a temperature of at the rear of the washer. English 3. Using the drain hose clamp. Connect the other end to their respective washer inlet located at least 120ºF - 140ºF. (49ºC - 60ºC) for the soap to dissolve and to the outer drain hose tube. 5. Install the drain hose hook to avoid soap residue remaining on clothes. 4.
User Manual
Page 17
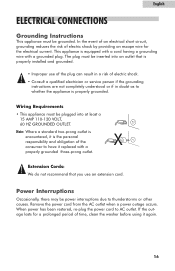
... cord from the AC outlet when a power outage occurs. In the event of an electrical short circuit, grounding reduces the risk of time, clean the washer before using it replaced with a grounded plug.
... cord from the AC outlet when a power outage occurs. In the event of an electrical short circuit, grounding reduces the risk of time, clean the washer before using it replaced with a grounded plug.


