User Manual
Page 3
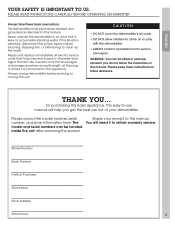
...cords that shows signs of damage anywhere along its length, at the plug, or where it to this Haier appliance. THANK YOU... ... PLEASE READ INSTRUCTIONS CAREFULLY BEFORE OPERATING DEHUMIDIFIER Always take these instructions for purchasing this manual. Model Number Serial Number Date of your receipt to obtain ...warranty service. ENGLISH YOUR SAFETY IS IMPORTANT TO US. CAUTION • DO NOT cover the dehumidifier's air vents. • DO NOT allow children to clean up the water. This easy-to-use out of Purchase Store Name Store...
...cords that shows signs of damage anywhere along its length, at the plug, or where it to this Haier appliance. THANK YOU... ... PLEASE READ INSTRUCTIONS CAREFULLY BEFORE OPERATING DEHUMIDIFIER Always take these instructions for purchasing this manual. Model Number Serial Number Date of your receipt to obtain ...warranty service. ENGLISH YOUR SAFETY IS IMPORTANT TO US. CAUTION • DO NOT cover the dehumidifier's air vents. • DO NOT allow children to clean up the water. This easy-to-use out of Purchase Store Name Store...

User Manual
Page 4
...N I N G Improper use only a UL-listed, 3-wire, grounding type, 16 AWG, 15A, 125V appliance extension cord. DO NOT USE the dehumidifier until a proper ground has been made where local codes permit if the 2-prong wall outlet is not grounded, please contact a professional electrician to help you... the adapter goes into the large slot. It contains instructions to have it replaced with a grounding wire and a grounded 3-prong plug. This dehumidifier has a power cord with a properly grounded outlet. DO NOT, under any circumstances, cut or remove the third (ground) prong from the...
...N I N G Improper use only a UL-listed, 3-wire, grounding type, 16 AWG, 15A, 125V appliance extension cord. DO NOT USE the dehumidifier until a proper ground has been made where local codes permit if the 2-prong wall outlet is not grounded, please contact a professional electrician to help you... the adapter goes into the large slot. It contains instructions to have it replaced with a grounding wire and a grounded 3-prong plug. This dehumidifier has a power cord with a properly grounded outlet. DO NOT, under any circumstances, cut or remove the third (ground) prong from the...
User Manual
Page 5
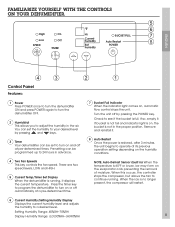
...humidity to your desired level by pressing the POWER key. There are two speed levels, LOW and HIGH. 5 Current Temp/Timer Set Display When the dehumidifier is no longer present, the compressor will restart. 5 Setting Humidity Range: 40%RH~70%RH Display Humidity Range: (LO)30%RH~(HI)90%... When the indicator light comes on or off automatically at its previous operation setting depending on and off by pressing and keys. 3 Timer Your dehumidifier can be set to 24 hours in the air. Check to operate at a pre-determined time. 6 Current Humidity/Setting Humidity Display Displays the...
...humidity to your desired level by pressing the POWER key. There are two speed levels, LOW and HIGH. 5 Current Temp/Timer Set Display When the dehumidifier is no longer present, the compressor will restart. 5 Setting Humidity Range: 40%RH~70%RH Display Humidity Range: (LO)30%RH~(HI)90%... When the indicator light comes on or off automatically at its previous operation setting depending on and off by pressing and keys. 3 Timer Your dehumidifier can be set to 24 hours in the air. Check to operate at a pre-determined time. 6 Current Humidity/Setting Humidity Display Displays the...
User Manual
Page 6
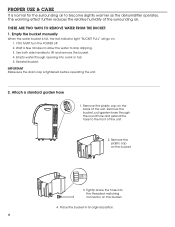
... USE & CARE It is normal for the surrounding air to stop dripping. 3. Wait a few minutes to allow the water to become slightly warmer as the dehumidifier operates. Place the bucket in its original position. 6 Remove the plastic cap on the back of the surrounding air. Remove the plastic cap on the...
... USE & CARE It is normal for the surrounding air to stop dripping. 3. Wait a few minutes to allow the water to become slightly warmer as the dehumidifier operates. Place the bucket in its original position. 6 Remove the plastic cap on the back of the surrounding air. Remove the plastic cap on the...
User Manual
Page 7
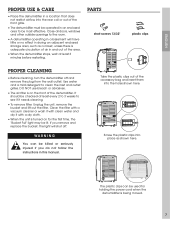
...or no effect in a basement will shut off and remove the plug from the wall outlet. ENGLISH PROPER USE & CARE • Place the dehumidifier in a location that does not restrict airflow into the holes shown here. Close all doors, windows and other outside openings to clean the inlet... and outlet grilles. PARTS short screws 13/32" plastic clips PROPER CLEANING • Before cleaning, turn the dehumidifier off . The plastic clips can be lit. Screw the plastic clips into place as a closet, unless there is on for holding the power ...
...or no effect in a basement will shut off and remove the plug from the wall outlet. ENGLISH PROPER USE & CARE • Place the dehumidifier in a location that does not restrict airflow into the holes shown here. Close all doors, windows and other outside openings to clean the inlet... and outlet grilles. PARTS short screws 13/32" plastic clips PROPER CLEANING • Before cleaning, turn the dehumidifier off . The plastic clips can be lit. Screw the plastic clips into place as a closet, unless there is on for holding the power ...
User Manual
Page 8
... and may require special cleaning methods by the dryer. Dryer should be ice forming on the coils. Airflow is below 60°F. The dehumidifier automatically turns off . The drain bucket needs to be clogged. This protects the compressor. Unsatisfactory dehumidification • When first installed, allow at... 1-877-337-3639. Check with a soft brush, this occurs. Check that all the way into the dehumidifier. • When the ambient temperature is above 112°F or below 32°F, the unit will usually disappear within 60 minutes unless the ...
... and may require special cleaning methods by the dryer. Dryer should be ice forming on the coils. Airflow is below 60°F. The dehumidifier automatically turns off . The drain bucket needs to be clogged. This protects the compressor. Unsatisfactory dehumidification • When first installed, allow at... 1-877-337-3639. Check with a soft brush, this occurs. Check that all the way into the dehumidifier. • When the ambient temperature is above 112°F or below 32°F, the unit will usually disappear within 60 minutes unless the ...

