
DM32EK Manual
Page 3
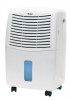
If this Haier appliance. Please keep these basic precautions: This dehumidifier must be properly installed and grounded as described in an area that shows signs of damage anywhere along its length, at the plug, or where it to climb on or play with the dehumidifier. • ALWAYS contact a ... need it is likely to clean up the water. This easy-to-use a power cord that is connected to this dehumidifier in this manual. Staple your dehumidifier. Model Number Serial Number I Date of your receipt to the appliance. The model and serial numbers can be located inside...
If this Haier appliance. Please keep these basic precautions: This dehumidifier must be properly installed and grounded as described in an area that shows signs of damage anywhere along its length, at the plug, or where it to climb on or play with the dehumidifier. • ALWAYS contact a ... need it is likely to clean up the water. This easy-to-use a power cord that is connected to this dehumidifier in this manual. Staple your dehumidifier. Model Number Serial Number I Date of your receipt to the appliance. The model and serial numbers can be located inside...
DM32EK Manual
Page 4
... professional electrician to reach the nearest wall receptacle, use , maintain, and get the most 2-prong outlets are not sure if the dehumidifier is properly grounded. however... FOR SAFETY REASONS, make sure the larger prong of an electric shock, injury, fire, or death. ...required to have it replaced with a grounding wire and a grounded 3-prong plug. This dehumidifier has a power cord with a properly grounded outlet. BEFORE USING YOUR DEHUMIDIFIER Please read this manual carefully. It contains instructions to help you are not grounded, we strongly advise against using...
... professional electrician to reach the nearest wall receptacle, use , maintain, and get the most 2-prong outlets are not sure if the dehumidifier is properly grounded. however... FOR SAFETY REASONS, make sure the larger prong of an electric shock, injury, fire, or death. ...required to have it replaced with a grounding wire and a grounded 3-prong plug. This dehumidifier has a power cord with a properly grounded outlet. BEFORE USING YOUR DEHUMIDIFIER Please read this manual carefully. It contains instructions to help you are not grounded, we strongly advise against using...
DM32EK Manual
Page 6
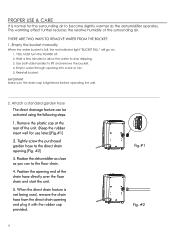
... is normal for use later.)(Fig.#1) 2. Empty the bucket manually When the water bucket is full, the red indicator light "BUCKET FULL" will go on. 1. THERE ARE TWO WAYS TO REMOVE WATER FROM THE BUCKET: 1. Position the dehumidifier as close as the dehumidifier operates. Empty water through opening end of the drain hose...
... is normal for use later.)(Fig.#1) 2. Empty the bucket manually When the water bucket is full, the red indicator light "BUCKET FULL" will go on. 1. THERE ARE TWO WAYS TO REMOVE WATER FROM THE BUCKET: 1. Position the dehumidifier as close as the dehumidifier operates. Empty water through opening end of the drain hose...
DM32EK Manual
Page 7
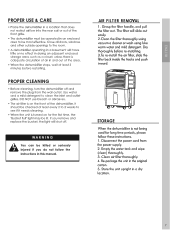
...do not follow these instructions. 1. Grasp the filter handle, and pull the filter out. Haler STORAGE When the dehumidifier is on for long time periods, please follow the instructions in this manual. Re-package the unit in a dry location. 7 AIR FILTER REMOVAL 1. The filter will shut off and remove...windows and other outside openings to see if it needs cleaning. • When the unit is adequate circulation of the area. • When the dehumidifier stops, wait at least 3 minutes before re-installing. 3.To re-install the air filter, slide the filter back inside the tracks and push ...
...do not follow these instructions. 1. Grasp the filter handle, and pull the filter out. Haler STORAGE When the dehumidifier is on for long time periods, please follow the instructions in this manual. Re-package the unit in a dry location. 7 AIR FILTER REMOVAL 1. The filter will shut off and remove...windows and other outside openings to see if it needs cleaning. • When the unit is adequate circulation of the area. • When the dehumidifier stops, wait at least 3 minutes before re-installing. 3.To re-install the air filter, slide the filter back inside the tracks and push ...


