
User Manual
Page 4
... meats is not being used . If the odor or color of danger to save as you remove the doors and leave the shelves in the freezer compartment, particularly when hands are still cold-below 40˚F". Use refrozen foods as soon as possible, to children. 8) After your refrigerator before cleaning or...
... meats is not being used . If the odor or color of danger to save as you remove the doors and leave the shelves in the freezer compartment, particularly when hands are still cold-below 40˚F". Use refrozen foods as soon as possible, to children. 8) After your refrigerator before cleaning or...
User Manual
Page 5
... obtain warranty service. 3 SAVE THESE INSTRUCTIONS DANGER Risk of child entrapment. Before you for freestanding installation only. 11) Do not operate your old refrigerator or freezer, take off the doors. Model number Serial number Date of purchase Staple your manual. It is designed for using our Amana product. Remember to your...
... obtain warranty service. 3 SAVE THESE INSTRUCTIONS DANGER Risk of child entrapment. Before you for freestanding installation only. 11) Do not operate your old refrigerator or freezer, take off the doors. Model number Serial number Date of purchase Staple your manual. It is designed for using our Amana product. Remember to your...

User Manual
Page 7
Adjustable Full-Width Glass Spill Proof Shelves (2) 9. Adjustable Temperature Control (Location may vary per model purchased) English Parts And Features 1 11 2 10 3 9 8 4 7 6 ATB11ARW 5 1. Full-Width Freezer Door Shelves (2) 3. See Thru Gray Tint Covered Dairy Compartment 4. Full-Width Door Shelves (2) (Shelves May Vary per model purchased) 10. See Thru Gray Tint Crispers (2) 5 7. Clear Glass Crisper Cover 8. Automatic Interior Light 11. Freezer Shelf (Style may vary per Model) 5. Ice Cube Trays (2) 2. Adjustable Front Leveling Legs (not shown) 6.
Adjustable Full-Width Glass Spill Proof Shelves (2) 9. Adjustable Temperature Control (Location may vary per model purchased) English Parts And Features 1 11 2 10 3 9 8 4 7 6 ATB11ARW 5 1. Full-Width Freezer Door Shelves (2) 3. See Thru Gray Tint Covered Dairy Compartment 4. Full-Width Door Shelves (2) (Shelves May Vary per model purchased) 10. See Thru Gray Tint Crispers (2) 5 7. Clear Glass Crisper Cover 8. Automatic Interior Light 11. Freezer Shelf (Style may vary per Model) 5. Ice Cube Trays (2) 2. Adjustable Front Leveling Legs (not shown) 6.
User Manual
Page 10
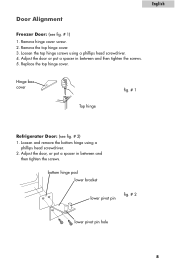
English Door Alignment Freezer Door: (see fig. # 2) 1. Loosen and remove the bottom hinge using a phillips head screwdriver. 4. Adjust the door or put a spacer in between and then tighten the ...
English Door Alignment Freezer Door: (see fig. # 2) 1. Loosen and remove the bottom hinge using a phillips head screwdriver. 4. Adjust the door or put a spacer in between and then tighten the ...

User Manual
Page 11
... refrigerator doors and install them in place. 2. Remove the adhesive tape on the upper part of freezer door with a phillips head screwdriver. screw holes stop of freezer door middle bracket (central hinge bracket) middle pivot pin fig. # 3 stop of refrigerator door 9 Remove the adhesive tape ...opposite side of the door. You can select your preference of door opening . Remove the door stoppers from the hinge. Fix refrigerator and freezer door by pulling it vertically, and keep them on refrigerator door, lift and take down refrigerator door, and carefully put it aside. ...
... refrigerator doors and install them in place. 2. Remove the adhesive tape on the upper part of freezer door with a phillips head screwdriver. screw holes stop of freezer door middle bracket (central hinge bracket) middle pivot pin fig. # 3 stop of refrigerator door 9 Remove the adhesive tape ...opposite side of the door. You can select your preference of door opening . Remove the door stoppers from the hinge. Fix refrigerator and freezer door by pulling it vertically, and keep them on refrigerator door, lift and take down refrigerator door, and carefully put it aside. ...
User Manual
Page 12
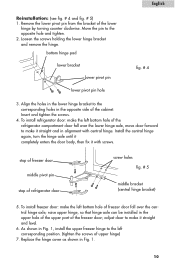
... it straight and in alignment with screws. Move the pin to make the left corresponding position. (tighten the screws of the cabinet. stop of freezer door middle pivot pin stop of the lower hinge by turning counter clockwise. raise upper hinge, so that hinge axle can be installed in the... of upper hinge) 7. Insert and tighten the screws. 4. As shown in Fig. 1. 10 Replace the hinge cover as shown in Fig. 1, install the upper freezer hinge to make it with central hinge. adjust door to the left bottom hole of the refrigerator compartment door fall over the lower hinge axle...
... it straight and in alignment with screws. Move the pin to make the left corresponding position. (tighten the screws of the cabinet. stop of freezer door middle pivot pin stop of the lower hinge by turning counter clockwise. raise upper hinge, so that hinge axle can be installed in the... of upper hinge) 7. Insert and tighten the screws. 4. As shown in Fig. 1. 10 Replace the hinge cover as shown in Fig. 1, install the upper freezer hinge to make it with central hinge. adjust door to the left bottom hole of the refrigerator compartment door fall over the lower hinge axle...
User Manual
Page 13
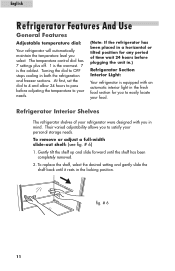
... temperature level you to satisfy your food. fig. # 6 11 Gently tilt the shelf up and slide forward until it rests in both the refrigeration and freezer sections. Their varied adjustability allows you select. The temperature control dial has 7 settings plus off. 1 is the warmest. 7 is equipped with you to easily locate...
... temperature level you to satisfy your food. fig. # 6 11 Gently tilt the shelf up and slide forward until it rests in both the refrigeration and freezer sections. Their varied adjustability allows you select. The temperature control dial has 7 settings plus off. 1 is the warmest. 7 is equipped with you to easily locate...
User Manual
Page 15
... noted. English Food Storage Information Fresh Food • When storing fresh food, which is not prepackaged, be sure to wrap or store food in the freezer section. 13 Follow the suggestions below for safe storage: • Chicken 1-2 Days • Ground Beef 1-2 Days • Cold Cuts 3-5 Days • Steaks/Roasts 3-5 Days •...
... noted. English Food Storage Information Fresh Food • When storing fresh food, which is not prepackaged, be sure to wrap or store food in the freezer section. 13 Follow the suggestions below for safe storage: • Chicken 1-2 Days • Ground Beef 1-2 Days • Cold Cuts 3-5 Days • Steaks/Roasts 3-5 Days •...
User Manual
Page 16
... , or out. Improper storage will result in odor and taste transfer and will click when it cycles on the packaging. English Frozen Food • Proper freezer storage requires correct packaging. All foods must be in packages, which do not allow the flow of air or moisture in the drying out of...
... , or out. Improper storage will result in odor and taste transfer and will click when it cycles on the packaging. English Frozen Food • Proper freezer storage requires correct packaging. All foods must be in packages, which do not allow the flow of air or moisture in the drying out of...

User Manual
Page 18
.... Remove the highest shelf. 3. Always replace with the unit lying down. To replace cover, insert rear clips in first and gently push front clip in freezer and refrigerator. English Light Bulb Replacement (Location may be power interruptions due to "General cleaning" section. When power has been restored, replug power cord to... pull to cool before reusing. Do not exceed the 15 watts rating at 15 watts or lesser wattage. 7. Remove the power cord from refrigerator and freezer, move the refrigerator vertically. Possible damage to the sealed system could occur. 16
.... Remove the highest shelf. 3. Always replace with the unit lying down. To replace cover, insert rear clips in first and gently push front clip in freezer and refrigerator. English Light Bulb Replacement (Location may be power interruptions due to "General cleaning" section. When power has been restored, replug power cord to... pull to cool before reusing. Do not exceed the 15 watts rating at 15 watts or lesser wattage. 7. Remove the power cord from refrigerator and freezer, move the refrigerator vertically. Possible damage to the sealed system could occur. 16
User Manual
Page 19
...• Interior needs cleaning. • Foods improperly wrapped or sealed are completely closed. Refrigerator/Freezer door does not shut properly: • Level the refrigerator. • Re align refrigerator/freezer door. • Check for temperature to colder setting. Refrigerator runs too frequently • This... opened frequently or for an extended period of the refrigerator: • This is too cold, adjust to reach fresh food or freezer temperature. • Check gaskets for proper seal. Food temperature appears too warm • Frequent door openings. • Allow time...
...• Interior needs cleaning. • Foods improperly wrapped or sealed are completely closed. Refrigerator/Freezer door does not shut properly: • Level the refrigerator. • Re align refrigerator/freezer door. • Check for temperature to colder setting. Refrigerator runs too frequently • This... opened frequently or for an extended period of the refrigerator: • This is too cold, adjust to reach fresh food or freezer temperature. • Check gaskets for proper seal. Food temperature appears too warm • Frequent door openings. • Allow time...


