User Manual
Page 3
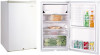
Leave the shelves in back of the refrigerator. Thank you throw away your old appliance,take off the doors. Model number Serial number Date of purchase Staple your receipt to -use of child entrapment. Remember to obtain warranty service. 2 You will guide you in getting the best use manual will need it to record the model and serial number. They are on a label in place so that children may not easily climb inside. SAVE THESE INSTRUCTIONS English DANGER Risk of your manual. This easy-to your refrigerator. Before you for using our Haier product.
Leave the shelves in back of the refrigerator. Thank you throw away your old appliance,take off the doors. Model number Serial number Date of purchase Staple your receipt to -use of child entrapment. Remember to obtain warranty service. 2 You will guide you in getting the best use manual will need it to record the model and serial number. They are on a label in place so that children may not easily climb inside. SAVE THESE INSTRUCTIONS English DANGER Risk of your manual. This easy-to your refrigerator. Before you for using our Haier product.
User Manual
Page 6
... or heat source e.g. If it is a suitable power Outlet (115 volts, 15 amps outlet) with proper grounding to raise or lower the refrigerator. • This model is a dangerous practice since it provides no effective grounding for , you should install it was not designed to reduce moisture build up inside and outside...
... or heat source e.g. If it is a suitable power Outlet (115 volts, 15 amps outlet) with proper grounding to raise or lower the refrigerator. • This model is a dangerous practice since it provides no effective grounding for , you should install it was not designed to reduce moisture build up inside and outside...
User Manual
Page 7
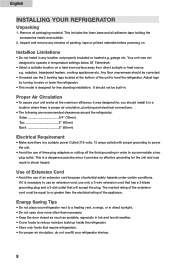
... holes in the lower hinge bracket to the opposite hole and tighten. (see fig. #1) 3. Make sure the door closes easily but do not tighten all models) (see fig. #1) 1. English Door Alignment (all the way. (see fig. #1) 11. Remove the top hinge cover. 2. Reversing the Door Hinge (All... models) 1. Removing the top hinge cover screw and then remove the top hinge cover. (see fig. #1) fig. # 2 door pin fig. # 3 lower hinge bracket 6 Loosen the screws ...
... holes in the lower hinge bracket to the opposite hole and tighten. (see fig. #1) 3. Make sure the door closes easily but do not tighten all models) (see fig. #1) 1. English Door Alignment (all the way. (see fig. #1) 11. Remove the top hinge cover. 2. Reversing the Door Hinge (All... models) 1. Removing the top hinge cover screw and then remove the top hinge cover. (see fig. #1) fig. # 2 door pin fig. # 3 lower hinge bracket 6 Loosen the screws ...
User Manual
Page 8
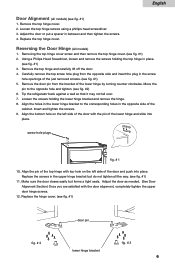
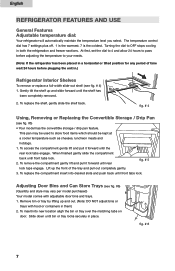
... aligh the bin or tray over the matching tabs on door. Adjusting Door Bins and Can Store Trays (see fig. #5) • Your model has the convertible storage / drip pan feature. To insert into desired slots and push back until the shelf has been completely removed. 2. fig...remove the compartment gently lift and pull it forward until rear fig. # 5 lock taps engage. This pan may vary per model purchased) Your model comes with food or containers in both the refrigeration and freezer sections. English REFRIGERATOR FEATURES AND USE General Features Adjustable temperature dial: ...
... aligh the bin or tray over the matching tabs on door. Adjusting Door Bins and Can Store Trays (see fig. #5) • Your model has the convertible storage / drip pan feature. To insert into desired slots and push back until the shelf has been completely removed. 2. fig...remove the compartment gently lift and pull it forward until rear fig. # 5 lock taps engage. This pan may vary per model purchased) Your model comes with food or containers in both the refrigeration and freezer sections. English REFRIGERATOR FEATURES AND USE General Features Adjustable temperature dial: ...
User Manual
Page 14
This warranty covers all defects in workmanship or materials for a period of purchase, brand, model and serial number for verification prior to incidental or consequential damages. Customer shall provide Haier with a refurbished or new product the same or similar to you . The mechanical and ...functional replacement parts and labor on how long an implied warranty lasts, so the above limitations may not apply to the original at Haier's discretion. Damage from improper installation. Labor (after the initial 12 months). This limited warranty doesn't apply to be repaired or ...
This warranty covers all defects in workmanship or materials for a period of purchase, brand, model and serial number for verification prior to incidental or consequential damages. Customer shall provide Haier with a refurbished or new product the same or similar to you . The mechanical and ...functional replacement parts and labor on how long an implied warranty lasts, so the above limitations may not apply to the original at Haier's discretion. Damage from improper installation. Labor (after the initial 12 months). This limited warranty doesn't apply to be repaired or ...


