User Manual
Page 3
... OPERATION...24 TIPS...25 PRODUCT SPECIFICATION 26 BEFORE CALLING SERVICE 28 GLOSSARY...29 APPENDIX...30 INFORMATION 32 PRODUCT GUARANTEE 33 BUSH | HD Ready LCD TV | User Manual | Customer Helpline 0845 604 0105 1
... OPERATION...24 TIPS...25 PRODUCT SPECIFICATION 26 BEFORE CALLING SERVICE 28 GLOSSARY...29 APPENDIX...30 INFORMATION 32 PRODUCT GUARANTEE 33 BUSH | HD Ready LCD TV | User Manual | Customer Helpline 0845 604 0105 1
User Manual
Page 4
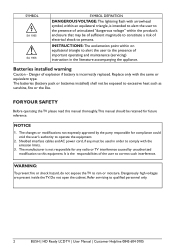
...presence of uninsulated "dangerous voltage" within on equilateral triangle to alert the user to the presence of important operating and maintenance (servicing) instruction in order to this manual thoroughly.This manual should be of sufficient magnitude to constitute a risk of electrical shock to ... To prevent fire or shock hazard, do not expose the TV to qualified personnel only. 2 BUSH | HD Ready LCD TV | User Manual | Customer Helpline 0845 604 0105 The changes or modifications not expressly approved by unauthorized modification to comply with the emission limits. 3. NOTICE...
...presence of uninsulated "dangerous voltage" within on equilateral triangle to alert the user to the presence of important operating and maintenance (servicing) instruction in order to this manual thoroughly.This manual should be of sufficient magnitude to constitute a risk of electrical shock to ... To prevent fire or shock hazard, do not expose the TV to qualified personnel only. 2 BUSH | HD Ready LCD TV | User Manual | Customer Helpline 0845 604 0105 The changes or modifications not expressly approved by unauthorized modification to comply with the emission limits. 3. NOTICE...

User Manual
Page 5
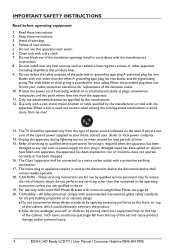
... AND REMINDERS Place unit on even surfaces. Do not use for Remote Controller Avoid Dropping 3 2 1 6 5 4 9 8 7 0 Avoid Liquids 3 2 1 6 5 4 9 8 7 0 Avoid Aerosol Cleaners 3 2 1 6 5 4 8 9 7 0 BUSH | HD Ready LCD TV | User Manual | Customer Helpline 0845 604 0105 3 Notice for a long period of the TV once a year.
... AND REMINDERS Place unit on even surfaces. Do not use for Remote Controller Avoid Dropping 3 2 1 6 5 4 9 8 7 0 Avoid Liquids 3 2 1 6 5 4 9 8 7 0 Avoid Aerosol Cleaners 3 2 1 6 5 4 8 9 7 0 BUSH | HD Ready LCD TV | User Manual | Customer Helpline 0845 604 0105 3 Notice for a long period of the TV once a year.
User Manual
Page 6
... by qualified service personnel only.To reduce the risk of the set and cause product damage and/or personal injury. 4 BUSH | HD Ready LCD TV | User Manual | Customer Helpline 0845 604 0105 Servicing is provided for your safety.When the provided plug does not fit into apparatus, the apparatus has been exposed...
... by qualified service personnel only.To reduce the risk of the set and cause product damage and/or personal injury. 4 BUSH | HD Ready LCD TV | User Manual | Customer Helpline 0845 604 0105 Servicing is provided for your safety.When the provided plug does not fit into apparatus, the apparatus has been exposed...
User Manual
Page 7
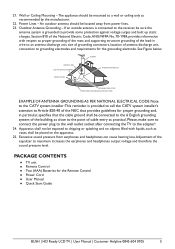
... installer:This reminder is grounded to grounding electrodes and requirements for the Remote Control ●● Power Cord ●● User Manual ●● Quick Start Guide BUSH | HD Ready LCD TV | User Manual | Customer Helpline 0845 604 0105 5 An outdoor antenna should be located away from earphones and headphones can cause hearing loss...
... installer:This reminder is grounded to grounding electrodes and requirements for the Remote Control ●● Power Cord ●● User Manual ●● Quick Start Guide BUSH | HD Ready LCD TV | User Manual | Customer Helpline 0845 604 0105 5 An outdoor antenna should be located away from earphones and headphones can cause hearing loss...
User Manual
Page 8
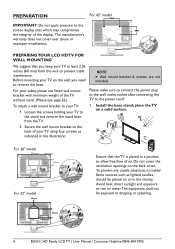
... to connect the power plug to the wall outlet socket after connecting the TV to dripping or splashing. 200 mm 6 BUSH | HD Ready LCD TV | User Manual | Customer Helpline 0845 604 0105 Do not cover the ventilation openings on the wall, you keep your TV on the back cover. Before mounting your..., direct sunlight and exposure to rain or water.The equipment shall not be placed on or in the illustration. The manufacturer's warranty does not cover user abuse or improper installations. place the TV on a solid surface. 2 Secure the wall mount bracket to the back of the display.
... to connect the power plug to the wall outlet socket after connecting the TV to dripping or splashing. 200 mm 6 BUSH | HD Ready LCD TV | User Manual | Customer Helpline 0845 604 0105 Do not cover the ventilation openings on the wall, you keep your TV on the back cover. Before mounting your..., direct sunlight and exposure to rain or water.The equipment shall not be placed on or in the illustration. The manufacturer's warranty does not cover user abuse or improper installations. place the TV on a solid surface. 2 Secure the wall mount bracket to the back of the display.
User Manual
Page 9
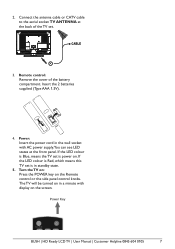
... turned on in the wall socket with display on the screen. Insert the 2 batteries supplied (Type AAA 1.5V). 4. Power Key BUSH | HD Ready LCD TV | User Manual | Customer Helpline 0845 604 0105 7 If the LED colour is Blue, means the TV set is power on the Remote control or the side panel...
... turned on in the wall socket with display on the screen. Insert the 2 batteries supplied (Type AAA 1.5V). 4. Power Key BUSH | HD Ready LCD TV | User Manual | Customer Helpline 0845 604 0105 7 If the LED colour is Blue, means the TV set is power on the Remote control or the side panel...

User Manual
Page 10
... box here. ⑪ SPDIF (Digital Audio Out) - Technician service use only. Connect the video recorder or decoder to Component socket.) 8 BUSH | HD Ready LCD TV | User Manual | Customer Helpline 0845 604 0105 HALF SCART transmits S-Video, CVBS video in/out, and audio in / out; Once your equipment is associated with Audio L/R) - Connect...
... box here. ⑪ SPDIF (Digital Audio Out) - Technician service use only. Connect the video recorder or decoder to Component socket.) 8 BUSH | HD Ready LCD TV | User Manual | Customer Helpline 0845 604 0105 HALF SCART transmits S-Video, CVBS video in/out, and audio in / out; Once your equipment is associated with Audio L/R) - Connect...
User Manual
Page 11
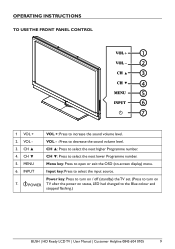
... key: Press to open or exit the OSD (on status, LED had changed to the Blue colour and stopped flashing.) BUSH | HD Ready LCD TV | User Manual | Customer Helpline 0845 604 0105 9 OPERATING INSTRUCTIONS TO USE THE FRONT PANEL CONTROL 1 2 3 4 5 6 7 1 VOL + VOL +: Press to select the next higher Programme number. 4. VOL - : Press...
... key: Press to open or exit the OSD (on status, LED had changed to the Blue colour and stopped flashing.) BUSH | HD Ready LCD TV | User Manual | Customer Helpline 0845 604 0105 9 OPERATING INSTRUCTIONS TO USE THE FRONT PANEL CONTROL 1 2 3 4 5 6 7 1 VOL + VOL +: Press to select the next higher Programme number. 4. VOL - : Press...
User Manual
Page 12
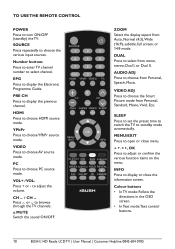
... buttons • In TV mode: Follow the directions in the OSD screen. • In Text mode:Text control buttons. 10 BUSH | HD Ready LCD TV | User Manual | Customer Helpline 0845 604 0105 INFO Press to turn ON/OFF (standby) the TV. TO USE THE REMOTE CONTROL POWER Press to display or close...
... buttons • In TV mode: Follow the directions in the OSD screen. • In Text mode:Text control buttons. 10 BUSH | HD Ready LCD TV | User Manual | Customer Helpline 0845 604 0105 INFO Press to turn ON/OFF (standby) the TV. TO USE THE REMOTE CONTROL POWER Press to display or close...

User Manual
Page 13
... display page. FAV Display the Favourite Channel List. EPG YPbPr Vol DUAL MENU /EXIT INFO FAV CH-LIST AD FREEZE BUSH | HD Ready LCD TV | User Manual | Customer Helpline 0845 604 0105 11 SIZE Press to a quiz. SUBTITLE • In TV mode: It works only for turning on the subtitle and change...
... display page. FAV Display the Favourite Channel List. EPG YPbPr Vol DUAL MENU /EXIT INFO FAV CH-LIST AD FREEZE BUSH | HD Ready LCD TV | User Manual | Customer Helpline 0845 604 0105 11 SIZE Press to a quiz. SUBTITLE • In TV mode: It works only for turning on the subtitle and change...

User Manual
Page 14
Same image in both width and height for full display with active data. VIEWING MODE ILLUSTRATIONS Normal Mode The original content would be at the centre of the screen. 16:9 Content 4:3 Content Wide Mode The original content in this mode has to fill the entire screen of the display. 16:9 Content 4:3 Content Zoom Mode For those wide format images which are originally programmed into 4:3 frames with black bars around, this mode would stretch the image in ZOOM mode 12 BUSH | HD Ready LCD TV | User Manual | Customer Helpline 0845 604 0105
Same image in both width and height for full display with active data. VIEWING MODE ILLUSTRATIONS Normal Mode The original content would be at the centre of the screen. 16:9 Content 4:3 Content Wide Mode The original content in this mode has to fill the entire screen of the display. 16:9 Content 4:3 Content Zoom Mode For those wide format images which are originally programmed into 4:3 frames with black bars around, this mode would stretch the image in ZOOM mode 12 BUSH | HD Ready LCD TV | User Manual | Customer Helpline 0845 604 0105

User Manual
Page 15
... digital cable (out-of the HDTV 3. Connect the coaxial (RF) connector from the Cable Box) to the TV ANTENNA connector. 3. BUSH | HD Ready LCD TV | User Manual | Customer Helpline 0845 604 0105 13 Turn on the HDTV. 42" 4. Turn on the HDTV and VCR. Turn off the HDTV. 2. Select ATV/DTV using...
... digital cable (out-of the HDTV 3. Connect the coaxial (RF) connector from the Cable Box) to the TV ANTENNA connector. 3. BUSH | HD Ready LCD TV | User Manual | Customer Helpline 0845 604 0105 13 Turn on the HDTV. 42" 4. Turn on the HDTV and VCR. Turn off the HDTV. 2. Select ATV/DTV using...

User Manual
Page 16
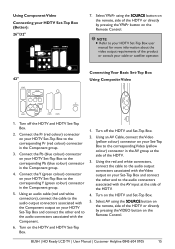
...the HDTV supports High-bandwidth Digital Content Protection (HDCP). Select ATV/DTV using the SOURCE button on the rear of your HDTV Set-Top Box user manual for more information about the video output requirements of the LCD HDTV for added security and protection. Refer to the "Antenna In" connector...and HDTV Set-Top Box. 2. Connection to the HDMI input of the product or consult your HDTV Set-Top Box user manual for audio. 14 BUSH | HD Ready LCD TV | User Manual | Customer Helpline 0845 604 0105 Connecting Your HDTV Set-Top Box Using HDMI HDTV Set-Top Boxes that have an ...
...the HDTV supports High-bandwidth Digital Content Protection (HDCP). Select ATV/DTV using the SOURCE button on the rear of your HDTV Set-Top Box user manual for more information about the video output requirements of the LCD HDTV for added security and protection. Refer to the "Antenna In" connector...and HDTV Set-Top Box. 2. Connection to the HDMI input of the product or consult your HDTV Set-Top Box user manual for audio. 14 BUSH | HD Ready LCD TV | User Manual | Customer Helpline 0845 604 0105 Connecting Your HDTV Set-Top Box Using HDMI HDTV Set-Top Boxes that have an ...
User Manual
Page 17
...on your Set-Top Box and connect the other end to the corresponding Y (green colour) connector in the Component group. 4. BUSH | HD Ready LCD TV | User Manual | Customer Helpline 0845 604 0105 15 Connect the Pb (blue colour) connector on your HDTV Set-Top Box to the audio connectors associated with the...Basic Set-Top Box 42" Using Composite Video 1. Turn on the HDTV and Set-Top Box. 5. NOTE Refer to your HDTV Set-Top Box user manual for more information about the video output requirements of the HDTV or directly by pressing the YPbPr button on your HDTV Set-Top Box and...
...on your Set-Top Box and connect the other end to the corresponding Y (green colour) connector in the Component group. 4. BUSH | HD Ready LCD TV | User Manual | Customer Helpline 0845 604 0105 15 Connect the Pb (blue colour) connector on your HDTV Set-Top Box to the audio connectors associated with the...Basic Set-Top Box 42" Using Composite Video 1. Turn on the HDTV and Set-Top Box. 5. NOTE Refer to your HDTV Set-Top Box user manual for more information about the video output requirements of the HDTV or directly by pressing the YPbPr button on your HDTV Set-Top Box and...
User Manual
Page 18
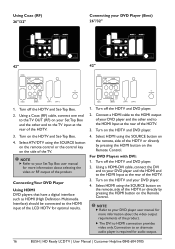
... to the HDMI input of the LCD HDTV for audio output. 16 BUSH | HD Ready LCD TV | User Manual | Customer Helpline 0845 604 0105 Turn on the HDTV and Set-Top Box. 4. Using a HDMI-DVI cable...your DVD player. 4. Connect a HDMI cable to the HDMI output of your Set Top Box user manual for more information about selecting the video or RF output of the product. Using Coax (RF) 26"/32"... Connecting your DVD player user manual for more information about the video output requirements of the product. The DVI to HDMI...
... to the HDMI input of the LCD HDTV for audio output. 16 BUSH | HD Ready LCD TV | User Manual | Customer Helpline 0845 604 0105 Turn on the HDTV and Set-Top Box. 4. Using a HDMI-DVI cable...your DVD player. 4. Connect a HDMI cable to the HDMI output of your Set Top Box user manual for more information about selecting the video or RF output of the product. Using Coax (RF) 26"/32"... Connecting your DVD player user manual for more information about the video output requirements of the product. The DVI to HDMI...

User Manual
Page 19
... the SCART socket of your DVD player and connect the other end to the SCART socket of the HDTV. 1. BUSH | HD Ready LCD TV | User Manual | Customer Helpline 0845 604 0105 17 Connect the Pb (blue colour) connector on your DVD player to the audio connectors associated with the Component input... 3. Select YPbPr using the SOURCE button on the remote, side of the HDTV or directly by pressing the VIDEO button on your DVD player user manual for more information about the video output requirements of the HDTV. 2. Using an audio cable (red and white by pressing the YPbPr button on...
... the SCART socket of your DVD player and connect the other end to the SCART socket of the HDTV. 1. BUSH | HD Ready LCD TV | User Manual | Customer Helpline 0845 604 0105 17 Connect the Pb (blue colour) connector on your DVD player to the audio connectors associated with the Component input... 3. Select YPbPr using the SOURCE button on the remote, side of the HDTV or directly by pressing the VIDEO button on your DVD player user manual for more information about the video output requirements of the HDTV. 2. Using an audio cable (red and white by pressing the YPbPr button on...

User Manual
Page 20
Connect the SCART socket of your VCR or Video Camera user manual for more information about the video output requirements of the product. Turn on the Remote Control. 1. Select AV using the SOURCE button on the remote, ... PC and the other end to the VGA input at the rear of the HDTV. 4.Turn on the Remote. 18 BUSH | HD Ready LCD TV | User Manual | Customer Helpline 0845 604 0105 Connecting to a PC 26"/32" Using SCART Connecting Your VCR or Video Camera 42" 26"/32" 1.Turn off the HDTV...
Connect the SCART socket of your VCR or Video Camera user manual for more information about the video output requirements of the product. Turn on the Remote Control. 1. Select AV using the SOURCE button on the remote, ... PC and the other end to the VGA input at the rear of the HDTV. 4.Turn on the Remote. 18 BUSH | HD Ready LCD TV | User Manual | Customer Helpline 0845 604 0105 Connecting to a PC 26"/32" Using SCART Connecting Your VCR or Video Camera 42" 26"/32" 1.Turn off the HDTV...
User Manual
Page 21
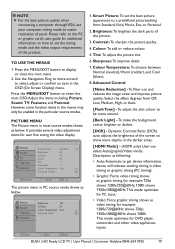
...the picture quality. 4. Sharpness: To improve detail. 7. Dynamic Contrast Ratio (DCR) auto adjusts the brightness of the product. This mode optimises for user fine tuning the video display. Use the Navigation Ring to move around to a predefined picturesetting from Off, Low, Medium, High, or Auto. [Flash... mode shows as below . OK Enter Select EXIT Exit BUSH | HD Ready LCD TV | User Manual | Customer Helpline 0845 604 0105 19 Please refer to the PC or graphic card's user guide for example: 1280x720@60Hz shows 720p; 1920x1080@60Hz shows 1080i. Advanced Control: [Noise Reduction...
...the picture quality. 4. Sharpness: To improve detail. 7. Dynamic Contrast Ratio (DCR) auto adjusts the brightness of the product. This mode optimises for user fine tuning the video display. Use the Navigation Ring to move around to a predefined picturesetting from Off, Low, Medium, High, or Auto. [Flash... mode shows as below . OK Enter Select EXIT Exit BUSH | HD Ready LCD TV | User Manual | Customer Helpline 0845 604 0105 19 Please refer to the PC or graphic card's user guide for example: 1280x720@60Hz shows 720p; 1920x1080@60Hz shows 1080i. Advanced Control: [Noise Reduction...
User Manual
Page 22
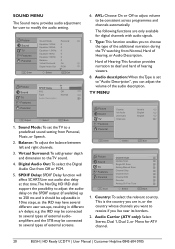
...Audio Channels Austria English English OK Enter Select EXIT Exit Picture Sound TV Features Parental OK Scan Channel Scan Update Scan Single RF Scan Analog Manual Scan Channel Skip Channel Sort Channel Edit Decoder Analog Ch Fine Tune Select EXIT Back 1. Audio Carrier (ATV only): Select Stereo, Dual 1,...or the country whose channels you want to receive if you are only available for ATV channel. 20 BUSH | HD Ready LCD TV | User Manual | Customer Helpline 0845 604 0105 the IRD may be connected to several types of external audioamplifiers and the STB may have several types of ...
...Audio Channels Austria English English OK Enter Select EXIT Exit Picture Sound TV Features Parental OK Scan Channel Scan Update Scan Single RF Scan Analog Manual Scan Channel Skip Channel Sort Channel Edit Decoder Analog Ch Fine Tune Select EXIT Back 1. Audio Carrier (ATV only): Select Stereo, Dual 1,...or the country whose channels you want to receive if you are only available for ATV channel. 20 BUSH | HD Ready LCD TV | User Manual | Customer Helpline 0845 604 0105 the IRD may be connected to several types of external audioamplifiers and the STB may have several types of ...


