
User Manual
Page 1
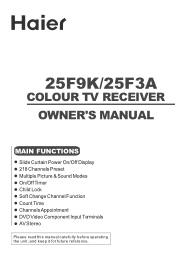
25F9K/25F3A COLOUR TV RECEIVER OWNER'S MANUAL MAIN FUNCTIONS Slide Curtain Power On/Off Display 218 Channels Preset Multiple Picture & Sound Modes On/Off Timer Child Lock Soft Change Channel Function Count Time Channels Appointment DVD Video Component Input Terminals AV Stereo Please read this manual carefully before operating the unit, and keep it for future reference.
25F9K/25F3A COLOUR TV RECEIVER OWNER'S MANUAL MAIN FUNCTIONS Slide Curtain Power On/Off Display 218 Channels Preset Multiple Picture & Sound Modes On/Off Timer Child Lock Soft Change Channel Function Count Time Channels Appointment DVD Video Component Input Terminals AV Stereo Please read this manual carefully before operating the unit, and keep it for future reference.
User Manual
Page 3
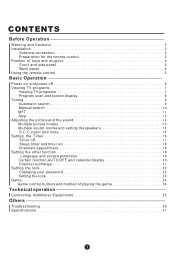
CONTENTS Before Operation Warning and Cautions Installation Antenna connection Preparation for the remote control Position of playing the game Technical operation Connecting Additional Equipments Others Troubleshooting Specifications Manual search MFT Skip Adjusting the picture and the sound Multiple picture modes 1 3 Multiple sound modes and setting the speakers. Sleep timer and timer on Channels appointment Setting the other function Language and screen protection Curtain function,AUTO OFF and calendar display Channel exchange Setting the lock Changing your password Setting the lock Game...
CONTENTS Before Operation Warning and Cautions Installation Antenna connection Preparation for the remote control Position of playing the game Technical operation Connecting Additional Equipments Others Troubleshooting Specifications Manual search MFT Skip Adjusting the picture and the sound Multiple picture modes 1 3 Multiple sound modes and setting the speakers. Sleep timer and timer on Channels appointment Setting the other function Language and screen protection Curtain function,AUTO OFF and calendar display Channel exchange Setting the lock Changing your password Setting the lock Game...

User Manual
Page 4
In order to prolong the using hard cloth, the tube surface will be cleaned with benzene, petrol and other chemicals. 4. Don't open the back cover, otherwise it on the display tube In general, it is not needed to rain or moisture. 2. Don't clean the cabinet and the screen with a dry cotton cloth after cutting off the power. To prevent the TV set . Explanation on a ventilated place. 5. Don't place the TV set to clean the tube surface. When the TV set isn't going to damage the components in the TV set and harm you clean the TV set, please pull out the power plug from ...
In order to prolong the using hard cloth, the tube surface will be cleaned with benzene, petrol and other chemicals. 4. Don't open the back cover, otherwise it on the display tube In general, it is not needed to rain or moisture. 2. Don't clean the cabinet and the screen with a dry cotton cloth after cutting off the power. To prevent the TV set . Explanation on a ventilated place. 5. Don't place the TV set to clean the tube surface. When the TV set isn't going to damage the components in the TV set and harm you clean the TV set, please pull out the power plug from ...

User Manual
Page 5
Tips for the remote control Battery installation ! The battery life should be used batteries in the specified manner. ! Remove the batteries cover. ! Dispose of used for a long period of the battery to the +/marks inside the battery compartment. Do not throw the batteries into a fire. Preparation for remote operation ! Installation Antenna connection Generally speaking, to enjoy a clearer picture, we recommend that you use . ! Insert two size AA batteries matching the +/-polarities of time or when the batteries are different. 300 twin-lead cable Antenna adapter ...
Tips for the remote control Battery installation ! The battery life should be used batteries in the specified manner. ! Remove the batteries cover. ! Dispose of used for a long period of the battery to the +/marks inside the battery compartment. Do not throw the batteries into a fire. Preparation for remote operation ! Installation Antenna connection Generally speaking, to enjoy a clearer picture, we recommend that you use . ! Insert two size AA batteries matching the +/-polarities of time or when the batteries are different. 300 twin-lead cable Antenna adapter ...
User Manual
Page 6
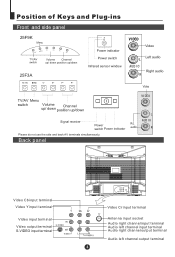
TV/AV P+ TV/AV switch Volume Channel up/ down position up/down Power indicator Power switch Infrared sensor window 25F3A Video Left audio Right audio Video TV/AV Menu switch Volume Channel up/ down position up/down Signal receiver Power switch Power indicator Please do ...
TV/AV P+ TV/AV switch Volume Channel up/ down position up/down Power indicator Power switch Infrared sensor window 25F3A Video Left audio Right audio Video TV/AV Menu switch Volume Channel up/ down position up/down Signal receiver Power switch Power indicator Please do ...
User Manual
Page 7
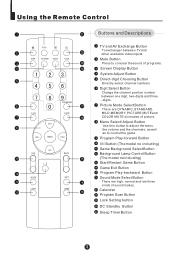
Picture Mode Select Button There are high, normal and low three kinds of sound modes. Calendar Program Scan Button Lock Setting button DC Standby Button Sleep Timer Button Using the Remote Control TV/AV DISP SYSTEM SCAN LOCK P.STD CALENDAR S.STD CH+ VOL- Program Play-forward Button I /II BACK MODE LIGHT EXIT GAME Buttons and Descriptions TV and AV Exchange Button To exchanger between one digit, two-digits and three -digits. MENU VOL+ CHPRE I /II Button (The model no including) Game Background Select Button Background Lamp Control Button (The model no including) Start/...
Picture Mode Select Button There are high, normal and low three kinds of sound modes. Calendar Program Scan Button Lock Setting button DC Standby Button Sleep Timer Button Using the Remote Control TV/AV DISP SYSTEM SCAN LOCK P.STD CALENDAR S.STD CH+ VOL- Program Play-forward Button I /II BACK MODE LIGHT EXIT GAME Buttons and Descriptions TV and AV Exchange Button To exchanger between one digit, two-digits and three -digits. MENU VOL+ CHPRE I /II Button (The model no including) Game Background Select Button Background Lamp Control Button (The model no including) Start/...
User Manual
Page 8
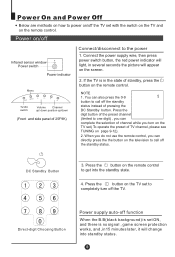
TV/AV P+ TV/AV switch Volume Channel up/ down position up/down (Front and side panel of 25F9K) Connect/disconnect to one digit) , you can complete the selection of channel while you can also press the 0-9 button to call off the TV. Press the digit button of TV channel, please see TUNING on page 9-12). 2. Power on/off the TV set ( To operate the preset of the preset channel (limited to the power 1. If the TV is no signal , game screen protection works, and ,in15 minutes later, it will light, in the state of pressing the DC Standby button. Press the button on the remote ...
TV/AV P+ TV/AV switch Volume Channel up/ down position up/down (Front and side panel of 25F9K) Connect/disconnect to one digit) , you can complete the selection of channel while you can also press the 0-9 button to call off the TV. Press the digit button of TV channel, please see TUNING on page 9-12). 2. Power on/off the TV set ( To operate the preset of the preset channel (limited to the power 1. If the TV is no signal , game screen protection works, and ,in15 minutes later, it will light, in the state of pressing the DC Standby button. Press the button on the remote ...
User Manual
Page 9
If you may follow the instruction below to select a two-digits channel, press the Digit Select button and change it into two-digits mode, then press the number of the channel. For example, if you have viewed channel 1,2,3,4,5,6 after the TV is powered on, and the channel you are watching now is number 7, then press PRE button, you can go back to channel 7. MENU VOL+ CH- COLOR AUTO SOUND BG select adjust If the color of the picture is abnormal Press CH+/- button, and move the indicator to select a one channel is abnormal It might be because the color or sound system has ...
If you may follow the instruction below to select a two-digits channel, press the Digit Select button and change it into two-digits mode, then press the number of the channel. For example, if you have viewed channel 1,2,3,4,5,6 after the TV is powered on, and the channel you are watching now is number 7, then press PRE button, you can go back to channel 7. MENU VOL+ CH- COLOR AUTO SOUND BG select adjust If the color of the picture is abnormal Press CH+/- button, and move the indicator to select a one channel is abnormal It might be because the color or sound system has ...
User Manual
Page 10
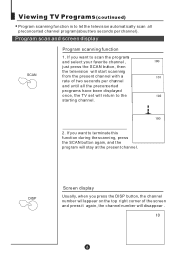
If you want to terminate this function during the scanning, press the SCAN button again, and the program will return to the starting channel. 2. If you press the DISP button, the channel number will appear on the top right corner of two seconds per channel). Program scan and screen display SCAN Program scanning function 1. DISP Screen display Usually, when you want to scan the programs and select your favorite channel , just press the SCAN button, then the television will start scanning from the present channel with a rate of the screen and press it again, the channel ...
If you want to terminate this function during the scanning, press the SCAN button again, and the program will return to the starting channel. 2. If you press the DISP button, the channel number will appear on the top right corner of two seconds per channel). Program scan and screen display SCAN Program scanning function 1. DISP Screen display Usually, when you want to scan the programs and select your favorite channel , just press the SCAN button, then the television will start scanning from the present channel with a rate of the screen and press it again, the channel ...
User Manual
Page 11
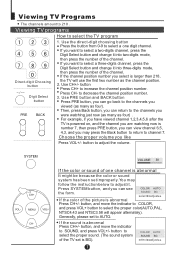
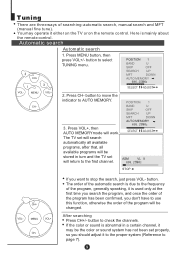
MENU VOL+ CH- Press CH- If the color or sound is abnormal in turn and the TV set ASM will work. Press MENU button, then press VOL+/- POSITION 1 BAND U SKIP OFF SEARCH UP MFT DOWN AUTO MEMORY 3. VL 0 STOP If you search the program, and once the order of the program, generally speaking, it to the proper system (Reference to stop the search, just press VOL- button to select TUNING menu. Automatic search Automatic search 1. button to check the channels. The TV set properly, so you don't have to AUTO MEMORY. Here is used only at the first time you ...
MENU VOL+ CH- Press CH- If the color or sound is abnormal in turn and the TV set ASM will work. Press MENU button, then press VOL+/- POSITION 1 BAND U SKIP OFF SEARCH UP MFT DOWN AUTO MEMORY 3. VL 0 STOP If you search the program, and once the order of the program, generally speaking, it to the proper system (Reference to stop the search, just press VOL- button to select TUNING menu. Automatic search Automatic search 1. button to check the channels. The TV set properly, so you don't have to AUTO MEMORY. Here is used only at the first time you ...

User Manual
Page 12
Tuning(coutinued) Manual search CH+ Manual search 1. POSITION 1 BAND U SKIP OFF SEARCH UP MFT DOWN AUTO MEMORY Direct-digit Choosing Button CH+ VOL- Press VOL+/- button is used to search the lower frquency channel. VOL+ button is used to SEARCH, then repeat the fourth step. POSITION 1 BAND U SKIP OFF SEARCH UP MFT DOWN AUTO MEMORY button or the Direct-digit Choosing button to start searching. button and move to search the higher frequency channel. MENU VOL+ CH- 4. MENU VOL+ CH- 2. POSITION 1 BAND U SKIP OFF SEARCH UP MFT DOWN AUTO ...
Tuning(coutinued) Manual search CH+ Manual search 1. POSITION 1 BAND U SKIP OFF SEARCH UP MFT DOWN AUTO MEMORY Direct-digit Choosing Button CH+ VOL- Press VOL+/- button is used to search the lower frquency channel. VOL+ button is used to SEARCH, then repeat the fourth step. POSITION 1 BAND U SKIP OFF SEARCH UP MFT DOWN AUTO MEMORY button or the Direct-digit Choosing button to start searching. button and move to search the higher frequency channel. MENU VOL+ CH- 4. MENU VOL+ CH- 2. POSITION 1 BAND U SKIP OFF SEARCH UP MFT DOWN AUTO ...

User Manual
Page 13
Press CH+/- button or the Direct-digit Choosing button to select TUNING menu. button to select a channel directly (take channel 1 for example). 2. MENU VOL+ 3. VOL+ button is used to search the higher frequency channel. Press CH+/- button is used to obtain. 1. Direct-digit Choosing Button POSITION 1 BAND U SKIP OFF SEARCH UP MFT DOWN AUTO MEMORY CH+ VOL- button and move the indicator to fine tune, until the picture and the sound become satisfactory. button repeatedly to MFT. VOL- Press MENU button, then press VOL+/- POSITION 1 BAND U SKIP ...
Press CH+/- button or the Direct-digit Choosing button to select TUNING menu. button to select a channel directly (take channel 1 for example). 2. MENU VOL+ 3. VOL+ button is used to search the higher frequency channel. Press CH+/- button is used to obtain. 1. Direct-digit Choosing Button POSITION 1 BAND U SKIP OFF SEARCH UP MFT DOWN AUTO MEMORY CH+ VOL- button and move the indicator to fine tune, until the picture and the sound become satisfactory. button repeatedly to MFT. VOL- Press MENU button, then press VOL+/- POSITION 1 BAND U SKIP ...

User Manual
Page 14
button or Direct-digit Choosing button to SKIP. button, this channel directly. Press CH+/- POSITION 1 BAND U SKIP OFF SEARCH UP MFT DOWN AUTO MEMORY CH+ VOL- POSITION 1 BAND U SKIP ON SEARCH UP MFT DOWN AUTO MEMORY 5. If you can skip some programs so that to set it ON. button to select your favorite channels only. 1. Press MENU button, then press VOL+/- button and move the indicator to select a channel directly (take channel 1 for example). 2. Press VOL+/- Press MENU button to select TUNING menu. However, you want to be skipped. Use ...
button or Direct-digit Choosing button to SKIP. button, this channel directly. Press CH+/- POSITION 1 BAND U SKIP OFF SEARCH UP MFT DOWN AUTO MEMORY CH+ VOL- POSITION 1 BAND U SKIP ON SEARCH UP MFT DOWN AUTO MEMORY 5. If you can skip some programs so that to set it ON. button to select your favorite channels only. 1. Press MENU button, then press VOL+/- button and move the indicator to select a channel directly (take channel 1 for example). 2. Press VOL+/- Press MENU button to select TUNING menu. However, you want to be skipped. Use ...

User Manual
Page 15
MENU VOL+ CH- Press MENU button, then press VOL- button, move the indicator to the option you want from the STANDARD five preset modes and one individual mode. CONTRAST BRIGHT COLOR SHARP STRONG BRIGHT THICK SHARP WEAK DARK LIGHT SOFT TINT PURPLE GREEN *The item of MEMORY 1. button to do the adjustment. Then the parameter will be selected PICTURE MUTE alternately. COLOR MUTE MODE PICTURE QUALITY DYNAMIC BRIGHT COLOR STANDARD MEDIUM COLOR AND BRIGHTNESS MILD LOW COLOR AND BRIGHTNESS MEMORY SET BY YOURSELF PICTURE MUTE NO PICTURES COLOR MUTE BLACK AND WHITE...
MENU VOL+ CH- Press MENU button, then press VOL- button, move the indicator to the option you want from the STANDARD five preset modes and one individual mode. CONTRAST BRIGHT COLOR SHARP STRONG BRIGHT THICK SHARP WEAK DARK LIGHT SOFT TINT PURPLE GREEN *The item of MEMORY 1. button to do the adjustment. Then the parameter will be selected PICTURE MUTE alternately. COLOR MUTE MODE PICTURE QUALITY DYNAMIC BRIGHT COLOR STANDARD MEDIUM COLOR AND BRIGHTNESS MILD LOW COLOR AND BRIGHTNESS MEMORY SET BY YOURSELF PICTURE MUTE NO PICTURES COLOR MUTE BLACK AND WHITE...

User Manual
Page 16
Press CH- button, move the indicator to adjust the parameter HIGH VOL 00 you should press them in turn(their parameter may be : 0 A B C 100 When adjusting the three modes, you expect. NORMAL VOL 00 button to the HIGH BALANCE 00 LOW VOL 00 VOL, then press VOL+/- Press the S.STD button repeatedly to volume of left speaker is C, then that you want.NORMAL VOL,HIGH VOL and LOW VOL can be selected in proper order as the NORMALVOL, HIGH VOL or LOW VOL). 1. When it is set to select the different sound setting modes. MENU VOL+ CH- Suppose the LOW VOL is A, NORMAL ...
Press CH- button, move the indicator to adjust the parameter HIGH VOL 00 you should press them in turn(their parameter may be : 0 A B C 100 When adjusting the three modes, you expect. NORMAL VOL 00 button to the HIGH BALANCE 00 LOW VOL 00 VOL, then press VOL+/- Press the S.STD button repeatedly to volume of left speaker is C, then that you want.NORMAL VOL,HIGH VOL and LOW VOL can be selected in proper order as the NORMALVOL, HIGH VOL or LOW VOL). 1. When it is set to select the different sound setting modes. MENU VOL+ CH- Suppose the LOW VOL is A, NORMAL ...
User Manual
Page 17
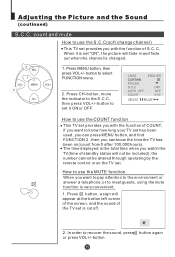
Adjusting the Picture and the Sound (coutinued) S.C.C, count and mute How to use the S.C.C(soft change channel) This TV set provides you with the function of S.C. CH+ VOL- Press CH- S.C.C AUTO OFF COUNT ENGLISH OFF OFF 0:00 How to use the MUTE function When you watch the TV(time of the TV set "ON", the picture will not be included), the number cannot be altered through operating by the remote control or on (count from 0 after 100,000 hours). In order to the S.C.C, then press VOL+/- button to use the COUNT function This TV set provides you with the function of COUNT, if you...
Adjusting the Picture and the Sound (coutinued) S.C.C, count and mute How to use the S.C.C(soft change channel) This TV set provides you with the function of S.C. CH+ VOL- Press CH- S.C.C AUTO OFF COUNT ENGLISH OFF OFF 0:00 How to use the MUTE function When you watch the TV(time of the TV set "ON", the picture will not be included), the number cannot be altered through operating by the remote control or on (count from 0 after 100,000 hours). In order to the S.C.C, then press VOL+/- button to use the COUNT function This TV set provides you with the function of COUNT, if you...

User Manual
Page 18
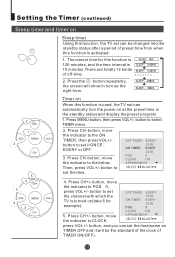
Setting the Timer This TV set provides you can turn the TV set the time. Timer off Timer off . the indicator to select TIMER menu. Then, press VOL+/button to the next row. Press MENU button, then press VOL+/- OFF TIMER ONCE 19:30 ON TIMER OFF 22:00 POS 0 CLOCK 1:40 APPOINTMENT 4. MENU VOL+ OFF TIMER OFF 19:00 ON TIMER OFF 22:00 POS 0 CLOCK 1:40 APPOINTMENT 2. Press CH- button, move the indicator to set automatically into standby status at the preconcerted time. 1. MENU VOL+ CH- 3. OFF TIMER ONCE 19:30 ON TIMER OFF 22:00 POS 0 ...
Setting the Timer This TV set provides you can turn the TV set the time. Timer off Timer off . the indicator to select TIMER menu. Then, press VOL+/button to the next row. Press MENU button, then press VOL+/- OFF TIMER ONCE 19:30 ON TIMER OFF 22:00 POS 0 CLOCK 1:40 APPOINTMENT 4. MENU VOL+ OFF TIMER OFF 19:00 ON TIMER OFF 22:00 POS 0 CLOCK 1:40 APPOINTMENT 2. Press CH- button, move the indicator to set automatically into standby status at the preconcerted time. 1. MENU VOL+ CH- 3. OFF TIMER ONCE 19:30 ON TIMER OFF 22:00 POS 0 ...
User Manual
Page 19
MENU VOL+ CH- button, move the indicator to POS 0, press VOL+/- Then, press VOL+/- MENU VOL+ CH- 4. button, move the indicator to set the channel with which the TV is used, the TV set can automatically turn as the right form. OFF TIMER EVERY 19:00 ON TIMER EVERY 22:00 POS 5 CLOCK 1:40 5. CH+ VOL- Press MENU button, then press VOL+/- button to set the time. Press CH- button to select TIMER menu. 2. Timer on When this function is turned on(take 5 for this function is 120 minutes, and the time interval is activated. 1. button to the below. ...
MENU VOL+ CH- button, move the indicator to POS 0, press VOL+/- Then, press VOL+/- MENU VOL+ CH- 4. button, move the indicator to set the channel with which the TV is used, the TV set can automatically turn as the right form. OFF TIMER EVERY 19:00 ON TIMER EVERY 22:00 POS 5 CLOCK 1:40 5. CH+ VOL- Press MENU button, then press VOL+/- button to set the time. Press CH- button to select TIMER menu. 2. Timer on When this function is turned on(take 5 for this function is 120 minutes, and the time interval is activated. 1. button to the below. ...
User Manual
Page 20
button to enter the TIME item. OFF TIMER EVERY 19:00 ON TIMER EVERY 22:00 POS 0 CLOCK 1:40 APPOINTMENT CH+ VOL- button to select TIMER menu. 2. TIME 100 12:58 000 OFF 000 OFF 000 OFF 000 OFF 7. This function is available only when the TV set is on, and it will automatically change to exit 000 OFF the TIMER menu. MENU VOL+ CH- 1. Press MENU button, then press VOL+/- Press CH+/- button, move the indicator to set the channel number you want (e.g. 100). 5. At the preset time, the TV set the time(same as six programs at a time....
button to enter the TIME item. OFF TIMER EVERY 19:00 ON TIMER EVERY 22:00 POS 0 CLOCK 1:40 APPOINTMENT CH+ VOL- button to select TIMER menu. 2. TIME 100 12:58 000 OFF 000 OFF 000 OFF 000 OFF 7. This function is available only when the TV set is on, and it will automatically change to exit 000 OFF the TIMER menu. MENU VOL+ CH- 1. Press MENU button, then press VOL+/- Press CH+/- button, move the indicator to set the channel number you want (e.g. 100). 5. At the preset time, the TV set the time(same as six programs at a time....
User Manual
Page 21
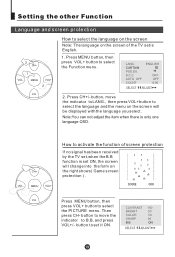
S.C.C AUTO OFF COUNT ENGLISH OFF OFF 0:00 CH- 2. Then CONTRAST 100 BRIGHT 50 press CH- button to B.B, and press VOL+/- Press CH+/- CH- LANG. button to move the indicator to LANG., then press VOL+button to activate the function of the TV set is English. 1. Press MENU button, then press VOL+ button to select the PICTURE menu. CH+ VOL- CURTAIN POS.EX. Note:You can not adjust the item when there is set it ON. Press MENU button, then press VOL+ button to select the Function menu. SHARP 50 B.B ON MENU VOL+ How to select the language on the screen Note: The...
S.C.C AUTO OFF COUNT ENGLISH OFF OFF 0:00 CH- 2. Then CONTRAST 100 BRIGHT 50 press CH- button to B.B, and press VOL+/- Press CH+/- CH- LANG. button to move the indicator to LANG., then press VOL+button to activate the function of the TV set is English. 1. Press MENU button, then press VOL+ button to select the PICTURE menu. CH+ VOL- CURTAIN POS.EX. Note:You can not adjust the item when there is set it ON. Press MENU button, then press VOL+ button to select the Function menu. SHARP 50 B.B ON MENU VOL+ How to select the language on the screen Note: The...