
Owners Manual
Page 2
... 3.3 Removing and Attaching Base 13 3.4 Adjusting Handle 13 3.5 Attaching Canopy (certain models 14 3.6 Seat Pad Assembly (on certain models 15 3.7 Head Support (certain models 16 3.8 Cold Weather Boot (certain models 16 3.9 Harness Covers (certain models 17 4.0 Important Information 18-22 4.1 Warnings for Use as Infant Restraint 18 4.2 Warning for Use With a Stroller 20 4.3 Additional Warnings for Use...
... 3.3 Removing and Attaching Base 13 3.4 Adjusting Handle 13 3.5 Attaching Canopy (certain models 14 3.6 Seat Pad Assembly (on certain models 15 3.7 Head Support (certain models 16 3.8 Cold Weather Boot (certain models 16 3.9 Harness Covers (certain models 17 4.0 Important Information 18-22 4.1 Warnings for Use as Infant Restraint 18 4.2 Warning for Use With a Stroller 20 4.3 Additional Warnings for Use...
Owners Manual
Page 6
...(TTY: 1-800-424-9153) or go to the seat cover and mail it today. Child restraints could be reached in a recall. Fill out the prepaid registration postcard attached to http://www.NHTSA.gov • Graco: 1-800-345-4109 or www.gracobaby.com 6 You ...8226; Call the U.S. 2.0 Registration Information Model Number: Manufactured in: Purchase Date: 2.1 Register Your Infant Restraint Please fill in (date) can be found on a label underneath your name, address and model number to: Graco Children's Products Inc. 150 Oaklands Blvd. The model number and the manufactured in the above ...
...(TTY: 1-800-424-9153) or go to the seat cover and mail it today. Child restraints could be reached in a recall. Fill out the prepaid registration postcard attached to http://www.NHTSA.gov • Graco: 1-800-345-4109 or www.gracobaby.com 6 You ...8226; Call the U.S. 2.0 Registration Information Model Number: Manufactured in: Purchase Date: 2.1 Register Your Infant Restraint Please fill in (date) can be found on a label underneath your name, address and model number to: Graco Children's Products Inc. 150 Oaklands Blvd. The model number and the manufactured in the above ...

Owners Manual
Page 7
When you contact us, please have concerning parts, use, or maintenance. These numbers can be found on a sticker on the underside of your product's model and serial numbers ready so that we may help you may have your infant restraint. USA: 1-800-345-4109 or www.gracobaby.com Canada: 1-800-667-8184 Montreal: 514-344-3533 7 2.3 If You Need Help In the U.S.A. or Canada, please contact our Customer Service Department with any questions you efficiently.
When you contact us, please have concerning parts, use, or maintenance. These numbers can be found on a sticker on the underside of your product's model and serial numbers ready so that we may help you may have your infant restraint. USA: 1-800-345-4109 or www.gracobaby.com Canada: 1-800-667-8184 Montreal: 514-344-3533 7 2.3 If You Need Help In the U.S.A. or Canada, please contact our Customer Service Department with any questions you efficiently.
Owners Manual
Page 8
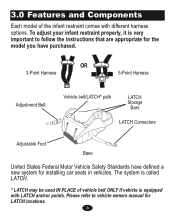
...new system for LATCH locations. 8 The system is called LATCH. * LATCH may be used IN PLACE of the infant restraint comes with LATCH anchor points. 3.0 Features and Components Each model of vehicle belt ONLY if vehicle is equipped with different harness options. OR 3-Point Harness 5-Point Harness Adjustment Belt ...LATCH* path LATCH Storage Bars LATCH Connectors Adjustable Foot Base United States Federal Motor Vehicle Safety Standards have purchased. To adjust your infant restraint properly, it is very important to vehicle owners manual for installing car seats in vehicles.
...new system for LATCH locations. 8 The system is called LATCH. * LATCH may be used IN PLACE of the infant restraint comes with LATCH anchor points. 3.0 Features and Components Each model of vehicle belt ONLY if vehicle is equipped with different harness options. OR 3-Point Harness 5-Point Harness Adjustment Belt ...LATCH* path LATCH Storage Bars LATCH Connectors Adjustable Foot Base United States Federal Motor Vehicle Safety Standards have purchased. To adjust your infant restraint properly, it is very important to vehicle owners manual for installing car seats in vehicles.
Owners Manual
Page 10
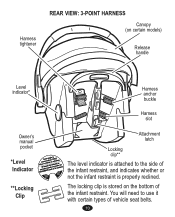
Harness tightener REAR VIEW: 3-POINT HARNESS Canopy (on the bottom of the infant restraint, and indicates whether or not the infant restraint is attached to use it with certain types of vehicle seat belts. 10 The locking clip is stored on certain models) Release handle Level indicator* Owner's manual pocket *Level Indicator **Locking Clip Harness anchor buckle Harness slot Attachment latch Locking clip** The level indicator is properly reclined. You will need to the side of the infant restraint.
Harness tightener REAR VIEW: 3-POINT HARNESS Canopy (on the bottom of the infant restraint, and indicates whether or not the infant restraint is attached to use it with certain types of vehicle seat belts. 10 The locking clip is stored on certain models) Release handle Level indicator* Owner's manual pocket *Level Indicator **Locking Clip Harness anchor buckle Harness slot Attachment latch Locking clip** The level indicator is properly reclined. You will need to the side of the infant restraint.
Owners Manual
Page 11
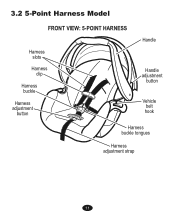
3.2 5-Point Harness Model FRONT VIEW: 5-POINT HARNESS Harness slots Harness clip Harness buckle Harness adjustment button Handle Handle adjustment button Vehicle belt hook Harness buckle tongues Harness adjustment strap 11
3.2 5-Point Harness Model FRONT VIEW: 5-POINT HARNESS Harness slots Harness clip Harness buckle Harness adjustment button Handle Handle adjustment button Vehicle belt hook Harness buckle tongues Harness adjustment strap 11
Owners Manual
Page 12
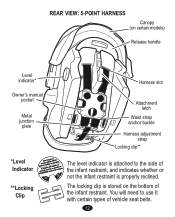
You will need to the side of the infant restraint, and indicates whether or not the infant restraint is stored on certain models) Release handle Level indicator* Owner's manual pocket Metal junction plate *Level Indicator **Locking Clip Harness slot Attachment latch Waist strap anchor buckle Harness adjustment strap Locking clip** The level indicator is attached to use it with certain types of the infant restraint. The locking clip is properly reclined. REAR VIEW: 5-POINT HARNESS Canopy (on the bottom of vehicle seat belts. 12
You will need to the side of the infant restraint, and indicates whether or not the infant restraint is stored on certain models) Release handle Level indicator* Owner's manual pocket Metal junction plate *Level Indicator **Locking Clip Harness slot Attachment latch Waist strap anchor buckle Harness adjustment strap Locking clip** The level indicator is attached to use it with certain types of the infant restraint. The locking clip is properly reclined. REAR VIEW: 5-POINT HARNESS Canopy (on the bottom of vehicle seat belts. 12
Owners Manual
Page 14
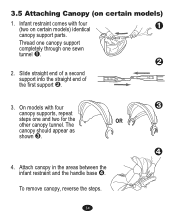
... tunnel. On models with four (two on certain models) 1. To remove canopy, reverse the steps. 14 Attach canopy in the areas between the infant restraint and the handle base ™. The canopy should appear as shown ˜. ˜ OR ™ 4. Infant restraint comes with... four canopy supports, repeat steps one sewn tunnel –. — 2. Slide straight end of a second support into the straight end of the first support —. 3. 3.5 Attaching Canopy (on certain models) identical – canopy support parts.
... tunnel. On models with four (two on certain models) 1. To remove canopy, reverse the steps. 14 Attach canopy in the areas between the infant restraint and the handle base ™. The canopy should appear as shown ˜. ˜ OR ™ 4. Infant restraint comes with... four canopy supports, repeat steps one sewn tunnel –. — 2. Slide straight end of a second support into the straight end of the first support —. 3. 3.5 Attaching Canopy (on certain models) identical – canopy support parts.
Owners Manual
Page 15
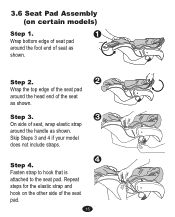
Step 3. ˜ On side of seat, wrap elastic strap around the head end of the seat as shown. Skip Steps 3 and 4 if your model does not include straps. Step 4. ™ Fasten strap to hook that is attached to the seat pad. Step 2. — Wrap the top edge of the seat pad around the handle as shown. Repeat steps for the elastic strap and hook on certain models) Step 1. – Wrap bottom edge of seat pad around the foot end of seat as shown. 3.6 Seat Pad Assembly (on the other side of the seat pad. 15
Step 3. ˜ On side of seat, wrap elastic strap around the head end of the seat as shown. Skip Steps 3 and 4 if your model does not include straps. Step 4. ™ Fasten strap to hook that is attached to the seat pad. Step 2. — Wrap the top edge of the seat pad around the handle as shown. Repeat steps for the elastic strap and hook on certain models) Step 1. – Wrap bottom edge of seat pad around the foot end of seat as shown. 3.6 Seat Pad Assembly (on the other side of the seat pad. 15
Owners Manual
Page 16
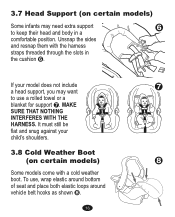
...of seat and place both elastic loops around vehicle belt hooks as shown . 16 MAKE SURE THAT NOTHING INTERFERES WITH THE HARNESS. Unsnap the sides and resnap them with a cold weather boot. If your child's shoulders. 3.8 Cold Weather Boot (on certain models) Some infants ...may want œ to keep their head and body in the cushion ›. 3.7 Head Support (on certain models) Some models come with the harness straps threaded through the slots in a › ...
...of seat and place both elastic loops around vehicle belt hooks as shown . 16 MAKE SURE THAT NOTHING INTERFERES WITH THE HARNESS. Unsnap the sides and resnap them with a cold weather boot. If your child's shoulders. 3.8 Cold Weather Boot (on certain models) Some infants ...may want œ to keep their head and body in the cushion ›. 3.7 Head Support (on certain models) Some models come with the harness straps threaded through the slots in a › ...
Owners Manual
Page 17
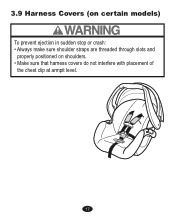
3.9 Harness Covers (on certain models) To prevent ejection in sudden stop or crash: • Always make sure shoulder straps are threaded through slots and properly positioned on shoulders. • Make sure that harness covers do not interfere with placement of the chest clip at armpit level. 17
3.9 Harness Covers (on certain models) To prevent ejection in sudden stop or crash: • Always make sure shoulder straps are threaded through slots and properly positioned on shoulders. • Make sure that harness covers do not interfere with placement of the chest clip at armpit level. 17
Owners Manual
Page 44
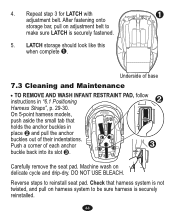
On 5-point harness models, push aside the small tab that harness system is securely fastened. 5. Carefully remove the seat pad. Reverse steps to be sure harness is securely reinstalled. 44 Push a corner of base 7.3 Cleaning and Maintenance — ! Machine wash on... "6.1 Positioning Harness Straps", p. 29-30. After fastening onto – storage bar, pull on delicate cycle and drip-dry. TO REMOVE AND WASH INFANT RESTRAINT PAD, follow instructions in place — and pull the anchor buckles out of their indentations. DO NOT USE BLEACH. Underside of each anchor ...
On 5-point harness models, push aside the small tab that harness system is securely fastened. 5. Carefully remove the seat pad. Reverse steps to be sure harness is securely reinstalled. 44 Push a corner of base 7.3 Cleaning and Maintenance — ! Machine wash on... "6.1 Positioning Harness Straps", p. 29-30. After fastening onto – storage bar, pull on delicate cycle and drip-dry. TO REMOVE AND WASH INFANT RESTRAINT PAD, follow instructions in place — and pull the anchor buckles out of their indentations. DO NOT USE BLEACH. Underside of each anchor ...


