

User Guide
Page 1
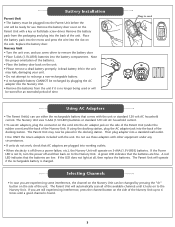
... Qty. 2 Model 2795 - We currently do not accept product registrations from within the U.S.A. Qty. 3 qty.1 Model 2795 - Replacement Parts • Warranty Information (USA) To purchase parts or accessories or for warranty information in the United States, please contact us online...) To register your Graco product from those living outside the United States of America. ©2006 Graco ISPM004BC 8/06 Parent's Unit (A3940) Model 2791 - 1 unit Model 2795 - 2 units Clip Product Features Green = batteries ok Red = batteries low Green when charging Rechargeable Battery Pack Model 2791 -...
... Qty. 2 Model 2795 - We currently do not accept product registrations from within the U.S.A. Qty. 3 qty.1 Model 2795 - Replacement Parts • Warranty Information (USA) To purchase parts or accessories or for warranty information in the United States, please contact us online...) To register your Graco product from those living outside the United States of America. ©2006 Graco ISPM004BC 8/06 Parent's Unit (A3940) Model 2791 - 1 unit Model 2795 - 2 units Clip Product Features Green = batteries ok Red = batteries low Green when charging Rechargeable Battery Pack Model 2791 -...
User Guide
Page 3
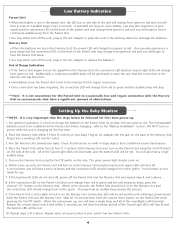
... outlet. • Use ONLY the Graco adapters included with a key or flat blade screw driver. The Parent Unit will automatically scan all , then replace the batteries. Note the proper orientation of the batteries. • Place the battery door back on the side. Do not use either the rechargeable battery that the batteries are plugged into working outlets...
... outlet. • Use ONLY the Graco adapters included with a key or flat blade screw driver. The Parent Unit will automatically scan all , then replace the batteries. Note the proper orientation of the batteries. • Place the battery door back on the side. Do not use either the rechargeable battery that the batteries are plugged into working outlets...
User Guide
Page 4
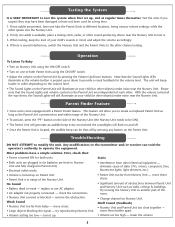
... in on the side. Repeat same set-up , you will begin to lock in the A/C adapter or replace the batteries. Nursery Unit • When the batteries are no walls or large objects that the steps below be red. Setting Up the Baby Monitor ***NOTE: It is charging for at least 16 hours prior to the... "Battery Installation" section. Turn on the Nursery Unit using the On/Off switch on the Nursery Unit (connection LED will be red and the ...
... in on the side. Repeat same set-up , you will begin to lock in the A/C adapter or replace the batteries. Nursery Unit • When the batteries are no walls or large objects that the steps below be red. Setting Up the Baby Monitor ***NOTE: It is charging for at least 16 hours prior to the... "Battery Installation" section. Turn on the Nursery Unit using the On/Off switch on the Nursery Unit (connection LED will be red and the ...
User Guide
Page 5
.... Any modifications to the transmitter and/or receiver can be shut-off by pressing the Volume Up/Down buttons. replace or use AC adapter. • AC adapter not properly connected - move closer. • Large objects blocking the...a misplaced Parent Unit as long as the volume button is pressed up . • Parent Unit too far from baby - lower the volume. 5 Parent Finder Feature • Some units come equipped with a Parent Finder feature. Weak... both units Static • Both units are plugged in (or batteries are independent of the Nursery Unit No Sound •...
.... Any modifications to the transmitter and/or receiver can be shut-off by pressing the Volume Up/Down buttons. replace or use AC adapter. • AC adapter not properly connected - move closer. • Large objects blocking the...a misplaced Parent Unit as long as the volume button is pressed up . • Parent Unit too far from baby - lower the volume. 5 Parent Finder Feature • Some units come equipped with a Parent Finder feature. Weak... both units Static • Both units are plugged in (or batteries are independent of the Nursery Unit No Sound •...


