Instruction Manual
Page 2
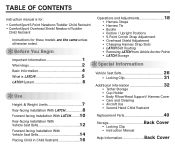
... Overhead Shield Newborn/Toddler Child Restraint Operations and Adjustments 18 • Harness Straps • Harness Tie • Buckle • Recline / Upright Positions Instructions for these models are the same unless otherwise noted. • 5-Point Crotch Strap Adjustment • Overhead Shield Adjustment • Changing Harness Strap Slots c Before You Begin • LATCH...
... Overhead Shield Newborn/Toddler Child Restraint Operations and Adjustments 18 • Harness Straps • Harness Tie • Buckle • Recline / Upright Positions Instructions for these models are the same unless otherwise noted. • 5-Point Crotch Strap Adjustment • Overhead Shield Adjustment • Changing Harness Strap Slots c Before You Begin • LATCH...
Instruction Manual
Page 3
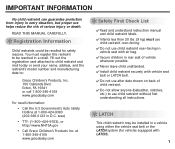
... first understanding all instructions. Fill out the registration card attached to child restraint and mail today or send your name, address, and the restraint's model number and manufacturing date to: Graco Children's Products, Inc. 150 Oaklands Blvd. area) • TTY: (1-800-424-9153), or http://www.NHTSA.gov • Call... Graco Children's Products Inc. c LATCH This child restraint may be installed in a vehicle using either the vehicle seat belt or the LATCH system (for safety ...
... first understanding all instructions. Fill out the registration card attached to child restraint and mail today or send your name, address, and the restraint's model number and manufacturing date to: Graco Children's Products, Inc. 150 Oaklands Blvd. area) • TTY: (1-800-424-9153), or http://www.NHTSA.gov • Call... Graco Children's Products Inc. c LATCH This child restraint may be installed in a vehicle using either the vehicle seat belt or the LATCH system (for safety ...
Instruction Manual
Page 16
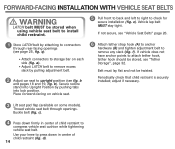
.... q). • Attach connectors to press down firmly in center of child restraint to remove any slack (fig. b). Use your knee to storage bar on some models). a). • Adjust LATCH belt to remove excess slack by pushing tabs into Upright Position by pulling adjustment belt. 2 Adjust car seat to check for secure...
.... q). • Attach connectors to press down firmly in center of child restraint to remove any slack (fig. b). Use your knee to storage bar on some models). a). • Adjust LATCH belt to remove excess slack by pushing tabs into Upright Position by pulling adjustment belt. 2 Adjust car seat to check for secure...
Instruction Manual
Page 18
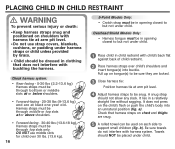
...and insert tongue(s) into an unnatural position (fig. DO NOT use strap covers, blankets, cushions, or padding under harness straps or child unless provided by Graco. • Child should be dressed in clothing that harness straps on chest and thighs are snug. 5 A rolled towel can be used on each ...side to be in a relatively straight line without sagging. Be sure towels do not interfere with buckling the harness. Overhead Shield Models Only: • Harness tongue must be snug. Pull up on the child's flesh or push the child's body into buckle. It does not ...
...and insert tongue(s) into an unnatural position (fig. DO NOT use strap covers, blankets, cushions, or padding under harness straps or child unless provided by Graco. • Child should be dressed in clothing that harness straps on chest and thighs are snug. 5 A rolled towel can be used on each ...side to be in a relatively straight line without sagging. Be sure towels do not interfere with buckling the harness. Overhead Shield Models Only: • Harness tongue must be snug. Pull up on the child's flesh or push the child's body into buckle. It does not ...
Instruction Manual
Page 20
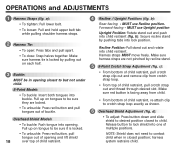
...out of multiple positions. Pull up on tongue to be sure it is locked by pulling out on tongues to but not under child. 5-Point Models • To buckle: Insert both tongues into one of buckle. Pull up on each half. 3 Buckle: MUST be sure they are not pinched...red button is facing away from crotch strap loop. • From top of child restraint. 4 Recline / Upright Positions (fig. harness system restrains child. Overhead Shield Models • To buckle: Push tongue into child restraint (fig. a): • To tighten: Pull lower belt. • To loosen: Pull and hold upper belt ...
...out of multiple positions. Pull up on tongue to be sure it is locked by pulling out on tongues to but not under child. 5-Point Models • To buckle: Insert both tongues into one of buckle. Pull up on each half. 3 Buckle: MUST be sure they are not pinched...red button is facing away from crotch strap loop. • From top of child restraint. 4 Recline / Upright Positions (fig. harness system restrains child. Overhead Shield Models • To buckle: Push tongue into child restraint (fig. a): • To tighten: Pull lower belt. • To loosen: Pull and hold upper belt ...

Instruction Manual
Page 22
... loop on Splitter Plate first, then attach Bottom left strap loop. C Change harness strap slots. It may be necessary to Splitter Plate: 5-Point Models (fig. D Re-attach harness strap loops to remove seat pad from Splitter Plate on Splitter Plate first, then attach left strap loop. NOTE: ...routed behind Splitter Plate. • For Toddlers: Put Bottom right strap loop on Splitter Plate first, then attach Top left strap loop. Overhead Shield Models (fig. Pull harness straps out. Make sure harness straps are behind stand (fig. f): Put right strap loop on back of seat pad and...
... loop on Splitter Plate first, then attach Bottom left strap loop. C Change harness strap slots. It may be necessary to Splitter Plate: 5-Point Models (fig. D Re-attach harness strap loops to remove seat pad from Splitter Plate on Splitter Plate first, then attach left strap loop. NOTE: ...routed behind Splitter Plate. • For Toddlers: Put Bottom right strap loop on Splitter Plate first, then attach Top left strap loop. Overhead Shield Models (fig. Pull harness straps out. Make sure harness straps are behind stand (fig. f): Put right strap loop on back of seat pad and...
Instruction Manual
Page 35
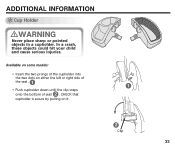
ADDITIONAL INFORMATION c Cup Holder WARNING Never place sharp or pointed objects in a cupholder. Available on some models: • Insert the two prongs of the cupholder into the two slots on it. 2 Clip 33 In a crash, these objects could hit your child and cause serious injuries. CHECK that cupholder is secure by pulling on either the left or right side of the seat . 1 1 • Push cupholder down until the clip snaps onto the bottom of seat 2 .
ADDITIONAL INFORMATION c Cup Holder WARNING Never place sharp or pointed objects in a cupholder. Available on some models: • Insert the two prongs of the cupholder into the two slots on it. 2 Clip 33 In a crash, these objects could hit your child and cause serious injuries. CHECK that cupholder is secure by pulling on either the left or right side of the seat . 1 1 • Push cupholder down until the clip snaps onto the bottom of seat 2 .
Instruction Manual
Page 36
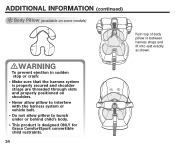
... is properly secured and shoulder straps are threaded through slots and properly positioned on some models) Push top of body pillow in sudden stop or crash: • Make sure that the harness system is designed ONLY for Graco ComfortSport convertible child restraints. 34 WARNING To prevent ejection in between harness straps and...
... is properly secured and shoulder straps are threaded through slots and properly positioned on some models) Push top of body pillow in sudden stop or crash: • Make sure that the harness system is designed ONLY for Graco ComfortSport convertible child restraints. 34 WARNING To prevent ejection in between harness straps and...
Instruction Manual
Page 37
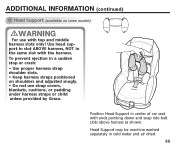
... stop or crash: • Use proper harness strap shoulder slots. • Keep harness straps positioned on some models) WARNING For use strap covers, blankets, cushions, or padding under harness straps or child unless provided by Graco. ADDITIONAL INFORMATION (continued) c Head Support (available on shoulders and adjusted snugly. • Do not use with...
... stop or crash: • Use proper harness strap shoulder slots. • Keep harness straps positioned on some models) WARNING For use strap covers, blankets, cushions, or padding under harness straps or child unless provided by Graco. ADDITIONAL INFORMATION (continued) c Head Support (available on shoulders and adjusted snugly. • Do not use with...
Instruction Manual
Page 38
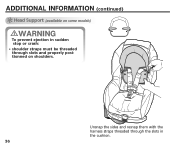
ADDITIONAL INFORMATION (continued) c Head Support (available on some models) WARNING To prevent ejection in the cushion. 36 Unsnap the sides and resnap them with the harness straps threaded through the slots in sudden stop or crash: • shoulder straps must be threaded through slots and properly positionned on shoulders.
ADDITIONAL INFORMATION (continued) c Head Support (available on some models) WARNING To prevent ejection in the cushion. 36 Unsnap the sides and resnap them with the harness straps threaded through the slots in sudden stop or crash: • shoulder straps must be threaded through slots and properly positionned on shoulders.
Instruction Manual
Page 39
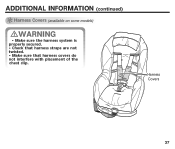
ADDITIONAL INFORMATION (continued) c Harness Covers (available on some models) WARNING • Make sure the harness system is properly secured. • Check that harness straps are not twisted. • Make sure that harness covers do not interfere with placement of the chest clip. Harness Covers 37
ADDITIONAL INFORMATION (continued) c Harness Covers (available on some models) WARNING • Make sure the harness system is properly secured. • Check that harness straps are not twisted. • Make sure that harness covers do not interfere with placement of the chest clip. Harness Covers 37

Instruction Manual
Page 40
.... Open harness tie, release tongues from buckle. (see pages 1 18-21) 1 Unhook "J" hooks from around shield. ADDITIONAL INFORMATION (continued) c Care & Cleaning Removing Seat Pad (all models): Remove both 2-button clips out of shield and unwrap pad from child restraint shell. 2 Pull three 2-button clips out of lower front edge of child...
.... Open harness tie, release tongues from buckle. (see pages 1 18-21) 1 Unhook "J" hooks from around shield. ADDITIONAL INFORMATION (continued) c Care & Cleaning Removing Seat Pad (all models): Remove both 2-button clips out of shield and unwrap pad from child restraint shell. 2 Pull three 2-button clips out of lower front edge of child...


