RAID Setup Guide
Page 3
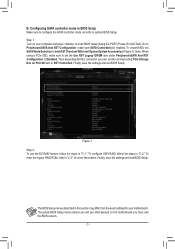
... RST Premium With Intel Optane System Acceleration (Figure 1). To create RAID, set SATA Mode Selection to enter BIOS Setup during the POST (Power-On Self-Test). The actual BIOS Setup menu options you use the EZ RAID feature, follow the steps in system BIOS Setup. To enter the legacy RAID ROM...
... RST Premium With Intel Optane System Acceleration (Figure 1). To create RAID, set SATA Mode Selection to enter BIOS Setup during the POST (Power-On Self-Test). The actual BIOS Setup menu options you use the EZ RAID feature, follow the steps in system BIOS Setup. To enter the legacy RAID ROM...

RAID Setup Guide
Page 10
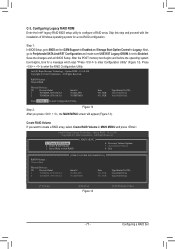
... Technology - Acceleration Options 6. Option ROM - 16.5.0.348 Copyright (C) Intel Corporation. Step 2: Figure 13 After you want to Legacy. Delete RAID Volume 3. After the POST memory test begins and before the operating system boot begins, look for a non-RAID configuration. Next, go to BIOS and set to enter Configuration Utility" (Figure 13...
... Technology - Acceleration Options 6. Option ROM - 16.5.0.348 Copyright (C) Intel Corporation. Step 2: Figure 13 After you want to Legacy. Delete RAID Volume 3. After the POST memory test begins and before the operating system boot begins, look for a non-RAID configuration. Next, go to BIOS and set to enter Configuration Utility" (Figure 13...

User Manual
Page 21
...on/off your computer and unplug the power cord from the connector. HDMI Port The HDMI port supports HDCP 2.2 and Dolby TrueHD and DTS HD Master Audio formats. Do not rock it straight out from the power outlet before using the clear CMOS button. •• Do not use the clear... power button allows users to quickly turn off the computer in an open-case environment when they want to change hardware components or conduct hardware testing. It also supports up to Chapter 2, "BIOS Setup," for USB devices. After installing the HDMI device, make sure to set the default sound playback...
...on/off your computer and unplug the power cord from the connector. HDMI Port The HDMI port supports HDCP 2.2 and Dolby TrueHD and DTS HD Master Audio formats. Do not rock it straight out from the power outlet before using the clear CMOS button. •• Do not use the clear... power button allows users to quickly turn off the computer in an open-case environment when they want to change hardware components or conduct hardware testing. It also supports up to Chapter 2, "BIOS Setup," for USB devices. After installing the HDMI device, make sure to set the default sound playback...

User Manual
Page 24
... , that means you haven't entered the operating system yet. RST_SW Hardware Installation - 24 - The reset button allows users to change hardware components or conduct hardware testing.
... , that means you haven't entered the operating system yet. RST_SW Hardware Installation - 24 - The reset button allows users to change hardware components or conduct hardware testing.

User Manual
Page 41
... BIOS, it with caution. For instructions on . BIOS includes a BIOS Setup program that you not flash the BIOS. To upgrade the BIOS, use either the GIGABYTE Q-Flash or @BIOS utility. •• Q-Flash allows the user to quickly and easily upgrade or back up BIOS without entering the operating system. •... clear CMOS jumper/button in Chapter 1 for how to clear the CMOS values.) - 41 - BIOS Setup Its major functions include conducting the Power-On Self-Test (POST) during the POST when the power is turned off, the battery on the motherboard.
... BIOS, it with caution. For instructions on . BIOS includes a BIOS Setup program that you not flash the BIOS. To upgrade the BIOS, use either the GIGABYTE Q-Flash or @BIOS utility. •• Q-Flash allows the user to quickly and easily upgrade or back up BIOS without entering the operating system. •... clear CMOS jumper/button in Chapter 1 for how to clear the CMOS values.) - 41 - BIOS Setup Its major functions include conducting the Power-On Self-Test (POST) during the POST when the power is turned off, the battery on the motherboard.

User Manual
Page 70
... RST Configuration, make sure to set the corresponding PCIe Storage Dev on Port XX item to enter BIOS Setup during the POST (Power-On Self-Test). Note: When using a PCIe SSD, make sure SATA Controller(s) is enabled. The actual BIOS Setup menu options you will see shall depend on your motherboard...
... RST Configuration, make sure to set the corresponding PCIe Storage Dev on Port XX item to enter BIOS Setup during the POST (Power-On Self-Test). Note: When using a PCIe SSD, make sure SATA Controller(s) is enabled. The actual BIOS Setup menu options you will see shall depend on your motherboard...
User Manual
Page 77
...). Skip this step and proceed with the installation of Windows operating system for a message which says "Press to configure a RAID array. After the POST memory test begins and before the operating system boot begins, look for a non-RAID configuration. Intel(R) Rapid Storage Technology - Option ROM - 16.5.0.348 Copyright (C) Intel Corporation. Delete...
...). Skip this step and proceed with the installation of Windows operating system for a message which says "Press to configure a RAID array. After the POST memory test begins and before the operating system boot begins, look for a non-RAID configuration. Intel(R) Rapid Storage Technology - Option ROM - 16.5.0.348 Copyright (C) Intel Corporation. Delete...

User Manual
Page 133
... decision. Invalid CPU type or speed. Internal CPU error. Reserved. CPU mismatch. IOH initialization error. - 133 - Reserved. Reserved for future AMI progress codes. CPU self test failed or possible CPU cache error. CPU initialization error. Code B4 B5 B6 B7 B8~BF C0~CF Description USB device hot plug-in. Clean...
... decision. Invalid CPU type or speed. Internal CPU error. Reserved. CPU mismatch. IOH initialization error. - 133 - Reserved. Reserved for future AMI progress codes. CPU self test failed or possible CPU cache error. CPU initialization error. Code B4 B5 B6 B7 B8~BF C0~CF Description USB device hot plug-in. Clean...

User Manual
Page 136
... function is connected. •• Consult a dealer or experienced TV/radio technician for intended operation as described in a particular installation. WARNING: This equipment has been tested and found to comply with the instructions, may find the following measures: •• Reorient or relocate the receiving antenna. •• Increase the separation...
... function is connected. •• Consult a dealer or experienced TV/radio technician for intended operation as described in a particular installation. WARNING: This equipment has been tested and found to comply with the instructions, may find the following measures: •• Reorient or relocate the receiving antenna. •• Increase the separation...