
Manual
Page 2
... System Requirement 8 3.1.2. DirectX Installation ...9 3.1.3. Appendix 33 5.1. Resolutions and Color Depth Table (In Windows® XP 34 GV-RX30 Series Graphics Accelerator - 2 - Hardware Installation 4 2.1. Driver Installation ...10 3.1.4. Display Properties pages 18 3.2. Minimum System Requirement 3 2. Windows® 2000 Driver Installation 31 4. Features ...3 1.2. Windows® XP Driver and Utilities Installation 8 3.1.1. Utilities on Driver CD 12 3.1.5. Reflash BIOS...
... System Requirement 8 3.1.2. DirectX Installation ...9 3.1.3. Appendix 33 5.1. Resolutions and Color Depth Table (In Windows® XP 34 GV-RX30 Series Graphics Accelerator - 2 - Hardware Installation 4 2.1. Driver Installation ...10 3.1.4. Display Properties pages 18 3.2. Minimum System Requirement 3 2. Windows® 2000 Driver Installation 31 4. Features ...3 1.2. Windows® XP Driver and Utilities Installation 8 3.1.1. Utilities on Driver CD 12 3.1.5. Reflash BIOS...
Manual
Page 3
...PCI Express x 16 • Supports 128MB DDR memory (Local on-board memory is 32MB VRAM) (Only for GV-RX30HM128D) • Supports 256MB DDR memory (Local on-board memory is 128MB DDRII) (Only for GV-RX30HM256DP) • Supports DirectX 9.0 • Supports TV-Out connector • Supports DVI-I connector • Supports ...® III 650MHz or AMD Athlon 650MHz class processor or higher • One PCI Express x 16 slot • Operating Systems Windows® 2000 / Windows® XP • 64MB system memory • 50MB of available disk space for GV-RX30HM256DP) 1.2. Introduction 1.1.
...PCI Express x 16 • Supports 128MB DDR memory (Local on-board memory is 32MB VRAM) (Only for GV-RX30HM128D) • Supports 256MB DDR memory (Local on-board memory is 128MB DDRII) (Only for GV-RX30HM256DP) • Supports DirectX 9.0 • Supports TV-Out connector • Supports DVI-I connector • Supports ...® III 650MHz or AMD Athlon 650MHz class processor or higher • One PCI Express x 16 slot • Operating Systems Windows® 2000 / Windows® XP • 64MB system memory • 50MB of available disk space for GV-RX30HM256DP) 1.2. Introduction 1.1.

Manual
Page 9
...this manual, we assume that motherboard. Or please contact your system has installed DirectX 9 or later version. • If you can see the AUTORUN window (if it does not show up, run "D:\setup.exe"). Operating System Requirement • When loading the graphics card drivers for the system, please make... drive, you insert the driver CD into your CD-ROM Drive letter to install the driver for the motherboard, which consist of Windows® 2000 / Windows® XP drivers is very simple. Then you install the graphics card drivers for your graphics accelerator.) 3.1. English 3.
...this manual, we assume that motherboard. Or please contact your system has installed DirectX 9 or later version. • If you can see the AUTORUN window (if it does not show up, run "D:\setup.exe"). Operating System Requirement • When loading the graphics card drivers for the system, please make... drive, you insert the driver CD into your CD-ROM Drive letter to install the driver for the motherboard, which consist of Windows® 2000 / Windows® XP drivers is very simple. Then you install the graphics card drivers for your graphics accelerator.) 3.1. English 3.
Manual
Page 10
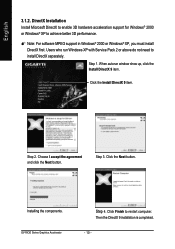
...DirectX 9 item. Click Finish to install DirectX separately. Step 1. Click the Next button. Step 3. English 3.1.2. Installing the components. GV-RX30 Series Graphics Accelerator Step 4. Step 2. Then the DirectX 9 installation is completed. - 10 - DirectX Installation Install Microsoft DirectX... to enable 3D hardware acceleration support for Windows® 2000 or Windows® XP to achieve better 3D performance. 0 Note: For software MPEG support in Windows® 2000 or Windows® XP, you must install DirectX first.
...DirectX 9 item. Click Finish to install DirectX separately. Step 1. Click the Next button. Step 3. English 3.1.2. Installing the components. GV-RX30 Series Graphics Accelerator Step 4. Step 2. Then the DirectX 9 installation is completed. - 10 - DirectX Installation Install Microsoft DirectX... to enable 3D hardware acceleration support for Windows® 2000 or Windows® XP to achieve better 3D performance. 0 Note: For software MPEG support in Windows® 2000 or Windows® XP, you must install DirectX first.

Manual
Page 11
...Click the Next button to install the driver. (There is a driver CD disk that came with your computer at the first time, the windows will search for the driver and install it now.) Or click the Cancel button to finish the installation. - 11 - New hardware found ...by-step installation guide. Driver Installation A. English 3.1.3. Step 3: Found new hardware wizard: Finish Click the Finish button to install the driver from AUTORUN window. Step 2: Found new hardware wizard: Searching and installing The wizard will automatically detect a new hardware in the system and pop out a "New ...
...Click the Next button to install the driver. (There is a driver CD disk that came with your computer at the first time, the windows will search for the driver and install it now.) Or click the Cancel button to finish the installation. - 11 - New hardware found ...by-step installation guide. Driver Installation A. English 3.1.3. Step 3: Found new hardware wizard: Finish Click the Finish button to install the driver from AUTORUN window. Step 2: Found new hardware wizard: Searching and installing The wizard will automatically detect a new hardware in the system and pop out a "New ...
Manual
Page 12
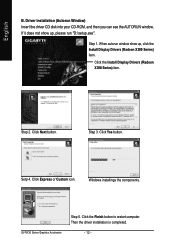
... the driver CD disk into your CD-ROM, and then you can see the AUTORUN window. When autorun window show up , click the Install Display Drivers (Radeon X300 Series) item. Windows installings the components. Step 3. Then the driver installation is completed. - 12 - If... it does not show up , please run "D:\setup.exe". Step 1. Click the Install Display Drivers (Radeon X300 Series) item. GV-RX30 Series Graphics Accelerator Step 5....
... the driver CD disk into your CD-ROM, and then you can see the AUTORUN window. When autorun window show up , click the Install Display Drivers (Radeon X300 Series) item. Windows installings the components. Step 3. Then the driver installation is completed. - 12 - If... it does not show up , please run "D:\setup.exe". Step 1. Click the Install Display Drivers (Radeon X300 Series) item. GV-RX30 Series Graphics Accelerator Step 5....

Manual
Page 13
Utilities on Driver CD Insert the driver CD disk into your name and company. Step 3. Step 4. If it does not show up, please run "D:\setup.exe". Step 2. Enter your CD-ROM, and then you can see the AUTORUN window. Then the V-Tuner2 installation is completed. - 13 - Software Installation z Install GIGABYTE Utility (V-Tuner2): Click the GIGABYTE Utility item. Click the Next button. English 3.1.4. Click the Finish button to restart computer.
Utilities on Driver CD Insert the driver CD disk into your name and company. Step 3. Step 4. If it does not show up, please run "D:\setup.exe". Step 2. Enter your CD-ROM, and then you can see the AUTORUN window. Then the V-Tuner2 installation is completed. - 13 - Software Installation z Install GIGABYTE Utility (V-Tuner2): Click the GIGABYTE Utility item. Click the Next button. English 3.1.4. Click the Finish button to restart computer.

Manual
Page 14
Step 5. Step 2. Click the Next button. GV-RX30 Series Graphics Accelerator Step 6. Windows installings the components. English z Install Hydravision : Click the Hydravision Install item. Step 3. Click the Finish button to restart computer. Then the Hydravision Install is completed. - 14 - Click the Next button. Step 4. Click the Next button. Click the Yes button.
Step 5. Step 2. Click the Next button. GV-RX30 Series Graphics Accelerator Step 6. Windows installings the components. English z Install Hydravision : Click the Hydravision Install item. Step 3. Click the Finish button to restart computer. Then the Hydravision Install is completed. - 14 - Click the Next button. Step 4. Click the Next button. Click the Yes button.
Manual
Page 18
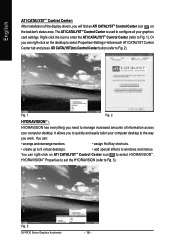
English ATI CATALYSTTM Control Center: After installation of information across your computer desktop. Fig. 3 GV-RX30 Series Graphics Accelerator - 18 - You can right-click on the desktop to select Properties>Settings> Advanced> ATI CATALYST Control Center tab and press ATI... everything you need to manage increased amounts of the display drivers, you to Fig. 2). You can right-click on ATI CATALYSTTM Control Center icon to windows and menus. Right-click the icon to enter the ATI CATALYSTTM Control Center (refer to Fig. 3). The ATI CATALYSTTM Control Center is used to configure...
English ATI CATALYSTTM Control Center: After installation of information across your computer desktop. Fig. 3 GV-RX30 Series Graphics Accelerator - 18 - You can right-click on the desktop to select Properties>Settings> Advanced> ATI CATALYST Control Center tab and press ATI... everything you need to manage increased amounts of the display drivers, you to Fig. 2). You can right-click on ATI CATALYSTTM Control Center icon to windows and menus. Right-click the icon to enter the ATI CATALYSTTM Control Center (refer to Fig. 3). The ATI CATALYSTTM Control Center is used to configure...
Manual
Page 19
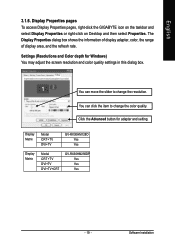
Display Properties pages To access Display Properties pages, right-click the GIGABYTE icon on the taskbar and select Display Properties or right-click on Desktop and then select Properties. Click the Advanced button for Windows) You may adjust the screen resolution and color quality settings in this ...dialog box. Settings (Resolutions and Color depth for adapter and setting. Display Matrix Model CRT+TV DVI+TV GV-RX30HM128D Yes Yes Display Matrix Model CRT+TV DVI+TV DVI+TV+CRT GV-RX30HM256DP ...
Display Properties pages To access Display Properties pages, right-click the GIGABYTE icon on the taskbar and select Display Properties or right-click on Desktop and then select Properties. Click the Advanced button for Windows) You may adjust the screen resolution and color quality settings in this ...dialog box. Settings (Resolutions and Color depth for adapter and setting. Display Matrix Model CRT+TV DVI+TV GV-RX30HM128D Yes Yes Display Matrix Model CRT+TV DVI+TV DVI+TV+CRT GV-RX30HM256DP ...
Manual
Page 22
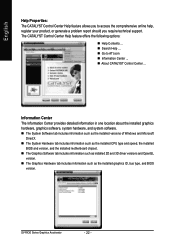
... The CATALYST Control Center Help feature allows you to ATI.com „ Information Center ... „ About CATALYST Control Center ... GV-RX30 Series Graphics Accelerator - 22 - Information Center The Information Center provides detailed information in one location about the installed graphics hardware, ...graphics software, system hardware, and system software. „ The System Software tab includes information such as the installed versions of Windows and Microsoft DirectX. „ The System Hardware tab includes information such as the installed CPU type and speed, the installed BIOS and...
... The CATALYST Control Center Help feature allows you to ATI.com „ Information Center ... „ About CATALYST Control Center ... GV-RX30 Series Graphics Accelerator - 22 - Information Center The Information Center provides detailed information in one location about the installed graphics hardware, ...graphics software, system hardware, and system software. „ The System Software tab includes information such as the installed versions of Windows and Microsoft DirectX. „ The System Hardware tab includes information such as the installed CPU type and speed, the installed BIOS and...

Manual
Page 29
... of your 3D application uses, and you want to select settings that use one of the principal 3D features onto a single page, without any preview window, allowing for display refresh • SMARTSHADERTM effects This page is useful when it is not necessary to preview the adjusted settings because the effect is...
... of your 3D application uses, and you want to select settings that use one of the principal 3D features onto a single page, without any preview window, allowing for display refresh • SMARTSHADERTM effects This page is useful when it is not necessary to preview the adjusted settings because the effect is...

Manual
Page 32
...Click Next. 7. Then the AUTORUN window will show the CD automatically, please...Install Display Drivers to complete the installation. Please make sure the Windows® 2000 have installed Windows® 2000 Service Pack (or later) before installing the graphics... Click Yes to install the driver. To install the graphics card driver for Windows® 2000, please insert the Installation CD. English 3.2. Click Install Display ...of the graphics card. Windows® 2000 Driver Installation With Windows running on the control bar. 2. Select Run. 3. If Windows® does not show ...
...Click Next. 7. Then the AUTORUN window will show the CD automatically, please...Install Display Drivers to complete the installation. Please make sure the Windows® 2000 have installed Windows® 2000 Service Pack (or later) before installing the graphics... Click Yes to install the driver. To install the graphics card driver for Windows® 2000, please insert the Installation CD. English 3.2. Click Install Display ...of the graphics card. Windows® 2000 Driver Installation With Windows running on the control bar. 2. Select Run. 3. If Windows® does not show ...

Manual
Page 33
... Guide located in graphics capabilities on your motherboard. Press the F8 key on your keyboard after system starts up. When the Windows Advanced Options Menu appears, select Safe Mode and press Enter. If necessary, adjust your computer. After getting into Safe Mode,...secondary display.) „ Make sure you selected the appropriate display device and graphics card when you experience problems. Contact your dealer or Gigabyte for the graphics card is securely fastened to the monitor's manual.) - 33 Troubleshooting Tips - English 4. Troubleshooting Tips The following ...
... Guide located in graphics capabilities on your motherboard. Press the F8 key on your keyboard after system starts up. When the Windows Advanced Options Menu appears, select Safe Mode and press Enter. If necessary, adjust your computer. After getting into Safe Mode,...secondary display.) „ Make sure you selected the appropriate display device and graphics card when you experience problems. Contact your dealer or Gigabyte for the graphics card is securely fastened to the monitor's manual.) - 33 Troubleshooting Tips - English 4. Troubleshooting Tips The following ...
Manual
Page 34
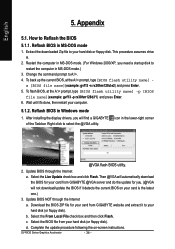
...then click Flash. English 5. Extract the downloaded Zip file to select the @VGA utility. @VGA flash BIOS utility. 2. This procedure assumes drive A. 2. GV-RX30 Series Graphics Accelerator - 34 - To flash BIOS, at the A:\> prompt, type[BIOS flash utility name] - Right-click to your hard disk (... or floppy disk. Restart the computer in MS-DOS mode. (For Windows 2000/XP, you . (@VGA will find a GIGABYTE icon in MS-DOS mode.) 3. Then @VGA will automatically download the BIOS for your card from GIGABYTE @VGA server and do the update for your card from your computer....
...then click Flash. English 5. Extract the downloaded Zip file to select the @VGA utility. @VGA flash BIOS utility. 2. This procedure assumes drive A. 2. GV-RX30 Series Graphics Accelerator - 34 - To flash BIOS, at the A:\> prompt, type[BIOS flash utility name] - Right-click to your hard disk (... or floppy disk. Restart the computer in MS-DOS mode. (For Windows 2000/XP, you . (@VGA will find a GIGABYTE icon in MS-DOS mode.) 3. Then @VGA will automatically download the BIOS for your card from GIGABYTE @VGA server and do the update for your card from your computer....
Manual
Page 35
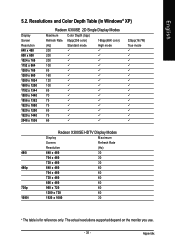
The actual resolutions supported depend on the monitor you use. - 35 - Appendix English 5.2. Resolutions and Color Depth Table (In Windows® XP) Display Screen Resolution 640 x 480 800 x 600 1024 x 768 1152 x 864 1280 x 768 1280 x 960 1280 x 1024 1600 x 1200 1792 x 1344 1800 x 1440 ...
The actual resolutions supported depend on the monitor you use. - 35 - Appendix English 5.2. Resolutions and Color Depth Table (In Windows® XP) Display Screen Resolution 640 x 480 800 x 600 1024 x 768 1152 x 864 1280 x 768 1280 x 960 1280 x 1024 1600 x 1200 1792 x 1344 1800 x 1440 ...
