Manual
Page 1
... remove any errors or omissions that is protected by GIGA-BYTE TECHNOLOGY CO., LTD. ("GBT"). AMD Graphics Accelerator User's Manual Rev. 101 Copyright © 2012 GIGABYTE TECHNOLOGY CO., LTD Copyright by U.S. Trademarks Third-party brands and names are the properties of this manual may void the warranty of their respective owners...
... remove any errors or omissions that is protected by GIGA-BYTE TECHNOLOGY CO., LTD. ("GBT"). AMD Graphics Accelerator User's Manual Rev. 101 Copyright © 2012 GIGABYTE TECHNOLOGY CO., LTD Copyright by U.S. Trademarks Third-party brands and names are the properties of this manual may void the warranty of their respective owners...
Manual
Page 2
Software Installation ...7 3.1. AMD Eyefinity ...29 5. Minimum System Requirements 3 2. Driver and Utility Installation 7 3.1.1. Table of Contents 1. Hardware Installation 4 2.1. GIGABYTE Easy Boost on Driver Disk 9 3.2. Taskbar Icon ...12 3.3. Hardware Installation ...4 2.1.1. Driver Installation ...7 3.1.2. Introduction ...3 1.1. AMD Crossfire ...5 3. Appendix ...30 - 2 - Display Properties Pages 14 4.
Software Installation ...7 3.1. AMD Eyefinity ...29 5. Minimum System Requirements 3 2. Driver and Utility Installation 7 3.1.1. Table of Contents 1. Hardware Installation 4 2.1. GIGABYTE Easy Boost on Driver Disk 9 3.2. Taskbar Icon ...12 3.3. Hardware Installation ...4 2.1.1. Driver Installation ...7 3.1.2. Introduction ...3 1.1. AMD Crossfire ...5 3. Appendix ...30 - 2 - Display Properties Pages 14 4.

Manual
Page 3
1. Windows® XP Professional x64 Edition - 3 - Windows® 7 - Minimum System Requirements • Hardware - Introduction Optical drive for best performance - Windows® Vista - Windows® XP with Service Pack 2 (SP2) - Introduction 1.1. Intel® Pentium® 4 / CoreTM 2 or AMD AthlonTM / PhenomTM - 1 GB or more of system memory for software installation (CD-ROM or DVD-ROM drive) • Operating System -
1. Windows® XP Professional x64 Edition - 3 - Windows® 7 - Minimum System Requirements • Hardware - Introduction Optical drive for best performance - Windows® Vista - Windows® XP with Service Pack 2 (SP2) - Introduction 1.1. Intel® Pentium® 4 / CoreTM 2 or AMD AthlonTM / PhenomTM - 1 GB or more of system memory for software installation (CD-ROM or DVD-ROM drive) • Operating System -
Manual
Page 4
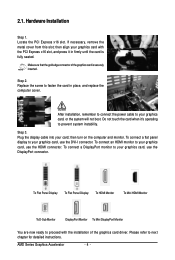
then align your graphics card, or the system will not boot. After installation, remember to connect the power cable to next chapter for detailed instructions. To Flat Panel Display To Flat Panel Display To HDMI Monitor To Mini HDMI Monitor To D-Sub Monitor DisplayPort Monitor To Mini DisplayPort Monitor You are now ready to prevent system instability. Please refer to your graphics card with the PCI Express x16 slot, and press it 's operating to proceed with the installation of the graphics card is fully seated. Replace the screw to your graphics card, use the DVI-I connector....
then align your graphics card, or the system will not boot. After installation, remember to connect the power cable to next chapter for detailed instructions. To Flat Panel Display To Flat Panel Display To HDMI Monitor To Mini HDMI Monitor To D-Sub Monitor DisplayPort Monitor To Mini DisplayPort Monitor You are now ready to prevent system instability. Please refer to your graphics card with the PCI Express x16 slot, and press it 's operating to proceed with the installation of the graphics card is fully seated. Replace the screw to your graphics card, use the DVI-I connector....
Manual
Page 5
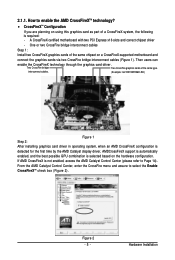
... to enable the AMD CrossFireXTM technology? • CrossFireXTM Configuration If you are planning on the hardware configuration. If AMD CrossFireX is required: - interconnect cables. (Example: GV-RX195P256D-RH) Figure 1 Step 2: After installing graphics card driver in operating system, when an AMD CrossFireX configuration is detected for the first time by the...
... to enable the AMD CrossFireXTM technology? • CrossFireXTM Configuration If you are planning on the hardware configuration. If AMD CrossFireX is required: - interconnect cables. (Example: GV-RX195P256D-RH) Figure 1 Step 2: After installing graphics card driver in operating system, when an AMD CrossFireX configuration is detected for the first time by the...

Manual
Page 6
To protect them against damage from the system. If you work correctly, please use official GIGABYTE BIOS only. Unpacking and installation should be done on the card before handling computer components. Inspect the card carton for HDMI output function, set the ... not have one, touch both audio and video signals. DO NOT APPLY POWER TO YOUR SYSTEM IF THE GRAPHICS CARD IS DAMAGED. Using non-official GIGABYTE BIOS might cause problem(s) on the bag that your graphics card can work on your computer. 1. Shipping and handling may cause damage to obtain audio...
To protect them against damage from the system. If you work correctly, please use official GIGABYTE BIOS only. Unpacking and installation should be done on the card before handling computer components. Inspect the card carton for HDMI output function, set the ... not have one, touch both audio and video signals. DO NOT APPLY POWER TO YOUR SYSTEM IF THE GRAPHICS CARD IS DAMAGED. Using non-official GIGABYTE BIOS might cause problem(s) on the bag that your graphics card can work on your computer. 1. Shipping and handling may cause damage to obtain audio...
Manual
Page 7
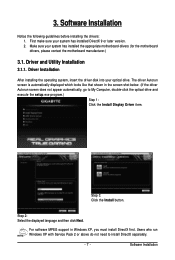
Driver and Utility Installation 3.1.1. Driver Installation After installing the operating system, insert the driver disk into your system has installed the appropriate motherboard drivers (for the motherboard drivers, please contact the motherboard manufacturer.) 3.1. Step 3: Click the Install button. Software Installation The driver Autorun screen is automatically displayed which looks like that shown in Windows XP, you must install DirectX first. Make sure your optical drive. Step 2: Select the displayed language and then click Next. For software MPEG support in the screen ...
Driver and Utility Installation 3.1.1. Driver Installation After installing the operating system, insert the driver disk into your system has installed the appropriate motherboard drivers (for the motherboard drivers, please contact the motherboard manufacturer.) 3.1. Step 3: Click the Install button. Software Installation The driver Autorun screen is automatically displayed which looks like that shown in Windows XP, you must install DirectX first. Make sure your optical drive. Step 2: Select the displayed language and then click Next. For software MPEG support in the screen ...
Manual
Page 8
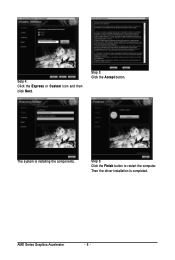
Then the driver installation is installing the components. Step 6: Click the Finish button to restart the computer. Setp 4: Click the Express or Custom icon and then click Next. Step 5: Click the Accept button. AMD Series Graphics Accelerator - 8 - The system is completed.
Then the driver installation is installing the components. Step 6: Click the Finish button to restart the computer. Setp 4: Click the Express or Custom icon and then click Next. Step 5: Click the Accept button. AMD Series Graphics Accelerator - 8 - The system is completed.
Manual
Page 9
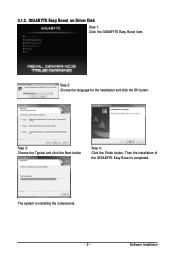
GIGABYTE Easy Boost on Driver Disk Step 1: Click the GIGABYTE Easy Boost item. The system is completed. Software Installation Step 3: Choose the Typical and click the Next button Step 4: Click the Finish button. 3.1.2. Then the installation of the GIGABYTE Easy Boost is installing the components. - 9 - Step 2: Choose the language for the installation and click the OK button.
GIGABYTE Easy Boost on Driver Disk Step 1: Click the GIGABYTE Easy Boost item. The system is completed. Software Installation Step 3: Choose the Typical and click the Next button Step 4: Click the Finish button. 3.1.2. Then the installation of the GIGABYTE Easy Boost is installing the components. - 9 - Step 2: Choose the language for the installation and click the OK button.
Manual
Page 10
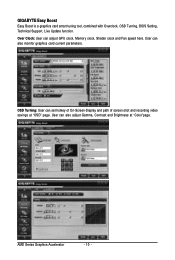
OSD Turning: User can also adjust Gamma, Contrast and Brightness at "OSD" page. AMD Series Graphics Accelerator - 10 - User can set hotkey of On-Screen-Display and path of screen shot and recording video savings at "Color"page. User can adjust GPU clock, Memory clock, Shader clock and Fan speed here. Over Clock: User can also monitor graphics card current parameters. GIGABYTE Easy Boost Easy Boost is a graphics card smart tuning tool, combined with Overclock, OSD Turning, BIOS Setting, Technical Support, Live Update function.
OSD Turning: User can also adjust Gamma, Contrast and Brightness at "OSD" page. AMD Series Graphics Accelerator - 10 - User can set hotkey of On-Screen-Display and path of screen shot and recording video savings at "Color"page. User can adjust GPU clock, Memory clock, Shader clock and Fan speed here. Over Clock: User can also monitor graphics card current parameters. GIGABYTE Easy Boost Easy Boost is a graphics card smart tuning tool, combined with Overclock, OSD Turning, BIOS Setting, Technical Support, Live Update function.
Manual
Page 11
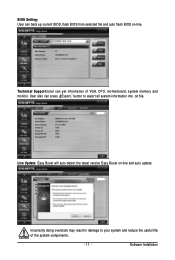
Live Update: Easy Boost will auto detect the latest version Easy Boost on -line. Technical Support:User can get information of the system components. - 11 - BIOS Setting: User can press ¡§Export¡¨ button to your system and reduce the useful life of VGA, CPU, motherboard, system memory and monitor. Software Installation Incorrectly doing overclock may result in damage to export all system information into .txt file. User also can back up current BIOS, flash BIOS from selected file and auto flash BIOS on -line and auto update.
Live Update: Easy Boost will auto detect the latest version Easy Boost on -line. Technical Support:User can get information of the system components. - 11 - BIOS Setting: User can press ¡§Export¡¨ button to your system and reduce the useful life of VGA, CPU, motherboard, system memory and monitor. Software Installation Incorrectly doing overclock may result in damage to export all system information into .txt file. User also can back up current BIOS, flash BIOS from selected file and auto flash BIOS on -line and auto update.
Manual
Page 12
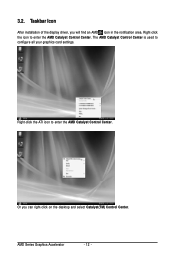
Or you will find an AMD icon in the notification area. Right-click the ATI icon to configure all your graphics card settings. AMD Series Graphics Accelerator - 12 - 3.2. Taskbar Icon After installation of the display driver, you can right-click on the desktop and select Catalyst(TM) Control Center. The AMD Catalyst Control Center is used to enter the AMD Catalyst Control Center. Right-click the icon to enter the AMD Catalyst Control Center.
Or you will find an AMD icon in the notification area. Right-click the ATI icon to configure all your graphics card settings. AMD Series Graphics Accelerator - 12 - 3.2. Taskbar Icon After installation of the display driver, you can right-click on the desktop and select Catalyst(TM) Control Center. The AMD Catalyst Control Center is used to enter the AMD Catalyst Control Center. Right-click the icon to enter the AMD Catalyst Control Center.
Manual
Page 13
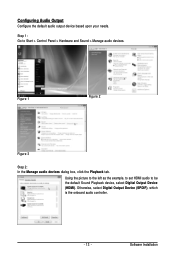
Software Installation Using the picture to the left as the example, to set HDMI audio to Start > Control Panel > Hardware and Sound > Manage audio devices. Configuring Audio Output Configure the default audio output device based upon your needs. Figure 1 Figure 2 Figure 3 Step 2: In the Manage audio devices dialog box, click the Playback tab. Step 1: Go to be the default Sound Playback device, select Digital Output Device (HDMI). Otherwise, select Digital Output Device (SPDIF), which is the onboard audio controller. - 13 -
Software Installation Using the picture to the left as the example, to set HDMI audio to Start > Control Panel > Hardware and Sound > Manage audio devices. Configuring Audio Output Configure the default audio output device based upon your needs. Figure 1 Figure 2 Figure 3 Step 2: In the Manage audio devices dialog box, click the Playback tab. Step 1: Go to be the default Sound Playback device, select Digital Output Device (HDMI). Otherwise, select Digital Output Device (SPDIF), which is the onboard audio controller. - 13 -

Manual
Page 14
AMD Series Graphics Accelerator - 14 - You can move the slider to change the color quality. Display Properties Pages Display Settings (Resolutions and Color Quality for advanced settings. Click the Advanced button for Windows) To access Display Settings page, right-click on desktop and select Personalize, then the Personalization windows will show up. Select Display Settings to change the resolution. You can click the item to adjust the screen resolution and color quality settings. 3.3.
AMD Series Graphics Accelerator - 14 - You can move the slider to change the color quality. Display Properties Pages Display Settings (Resolutions and Color Quality for advanced settings. Click the Advanced button for Windows) To access Display Settings page, right-click on desktop and select Personalize, then the Personalization windows will show up. Select Display Settings to change the resolution. You can click the item to adjust the screen resolution and color quality settings. 3.3.
Manual
Page 15
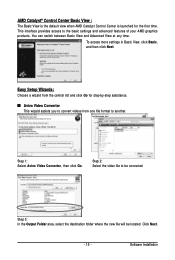
You can switch between Basic View and Advanced View at any time. To access more settings in Basic View, click Basic, and then click Next. Step 1: Select Avivo Video Converter, then click Go. Step 2: Select the video file to be located. Easy Setup Wizards: Choose a wizard from the central list and click Go for the first time. Step 3: In the Output Folder area, select the destination folder where the new file will be converted. Click Next. - 15 - Software Installation This interface provides access to the basic settings and advanced features of your AMD graphics ...
You can switch between Basic View and Advanced View at any time. To access more settings in Basic View, click Basic, and then click Next. Step 1: Select Avivo Video Converter, then click Go. Step 2: Select the video file to be located. Easy Setup Wizards: Choose a wizard from the central list and click Go for the first time. Step 3: In the Output Folder area, select the destination folder where the new file will be converted. Click Next. - 15 - Software Installation This interface provides access to the basic settings and advanced features of your AMD graphics ...
Manual
Page 16
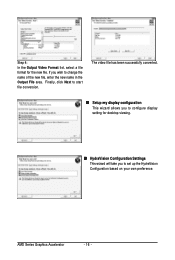
If you wish to set up the HydraVision Configuration based on your own preference. AMD Series Graphics Accelerator - 16 - The video file has been successfully converted. „ Setup my display configuration This wizard allows you to configure display setting for the new file. Finally, click Next to start file conversion. Step 4: In the Output Video Format list, select a file format for desktop viewing. „ HydraVision Configuration Settings This wizard will take you to change the name of the new file, enter the new name in the Output File area.
If you wish to set up the HydraVision Configuration based on your own preference. AMD Series Graphics Accelerator - 16 - The video file has been successfully converted. „ Setup my display configuration This wizard allows you to configure display setting for the new file. Finally, click Next to start file conversion. Step 4: In the Output Video Format list, select a file format for desktop viewing. „ HydraVision Configuration Settings This wizard will take you to change the name of the new file, enter the new name in the Output File area.
Manual
Page 17
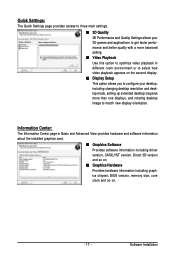
Quick Settings: The Quick Settings page provides access to three main settings. „ 3D Quality 3D Performance and Quality Settings allows your desktop, including changing desktop resolution and desktop mode, setting up extended desktop (requires more balanced setting. „ Video Playback Use this option to optimize video playback in Basic and Advanced View provides hardware and software information about the installed graphics card. „ Graphics Software Provides software information including driver version, CATALYST version, Direct 3D version and so on. „ Graphics Hardware ...
Quick Settings: The Quick Settings page provides access to three main settings. „ 3D Quality 3D Performance and Quality Settings allows your desktop, including changing desktop resolution and desktop mode, setting up extended desktop (requires more balanced setting. „ Video Playback Use this option to optimize video playback in Basic and Advanced View provides hardware and software information about the installed graphics card. „ Graphics Software Provides software information including driver version, CATALYST version, Direct 3D version and so on. „ Graphics Hardware ...
Manual
Page 18
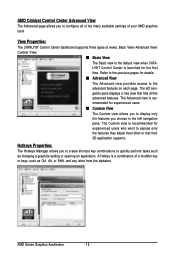
Refer to the previous pages for experienced users who want to expose only the features they adjust most often or that lists all of the many available settings of your AMD graphics card. The Custom view is recommended for details. „ Advanced View The Advanced view provides access to display only the features you choose in the left navi- The left navigation pane. ommended for the first time. Hotkeys Properties: The Hotkeys Manager allows you to create shortcut key combinations to configure all the advanced features. The Advanced view is a combination of ...
Refer to the previous pages for experienced users who want to expose only the features they adjust most often or that lists all of the many available settings of your AMD graphics card. The Custom view is recommended for details. „ Advanced View The Advanced view provides access to display only the features you choose in the left navi- The left navigation pane. ommended for the first time. Hotkeys Properties: The Hotkeys Manager allows you to create shortcut key combinations to configure all the advanced features. The Advanced view is a combination of ...
Manual
Page 19
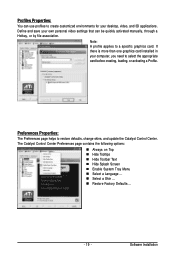
If there is more than one graphics card installed in your desktop, video, and 3D applications. Preferences Properties: The Preferences page helps to a specific graphics card. The Catalyst Control Center Preferences page contains the following options: „ Always on Top „ Hide Tooltips „ Hide Toolbar Text „ Hide Splash Screen „ Enable System Tray Menu „ Select a Language ... „ Select a Skin ... „ Restore Factory Defaults ... - 19 - Software Installation Note: A profile applies to restore defaults, change skins, and update the Catalyst ...
If there is more than one graphics card installed in your desktop, video, and 3D applications. Preferences Properties: The Preferences page helps to a specific graphics card. The Catalyst Control Center Preferences page contains the following options: „ Always on Top „ Hide Tooltips „ Hide Toolbar Text „ Hide Splash Screen „ Enable System Tray Menu „ Select a Language ... „ Select a Skin ... „ Restore Factory Defaults ... - 19 - Software Installation Note: A profile applies to restore defaults, change skins, and update the Catalyst ...
Manual
Page 20
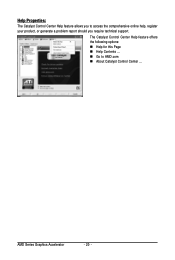
Help Properties: The Catalyst Control Center Help feature allows you require technical support. AMD Series Graphics Accelerator - 20 - The Catalyst Control Center Help feature offers the following options: „ Help for this Page „ Help Contents ... „ Go to access the comprehensive online help, register your product, or generate a problem report should you to AMD.com „ About Catalyst Control Center ...
Help Properties: The Catalyst Control Center Help feature allows you require technical support. AMD Series Graphics Accelerator - 20 - The Catalyst Control Center Help feature offers the following options: „ Help for this Page „ Help Contents ... „ Go to access the comprehensive online help, register your product, or generate a problem report should you to AMD.com „ About Catalyst Control Center ...
