Manual
Page 3
... technology must be handed over to a designated collection point for the recycling of their respective owners. Copyright © 2006 GIGABYTE TECHNOLOGY CO., LTD Copyright by U.S. The author assumes no responsibility for home and other limited viewing uses only unless otherwise authorized... of with user's other intellectual property rights. Reverse engineering or disassembly is protected by GIGA-BYTE TECHNOLOGY CO., LTD. ("GBT"). GV-NX79G256DP-RH GeForce™ 7900 GS Graphics Accelerator User's Manual Rev. 101 12MD-NX79G2PR-101R * The WEEE marking on VGA card, this...
... technology must be handed over to a designated collection point for the recycling of their respective owners. Copyright © 2006 GIGABYTE TECHNOLOGY CO., LTD Copyright by U.S. The author assumes no responsibility for home and other limited viewing uses only unless otherwise authorized... of with user's other intellectual property rights. Reverse engineering or disassembly is protected by GIGA-BYTE TECHNOLOGY CO., LTD. ("GBT"). GV-NX79G256DP-RH GeForce™ 7900 GS Graphics Accelerator User's Manual Rev. 101 12MD-NX79G2PR-101R * The WEEE marking on VGA card, this...
Manual
Page 4
... Utilities Installation 10 3.1.1. Appendix 29 5.1. Driver Installation ...12 3.1.4. Reflash BIOS in MS-DOS Mode 29 5.2. Resolutions and Color Depth Table (In Windows® XP 31 GV-NX79G256DP-RH Graphics Accelerator - 2 - DirectX Installation ...11 3.1.3. Troubleshooting Tips 28 5. Software Installation 10 3.1. Operating System Requirement 10 3.1.2. Display Properties pages 15 3.1.6. Windows® 2000 driver installation 27...
... Utilities Installation 10 3.1.1. Appendix 29 5.1. Driver Installation ...12 3.1.4. Reflash BIOS in MS-DOS Mode 29 5.2. Resolutions and Color Depth Table (In Windows® XP 31 GV-NX79G256DP-RH Graphics Accelerator - 2 - DirectX Installation ...11 3.1.3. Troubleshooting Tips 28 5. Software Installation 10 3.1. Operating System Requirement 10 3.1.2. Display Properties pages 15 3.1.6. Windows® 2000 driver installation 27...
Manual
Page 5
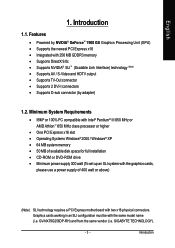
GV-NX79G256DP-RH) and from the same vendor (i.e. GIGABYTE TECHNOLOGY). - 3 - Minimum System Requirements • IBM® or 100% PC compatible with Intel® Pentium® III 650 MHz or AMD Athlon™ 650 MHz ...
GV-NX79G256DP-RH) and from the same vendor (i.e. GIGABYTE TECHNOLOGY). - 3 - Minimum System Requirements • IBM® or 100% PC compatible with Intel® Pentium® III 650 MHz or AMD Athlon™ 650 MHz ...
Manual
Page 6
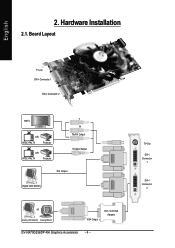
Board Layout TV-out DVI-I Connector 1 DVI-I Connector 2 HDTV OR NTSC / PAL TV Projector OR NTSC / PAL TV Projector Y Pr Pb/AV Output S-Video Output DVI Output Digital LCD Monitor OR Analog LCD Monitor Analog Monitor VGA Output DVI-I Connector 2 TV-Out DVI-I Connector 1 DVI-I to D-Sub Adapter GV-NX79G256DP-RH Graphics Accelerator - 4 - Hardware Installation 2.1. English 2.
Board Layout TV-out DVI-I Connector 1 DVI-I Connector 2 HDTV OR NTSC / PAL TV Projector OR NTSC / PAL TV Projector Y Pr Pb/AV Output S-Video Output DVI Output Digital LCD Monitor OR Analog LCD Monitor Analog Monitor VGA Output DVI-I Connector 2 TV-Out DVI-I Connector 1 DVI-I to D-Sub Adapter GV-NX79G256DP-RH Graphics Accelerator - 4 - Hardware Installation 2.1. English 2.
Manual
Page 7
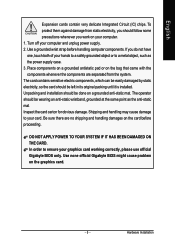
... the card carton for obvious damage. If you work on the graphics card. - 5 - In order to your computer and unplug power supply. 2. Use none official Gigabyte BIOS might cause problem on your graphics card working correctly, please use official...
... the card carton for obvious damage. If you work on the graphics card. - 5 - In order to your computer and unplug power supply. 2. Use none official Gigabyte BIOS might cause problem on your graphics card working correctly, please use official...

Manual
Page 8
... disable it on the motherboard. Power off the computer and monitor, then disconnect the display cable from your computer. 2. If necessary, consult your computer documentation. GV-NX79G256DP-RH Graphics Accelerator - 6 - Now that you have prepared your graphics accelerator card. Or, if your computer has any existing graphics card from the back of your...
... disable it on the motherboard. Power off the computer and monitor, then disconnect the display cable from your computer. 2. If necessary, consult your computer documentation. GV-NX79G256DP-RH Graphics Accelerator - 6 - Now that you have prepared your graphics accelerator card. Or, if your computer has any existing graphics card from the back of your...
Manual
Page 9
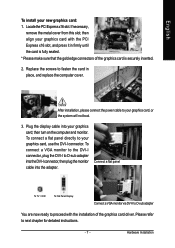
Replace the screws to next chapter for detailed instructions. - 7 - Please refer to fasten the card in firmly until the card is securely inserted. 2. Hardware Installation After installation, please connect the power cable to D-sub adapter into the DVI-I to your graphics card, or the system will not boot. 3. To connect a VGA monitor to the DVI-I connector, plug the DVI-I connector, then plug the monitor cable into your new graphics card: 1. To connect a flat panel directly to proceed with the PCI Express x16 slot, and press it in place, and replace the computer cover. ...
Replace the screws to next chapter for detailed instructions. - 7 - Please refer to fasten the card in firmly until the card is securely inserted. 2. Hardware Installation After installation, please connect the power cable to D-sub adapter into the DVI-I to your graphics card, or the system will not boot. 3. To connect a VGA monitor to the DVI-I connector, plug the DVI-I connector, then plug the monitor cable into your new graphics card: 1. To connect a flat panel directly to proceed with the PCI Express x16 slot, and press it in place, and replace the computer cover. ...
Manual
Page 10
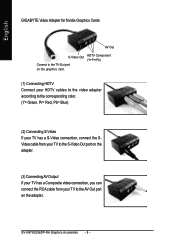
English GIGABYTE Video Adapter for Nvidia Graphics Cards AV Out S-Video Out Connect to the AV Out port on the graphics card. HDTV Component (Y+Pr+Pb) (1) Connecting ... Output If your TV has a Composite video connection, you can connect the RCA cable from your TV to the TV-Out port on the adapter. GV-NX79G256DP-RH Graphics Accelerator - 8 -
English GIGABYTE Video Adapter for Nvidia Graphics Cards AV Out S-Video Out Connect to the AV Out port on the graphics card. HDTV Component (Y+Pr+Pb) (1) Connecting ... Output If your TV has a Composite video connection, you can connect the RCA cable from your TV to the TV-Out port on the adapter. GV-NX79G256DP-RH Graphics Accelerator - 8 -
Manual
Page 11
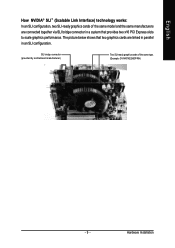
Hardware Installation English How NVIDIA® SLI™ (Scalable Link Interface) technology works: In an SLI configuration, two SLI-ready graphics cards of the same type. (Example: GV-NX79G256DP-RH) - 9 - The picture below shows that provides two x16 PCI Express slots to scale graphics performance. SLI bridge connector (provided by motherboard manufacturer) Two SLI-ready graphics cards of the same model and the same manufacturers are linked in parallel in a system that two graphics cards are connected together via SLI bridge connector in an SLI configuration.
Hardware Installation English How NVIDIA® SLI™ (Scalable Link Interface) technology works: In an SLI configuration, two SLI-ready graphics cards of the same type. (Example: GV-NX79G256DP-RH) - 9 - The picture below shows that provides two x16 PCI Express slots to scale graphics performance. SLI bridge connector (provided by motherboard manufacturer) Two SLI-ready graphics cards of the same model and the same manufacturers are linked in parallel in a system that two graphics cards are connected together via SLI bridge connector in an SLI configuration.
Manual
Page 12
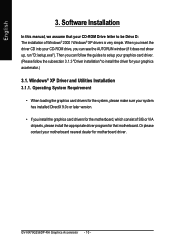
Software Installation In this manual, we assume that motherboard. GV-NX79G256DP-RH Graphics Accelerator - 10 - Windows® XP Driver and Utilities Installation 3.1.1. Or please contact your motherboard nearest dealer for your graphics card driver. (Please follow the ...
Software Installation In this manual, we assume that motherboard. GV-NX79G256DP-RH Graphics Accelerator - 10 - Windows® XP Driver and Utilities Installation 3.1.1. Or please contact your motherboard nearest dealer for your graphics card driver. (Please follow the ...
Manual
Page 13
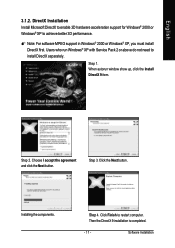
Users who run Windows® XP with Service Pack 2 or above do not need to restart computer. When autorun window show up, click the Install DirectX 9 item. Installing the components. Software Installation Click Finish to install DirectX separately. Step 2. Step 3. DirectX Installation Install Microsoft DirectX to enable 3D hardware acceleration support for Windows® 2000 or Windows® XP to achieve better 3D performance. 0 Note: For software MPEG support in Windows® 2000 or Windows® XP, you must install DirectX first. English 3.1.2. Then the ...
Users who run Windows® XP with Service Pack 2 or above do not need to restart computer. When autorun window show up, click the Install DirectX 9 item. Installing the components. Software Installation Click Finish to install DirectX separately. Step 2. Step 3. DirectX Installation Install Microsoft DirectX to enable 3D hardware acceleration support for Windows® 2000 or Windows® XP to achieve better 3D performance. 0 Note: For software MPEG support in Windows® 2000 or Windows® XP, you must install DirectX first. English 3.1.2. Then the ...
Manual
Page 14
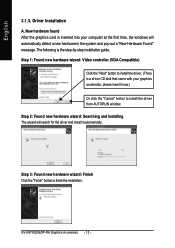
... computer at the first time, the windows will search for the driver and install it now.) Or click the "Cancel" button to finish the installation. GV-NX79G256DP-RH Graphics Accelerator - 12 - Step 2: Found new hardware wizard: Searching and installing The wizard will automatically detect a new hardware in the system and pop out a "New...
... computer at the first time, the windows will search for the driver and install it now.) Or click the "Cancel" button to finish the installation. GV-NX79G256DP-RH Graphics Accelerator - 12 - Step 2: Found new hardware wizard: Searching and installing The wizard will automatically detect a new hardware in the system and pop out a "New...

Manual
Page 15
If it does not show up , please run "D:\setup.exe". Then the driver installation is completed. - 13 - Software Installation Then click the Install Display Driver item. Click the Next button. Step 2. Click the Finish button to restart computer. Driver installation (Autorun Window) Insert the driver CD disk into your CD-ROM, and then you can see the AUTORUN window. Step 1. Windows installings the components. Step 3. When autorun window show up , click the Display Driver item. English B.
If it does not show up , please run "D:\setup.exe". Then the driver installation is completed. - 13 - Software Installation Then click the Install Display Driver item. Click the Next button. Step 2. Click the Finish button to restart computer. Driver installation (Autorun Window) Insert the driver CD disk into your CD-ROM, and then you can see the AUTORUN window. Step 1. Windows installings the components. Step 3. When autorun window show up , click the Display Driver item. English B.
Manual
Page 16
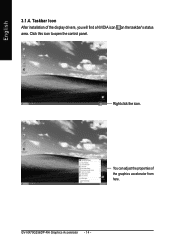
GV-NX79G256DP-RH Graphics Accelerator - 14 - Click this icon to open the control panel. You can adjust the properties of the display drivers, you will find a NVIDIA icon area. on the taskbar's status Right click the icon. Taskbar Icon After installation of the graphics accelerator from here. English 3.1.4.
GV-NX79G256DP-RH Graphics Accelerator - 14 - Click this icon to open the control panel. You can adjust the properties of the display drivers, you will find a NVIDIA icon area. on the taskbar's status Right click the icon. Taskbar Icon After installation of the graphics accelerator from here. English 3.1.4.
Manual
Page 17
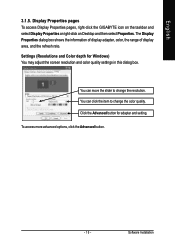
Display Properties pages To access Display Properties pages, right-click the GIGABYTE icon on the taskbar and select Display Properties or right-click on Desktop and then select Properties. You can move the slider to change the ...
Display Properties pages To access Display Properties pages, right-click the GIGABYTE icon on the taskbar and select Display Properties or right-click on Desktop and then select Properties. You can move the slider to change the ...
Manual
Page 18
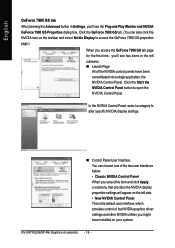
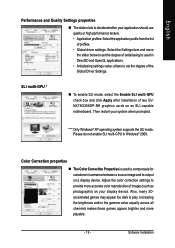
...; Launch Page All of the NVIDIA graphics driver settings and other NVIDIA utilities you might have been consolidated into a single application, the NVIDIA Control Panel. GV-NX79G256DP-RH Graphics Accelerator - 16 - English GeForce 7900 GS tab After pressing the Advanced button in Settings, you'll see two items in the left side. •...
...; Launch Page All of the NVIDIA graphics driver settings and other NVIDIA utilities you might have been consolidated into a single application, the NVIDIA Control Panel. GV-NX79G256DP-RH Graphics Accelerator - 16 - English GeForce 7900 GS tab After pressing the Advanced button in Settings, you'll see two items in the left side. •...

Manual
Page 19
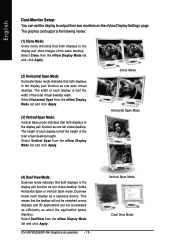
... you to connect separate displays to save settings. „ If TV is enabled. - 17 - Display Matrix Model CRT+TV CRT+DVI DVI+TV DVI+DVI GV-NX79G256DP-RH Yes Yes Yes Yes (Note) Only Single display mode is available when SLI mode is chosen as the example. Select the format for your preferred...
... you to connect separate displays to save settings. „ If TV is enabled. - 17 - Display Matrix Model CRT+TV CRT+DVI DVI+TV DVI+DVI GV-NX79G256DP-RH Yes Yes Yes Yes (Note) Only Single display mode is available when SLI mode is chosen as the example. Select the format for your preferred...
Manual
Page 20
... list and click Apply. Unlike Horizontal Span or Vertical Span mode, Dualview treats each display is half the height of the total virtual desktop height. GV-NX79G256DP-RH Graphics Accelerator - 18 - This means that both displays in the display pair function as one virtual desktop. This graphics card supports the following modes: (1) Clone...
... list and click Apply. Unlike Horizontal Span or Vertical Span mode, Dualview treats each display is half the height of the total virtual desktop height. GV-NX79G256DP-RH Graphics Accelerator - 18 - This means that both displays in the display pair function as one virtual desktop. This graphics card supports the following modes: (1) Clone...
Manual
Page 21
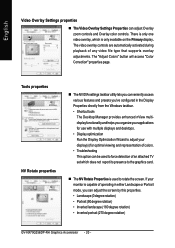
.... Increasing the brightness and/or the gamma value equally across all channels makes these games appear brighter and more accurate color reproduction of two GVNX79G256DP-RH graphics cards on a display device. Software Installation Please do not enable SLI multi-GPU in Direct3D and OpenGL applications. • Antialiasing settings value: allows to...
.... Increasing the brightness and/or the gamma value equally across all channels makes these games appear brighter and more accurate color reproduction of two GVNX79G256DP-RH graphics cards on a display device. Software Installation Please do not enable SLI multi-GPU in Direct3D and OpenGL applications. • Antialiasing settings value: allows to...
Manual
Page 22
... screen by this properties. • Landscape (0 degree rotation) • Portrait (90 degree rotation) • Inverted landscape (180 degree rotation) • Inverted portrait (270 degree rotation) GV-NX79G256DP-RH Graphics Accelerator - 20 -
... screen by this properties. • Landscape (0 degree rotation) • Portrait (90 degree rotation) • Inverted landscape (180 degree rotation) • Inverted portrait (270 degree rotation) GV-NX79G256DP-RH Graphics Accelerator - 20 -