Manual
Page 4
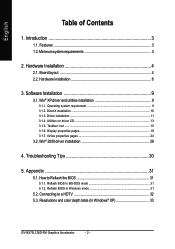
Software Installation 9 3.1. Win® XP driver and utilities installation 9 3.1.1. DirectX installation ...10 3.1.3. Taskbar icon ...15 3.1.6. Troubleshooting Tips 30 5. Reflash BIOS in MS-DOS mode 31 5.1.2. Connecting ... of Contents 1. Introduction 3 1.1. Hardware Installation 4 2.1. nView properties pages 24 3.2. Win® 2000 driver installation 29 4. Resolutions and color depth table (In Windows® XP 33 GV-NX73L128D-RH Graphics Accelerator - 2 -
Software Installation 9 3.1. Win® XP driver and utilities installation 9 3.1.1. DirectX installation ...10 3.1.3. Taskbar icon ...15 3.1.6. Troubleshooting Tips 30 5. Reflash BIOS in MS-DOS mode 31 5.1.2. Connecting ... of Contents 1. Introduction 3 1.1. Hardware Installation 4 2.1. nView properties pages 24 3.2. Win® 2000 driver installation 29 4. Resolutions and color depth table (In Windows® XP 33 GV-NX73L128D-RH Graphics Accelerator - 2 -

Manual
Page 11
... system has installed DirectX 9.0c or later version. • If you can see the AUTORUN window (if it does not show up, run "D:\setup.exe"). Software Installation Windows® XP Driver and Utilities Installation 3.1.1. Software Installation In this manual, we assume that motherboard.
... system has installed DirectX 9.0c or later version. • If you can see the AUTORUN window (if it does not show up, run "D:\setup.exe"). Software Installation Windows® XP Driver and Utilities Installation 3.1.1. Software Installation In this manual, we assume that motherboard.
Manual
Page 12
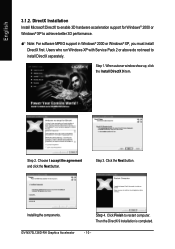
When autorun window show up, click the Install DirectX 9 item. Step 3. Click Finish to achieve better 3D performance. 0 Note: For software MPEG support in Windows® 2000 or Windows® XP, you must install DirectX first. Then the DirectX 9 installation is completed. - 10 -... Install Microsoft DirectX to enable 3D hardware acceleration support for Windows® 2000 or Windows® XP to restart computer. Step 1. GV-NX73L128D-RH Graphics Accelerator Step 4. English 3.1.2. Users who run Windows XP with Service Pack 2 or above do not need to install DirectX separately.
When autorun window show up, click the Install DirectX 9 item. Step 3. Click Finish to achieve better 3D performance. 0 Note: For software MPEG support in Windows® 2000 or Windows® XP, you must install DirectX first. Then the DirectX 9 installation is completed. - 10 -... Install Microsoft DirectX to enable 3D hardware acceleration support for Windows® 2000 or Windows® XP to restart computer. Step 1. GV-NX73L128D-RH Graphics Accelerator Step 4. English 3.1.2. Users who run Windows XP with Service Pack 2 or above do not need to install DirectX separately.
Manual
Page 13
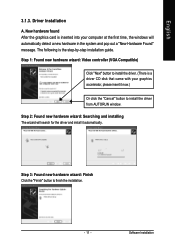
Driver Installation A. Step 3: Found new hardware wizard: Finish Click the "Finish" button to install the driver from AUTORUN window. Software Installation Step 1: Found new hardware wizard: Video controller (VGA Compatible) Click "Next" button to install the driver. (There is a driver CD disk that came with ...
Driver Installation A. Step 3: Found new hardware wizard: Finish Click the "Finish" button to install the driver from AUTORUN window. Software Installation Step 1: Found new hardware wizard: Video controller (VGA Compatible) Click "Next" button to install the driver. (There is a driver CD disk that came with ...
Manual
Page 15
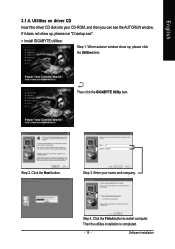
English 3.1.4. Click the Next button. Software Installation Then click the GIGABYTE Utility item. Then the utilities installation is completed. - 13 - Step 2. Utilities on driver CD Insert the driver CD disk into your name and company. Step 4. If it does not show up , please run "D:\setup.exe". • Install GIGABYTE utilities: Step 1. When autorun window show up , please click the Utilities item. Enter your CD-ROM, and then you can see the AUTORUN window. Click the Finish button to restart computer. Step 3.
English 3.1.4. Click the Next button. Software Installation Then click the GIGABYTE Utility item. Then the utilities installation is completed. - 13 - Step 2. Utilities on driver CD Insert the driver CD disk into your name and company. Step 4. If it does not show up , please run "D:\setup.exe". • Install GIGABYTE utilities: Step 1. When autorun window show up , please click the Utilities item. Enter your CD-ROM, and then you can see the AUTORUN window. Click the Finish button to restart computer. Step 3.
Manual
Page 17
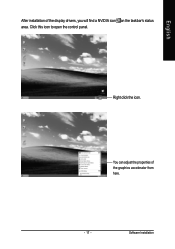
... to open the GBT control panel, showing a menu composed of shortcut of the display drivers, you will find a GBT icon on the taskbar's status area. Software Installation Right click the icon. You can link to GBT website for updated information about the graphics accelerator, latest drivers, and other functions. Right-click...
... to open the GBT control panel, showing a menu composed of shortcut of the display drivers, you will find a GBT icon on the taskbar's status area. Software Installation Right click the icon. You can link to GBT website for updated information about the graphics accelerator, latest drivers, and other functions. Right-click...
Manual
Page 19
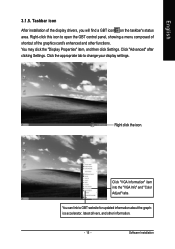
English After installation of the graphics accelerator from here. - 17 - You can adjust the properties of the display drivers, you will find a NVIDIA icon on the taskbar's status area. Software Installation Right click the icon. Click this icon to open the control panel.
English After installation of the graphics accelerator from here. - 17 - You can adjust the properties of the display drivers, you will find a NVIDIA icon on the taskbar's status area. Software Installation Right click the icon. Click this icon to open the control panel.
Manual
Page 21
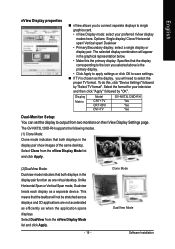
... the nView Display Mode list and click Apply. - 19 - Clone Mode DualView Mode Software Installation English nView Display properties „ nView allows you will need to select the proper TV format. The GV-NX73L128D-RH supports the following modes. (1) Clone Mode: Clone mode indicates that the display corresponding to... span/ Dualview • Primary/Secondary display: select a single display or display pair. Display Matrix Model CRT+TV CRT+DVI DVI+TV GV-NX73L128D-RH Yes Yes Yes Dual-Monitor Setup: You can set the display to output from two monitors on the nView Display Settings page.
... the nView Display Mode list and click Apply. - 19 - Clone Mode DualView Mode Software Installation English nView Display properties „ nView allows you will need to select the proper TV format. The GV-NX73L128D-RH supports the following modes. (1) Clone Mode: Clone mode indicates that the display corresponding to... span/ Dualview • Primary/Secondary display: select a single display or display pair. Display Matrix Model CRT+TV CRT+DVI DVI+TV GV-NX73L128D-RH Yes Yes Yes Dual-Monitor Setup: You can set the display to output from two monitors on the nView Display Settings page.
Manual
Page 23
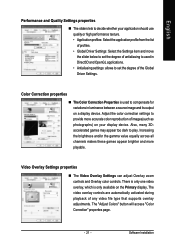
There is only one video overlay, which is used in luminance between a source image and its output on a display device. Software Installation Also, many 3Daccelerated games may appear too dark to set the degree of the Global Driver Settings. The video overlay controls are automatically activated ...
There is only one video overlay, which is used in luminance between a source image and its output on a display device. Software Installation Also, many 3Daccelerated games may appear too dark to set the degree of the Global Driver Settings. The video overlay controls are automatically activated ...
Manual
Page 25
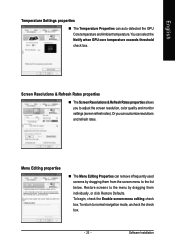
... the screen resolution, color quality and monitor settings (screen refresh rates). Menu Editing properties „ The Menu Editing Properties can customize resolutions and refresh rates. Software Installation To return to the list below. You can auto detected the GPU Core temperature and Ambient temperature. To begin, check the Enable screen menu...
... the screen resolution, color quality and monitor settings (screen refresh rates). Menu Editing properties „ The Menu Editing Properties can customize resolutions and refresh rates. Software Installation To return to the list below. You can auto detected the GPU Core temperature and Ambient temperature. To begin, check the Enable screen menu...
Manual
Page 27
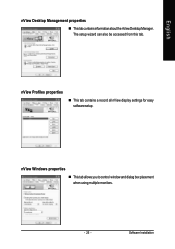
nView Windows properties „ This tab allows you to control window and dialog box placement when using multiple monitors. - 25 - English nView Desktop Management properties „ ThistabcontainsinformationaboutthenViewDesktopManager. The setup wizard can also be accessed from this tab. nView Profiles properties „ This tab contains a record all nView display settings for easy software setup. Software Installation
nView Windows properties „ This tab allows you to control window and dialog box placement when using multiple monitors. - 25 - English nView Desktop Management properties „ ThistabcontainsinformationaboutthenViewDesktopManager. The setup wizard can also be accessed from this tab. nView Profiles properties „ This tab contains a record all nView display settings for easy software setup. Software Installation

Manual
Page 29
nView Hot Keys properties „ This tab lets you can apply to your applications. Software Installation Also enables full screen video playback via the video mirroring control button. English nView Effects properties „ This tab provides special windows effects that you perform various actions with shortcut keys or key combinations. - 27 - nView Zoom properties „ This tab provides dynamic zoom functionality on the desktop.
nView Hot Keys properties „ This tab lets you can apply to your applications. Software Installation Also enables full screen video playback via the video mirroring control button. English nView Effects properties „ This tab provides special windows effects that you perform various actions with shortcut keys or key combinations. - 27 - nView Zoom properties „ This tab provides dynamic zoom functionality on the desktop.
Manual
Page 31
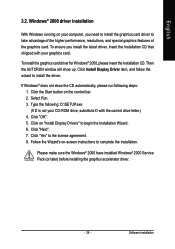
... Display Drivers" to take advantage of the higher performance, resolutions, and special graphics features of the graphics card. Follow the Wizard's on the control bar. 2. Software Installation
... Display Drivers" to take advantage of the higher performance, resolutions, and special graphics features of the graphics card. Follow the Wizard's on the control bar. 2. Software Installation