
Manual
Page 6
... on Driver CD 15 3.1.5. Minimum System Requirement 3 2. Software Installation 11 3.1. Connecting to Reflash the BIOS 33 5.2. Hardware Installation 4 2.1. Windows® XP Driver and Utilities Installation 11 3.1.1. nView Properties Pages 26 3.2. Resolutions and Color Depth Table (In Windows® XP 35 GV-NX72G Series Graphics Accelerator - 2 - Introduction 3 1.1. DirectX Installation ...12 3.1.3. Taskbar Icon ...18 3.1.6. How to a HDTV...
... on Driver CD 15 3.1.5. Minimum System Requirement 3 2. Software Installation 11 3.1. Connecting to Reflash the BIOS 33 5.2. Hardware Installation 4 2.1. Windows® XP Driver and Utilities Installation 11 3.1.1. nView Properties Pages 26 3.2. Resolutions and Color Depth Table (In Windows® XP 35 GV-NX72G Series Graphics Accelerator - 2 - Introduction 3 1.1. DirectX Installation ...12 3.1.3. Taskbar Icon ...18 3.1.6. How to a HDTV...

Manual
Page 7
... (a)+(b) 128 MB 256 MB 512 MB Available Graphics Memory Calculation for full installation • CD-ROM or DVD-ROM drive (Note): SLI technology requires a PCI Express motherboard with 256 MB DDRII memory (For GV-NX72G512P2 only) • Supports DirectX 9.0c • Supports NVIDIA® SLITM... output • Provides D-Sub and DVI-I connectors 1.2. Graphics cards working in an SLI configuration must be of available disk space for the GV-NX72G512P2 System Memory 256 MB 512 MB Onboard Graphics Memory (a) 256 MB 256 MB Allocated System Memory (b) 0 MB 0 MB Total Effective Graphics ...
... (a)+(b) 128 MB 256 MB 512 MB Available Graphics Memory Calculation for full installation • CD-ROM or DVD-ROM drive (Note): SLI technology requires a PCI Express motherboard with 256 MB DDRII memory (For GV-NX72G512P2 only) • Supports DirectX 9.0c • Supports NVIDIA® SLITM... output • Provides D-Sub and DVI-I connectors 1.2. Graphics cards working in an SLI configuration must be of available disk space for the GV-NX72G512P2 System Memory 256 MB 512 MB Onboard Graphics Memory (a) 256 MB 256 MB Allocated System Memory (b) 0 MB 0 MB Total Effective Graphics ...

Manual
Page 8
D-Sub Monitor Connector (15-pin) TV-Out DVI-I to D-Sub Adapter GV-NX72G Series Graphics Accelerator - 4 - GV-NX72G128D/GV-NX72G512P2 D-Sub Monitor Connector (15-pin) TV-out DVI-I Connector OR Analog LCD Monitor Analog Monitor HDTV OR NTSC / PAL TV Projector OR NTSC / PAL TV Projector D-Sub Output Y Pr Pb/AV Output S-Video Output DVI Output Digital LCD Monitor Analog LCD Monitor D-Sub Output DVI-I Connector Board Layout 1. Hardware Installation 2.1. English 2.
D-Sub Monitor Connector (15-pin) TV-Out DVI-I to D-Sub Adapter GV-NX72G Series Graphics Accelerator - 4 - GV-NX72G128D/GV-NX72G512P2 D-Sub Monitor Connector (15-pin) TV-out DVI-I Connector OR Analog LCD Monitor Analog Monitor HDTV OR NTSC / PAL TV Projector OR NTSC / PAL TV Projector D-Sub Output Y Pr Pb/AV Output S-Video Output DVI Output Digital LCD Monitor Analog LCD Monitor D-Sub Output DVI-I Connector Board Layout 1. Hardware Installation 2.1. English 2.

Manual
Page 9
English 2. GV-NX72G512P1 D-Sub Monitor Connector (15-pin) TV-out DVI-I Connector OR Analog LCD Monitor Analog Monitor HDTV OR NTSC / PAL TV Projector OR NTSC / PAL TV Projector D-Sub Output Y Pr Pb/AV Output S-Video Output DVI Output Digital LCD Monitor Analog LCD Monitor D-Sub Output DVI-I to D-Sub Adapter D-Sub Monitor Connector (15-pin) TV-Out DVI-I Connector - 5 - Hardware Installation
English 2. GV-NX72G512P1 D-Sub Monitor Connector (15-pin) TV-out DVI-I Connector OR Analog LCD Monitor Analog Monitor HDTV OR NTSC / PAL TV Projector OR NTSC / PAL TV Projector D-Sub Output Y Pr Pb/AV Output S-Video Output DVI Output Digital LCD Monitor Analog LCD Monitor D-Sub Output DVI-I to D-Sub Adapter D-Sub Monitor Connector (15-pin) TV-Out DVI-I Connector - 5 - Hardware Installation

Manual
Page 10
... BEEN DAMAGED ON THE CARD. Use none official Gigabyte BIOS might cause problem on a grounded anti-static... so the card should be left in its original packing until it is installed. Inspect the card carton for obvious damage. Use a grounded wrist strap ...you do not have one, touch both of your computer. 1. Unpacking and installation should follow some precautions whenever you should be done on the graphics card. ...static mat. In order to your graphics card working correctly, please use official Gigabyte BIOS only. Turn off your computer and unplug power supply. 2. Be sure...
... BEEN DAMAGED ON THE CARD. Use none official Gigabyte BIOS might cause problem on a grounded anti-static... so the card should be left in its original packing until it is installed. Inspect the card carton for obvious damage. Use a grounded wrist strap ...you do not have one, touch both of your computer. 1. Unpacking and installation should follow some precautions whenever you should be done on the graphics card. ...static mat. In order to your graphics card working correctly, please use official Gigabyte BIOS only. Turn off your computer and unplug power supply. 2. Be sure...
Manual
Page 11
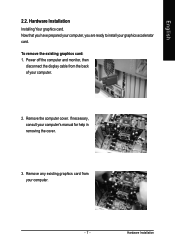
English 2.2. Now that you have prepared your computer, you are ready to install your computer's manual for help in removing the cover. 3. Remove the computer cover. To remove the existing graphics card: 1. If necessary, consult your graphics accelerator card. Remove any existing graphics card from the back of your computer. - 7 - Hardware Installation Hardware Installation Installing Your graphics card. Power off the computer and monitor, then disconnect the display cable from your computer. 2.
English 2.2. Now that you have prepared your computer, you are ready to install your computer's manual for help in removing the cover. 3. Remove the computer cover. To remove the existing graphics card: 1. If necessary, consult your graphics accelerator card. Remove any existing graphics card from the back of your computer. - 7 - Hardware Installation Hardware Installation Installing Your graphics card. Power off the computer and monitor, then disconnect the display cable from your computer. 2.
Manual
Page 12
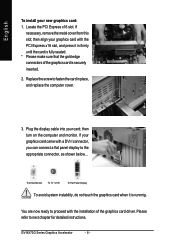
..., you can connect a flat panel display to next chapter for detailed instructions. If your graphics card with the installation of the graphics card is runnnig. English To install your card; Replace the screw to proceed with the PCI Express x16 slot, and press it is securely inserted.... 2. You are now ready to fasten the card in firmly until the card is fully seated. * Please make sure that the gold edge connectors of the graphics card driver. GV...
..., you can connect a flat panel display to next chapter for detailed instructions. If your graphics card with the installation of the graphics card is runnnig. English To install your card; Replace the screw to proceed with the PCI Express x16 slot, and press it is securely inserted.... 2. You are now ready to fasten the card in firmly until the card is fully seated. * Please make sure that the gold edge connectors of the graphics card driver. GV...

Manual
Page 13
...system when prompted. (Note): Only Windows® XP operating system supports SLI mode. Figure 1 Step 1: After installing the graphics card driver, right-click on an SLI motherboard (example: GV-NX72G128D)(Figure 1), users can enable SLI mode simply through the graphics card driver(Note). Please do not enable ...SLI multi-GPU in Windows® 2000. - 9 - Hardware Installation Select SLI multi-GPU from the side menu and...
...system when prompted. (Note): Only Windows® XP operating system supports SLI mode. Figure 1 Step 1: After installing the graphics card driver, right-click on an SLI motherboard (example: GV-NX72G128D)(Figure 1), users can enable SLI mode simply through the graphics card driver(Note). Please do not enable ...SLI multi-GPU in Windows® 2000. - 9 - Hardware Installation Select SLI multi-GPU from the side menu and...

Manual
Page 15
...the system, please make sure your graphics accelerator.) 3.1. Windows® XP Driver and Utilities Installation 3.1.1. Software Installation Then you can follow the subsection 3.1.3 "Driver installation" to install the driver for that your CD-ROM Drive letter to setup your motherboard nearest dealer for ...Please follow the guides to be Drive D: The installation of SIS or VIA chipsets, please install the appropriate driver program for your system has installed DirectX 9.0c or later version. • If you install the graphics card drivers for the motherboard, which ...
...the system, please make sure your graphics accelerator.) 3.1. Windows® XP Driver and Utilities Installation 3.1.1. Software Installation Then you can follow the subsection 3.1.3 "Driver installation" to install the driver for that your CD-ROM Drive letter to setup your motherboard nearest dealer for ...Please follow the guides to be Drive D: The installation of SIS or VIA chipsets, please install the appropriate driver program for your system has installed DirectX 9.0c or later version. • If you install the graphics card drivers for the motherboard, which ...

Manual
Page 16
Step 1. When autorun window show up, click the Install DirectX 9 item. Step 3. Installing the components. GV-NX72G Series Graphics Accelerator Step 4. Click the Next button. Step 2. Click Finish to install DirectX separately. English 3.1.2. Then the DirectX 9 installation is completed. - 12 - Choose I accept the agreement and click the Next button. Users who run Windows XP with Service...
Step 1. When autorun window show up, click the Install DirectX 9 item. Step 3. Installing the components. GV-NX72G Series Graphics Accelerator Step 4. Click the Next button. Step 2. Click Finish to install DirectX separately. English 3.1.2. Then the DirectX 9 installation is completed. - 12 - Choose I accept the agreement and click the Next button. Users who run Windows XP with Service...

Manual
Page 17
...time, the windows will search for the driver and install it now.) Or click the Cancel button to finish the installation. - 13 - Software Installation Step 3: Found new hardware wizard: Finish Click the "Finish" button to install the driver from AUTORUN window. The following is ...inserted into your graphics accelerator, please insert it automatically. Driver Installation A. Step 2: Found new hardware wizard: Searching and installing The wizard will automatically detect a new hardware in the system and pop out a "New Hardware Found" ...
...time, the windows will search for the driver and install it now.) Or click the Cancel button to finish the installation. - 13 - Software Installation Step 3: Found new hardware wizard: Finish Click the "Finish" button to install the driver from AUTORUN window. The following is ...inserted into your graphics accelerator, please insert it automatically. Driver Installation A. Step 2: Found new hardware wizard: Searching and installing The wizard will automatically detect a new hardware in the system and pop out a "New Hardware Found" ...

Manual
Page 18
Windows installings the components. GV-NX72G Series Graphics Accelerator - 14 - Click "Next" button. Click "Finish" button to restart computer. English B. Step 1. When autorun window show up , click Install Display Driver item. Driver installation (Autorun Window) Insert the driver CD disk into your CD-ROM, and then you can see the AUTORUN window. Step 3. Step 2. If it does not show up , please run "D:\setup.exe". Then the driver installation is completed.
Windows installings the components. GV-NX72G Series Graphics Accelerator - 14 - Click "Next" button. Click "Finish" button to restart computer. English B. Step 1. When autorun window show up , click Install Display Driver item. Driver installation (Autorun Window) Insert the driver CD disk into your CD-ROM, and then you can see the AUTORUN window. Step 3. Step 2. If it does not show up , please run "D:\setup.exe". Then the driver installation is completed.

Manual
Page 19
Utilities on Driver CD Insert the driver CD disk into your CD-ROM, and then you can see the AUTORUN window. Step 3. Click the Finish button. English 3.1.4. Step 2. Click the Install button. Click the Next button. - 15 - If it does not show up , please run "D:\setup.exe". • Install GIGABYTE utilities: Step 1. Click the Next button. Step 5. Software Installation When autorun window show up , please click the GIGABYTE Utility item. Step 4.
Utilities on Driver CD Insert the driver CD disk into your CD-ROM, and then you can see the AUTORUN window. Step 3. Click the Finish button. English 3.1.4. Step 2. Click the Install button. Click the Next button. - 15 - If it does not show up , please run "D:\setup.exe". • Install GIGABYTE utilities: Step 1. Click the Next button. Step 5. Software Installation When autorun window show up , please click the GIGABYTE Utility item. Step 4.

Manual
Page 20
Click the Finish button to restart computer. Click the Install button. Step 7. Step 9. Step 8. Then the utilities installation is completed. GV-NX72G Series Graphics Accelerator - 16 - English Step 6.Click the Next button. Click the Next button.
Click the Finish button to restart computer. Click the Install button. Step 7. Step 9. Step 8. Then the utilities installation is completed. GV-NX72G Series Graphics Accelerator - 16 - English Step 6.Click the Next button. Click the Next button.

Manual
Page 21
... graphic engine and video memory (Core Clock and Memory Clock). Opens Help page - 17 - If the utility should hang, restart your system or not. Software Installation The window will display the GPU temperature and show the thermal curve. English V-Tuner 3 V-Tuner 3 lets you restart your system and then enter "Auto-Optimized...
... graphic engine and video memory (Core Clock and Memory Clock). Opens Help page - 17 - If the utility should hang, restart your system or not. Software Installation The window will display the GPU temperature and show the thermal curve. English V-Tuner 3 V-Tuner 3 lets you restart your system and then enter "Auto-Optimized...
Manual
Page 22
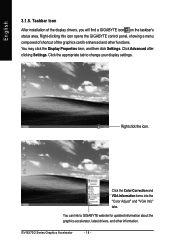
Taskbar Icon After installation of the graphics card's enhanced and other information. Click the appropriate tab to GIGABYTE website for updated information about the graphics accelerator, latest drivers, and other functions. Click the Color Correction and VGA Information items into the "Color Adjust" and "VGA Info" tabs. GV-NX72G Series Graphics Accelerator - 18 - English...
Taskbar Icon After installation of the graphics card's enhanced and other information. Click the appropriate tab to GIGABYTE website for updated information about the graphics accelerator, latest drivers, and other functions. Click the Color Correction and VGA Information items into the "Color Adjust" and "VGA Info" tabs. GV-NX72G Series Graphics Accelerator - 18 - English...

Manual
Page 23
Software Installation English Color Adjust Color Adjust allows you to make color adjustments, such as brightness, contrast and gamma values for each or all of RGB colors. VGA Information VGA Info lists the relevant information about your card. - 19 -
Software Installation English Color Adjust Color Adjust allows you to make color adjustments, such as brightness, contrast and gamma values for each or all of RGB colors. VGA Information VGA Info lists the relevant information about your card. - 19 -
Manual
Page 24
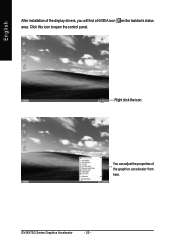
GV-NX72G Series Graphics Accelerator - 20 - Right click the icon. You can adjust the properties of the display drivers, you will find a NVIDIA icon on the taskbar's status area. Click this icon to open the control panel. English After installation of the graphics accelerator from here.
GV-NX72G Series Graphics Accelerator - 20 - Right click the icon. You can adjust the properties of the display drivers, you will find a NVIDIA icon on the taskbar's status area. Click this icon to open the control panel. English After installation of the graphics accelerator from here.

Manual
Page 25
... 7300 SE/7200 GS dialog box. Click the GeForce 7300 SE/7200 GS tab. (You can move the slider to change the color quality. Software Installation English 3.1.6. You can select other properties from the pop-out menu. - 21 -
... 7300 SE/7200 GS dialog box. Click the GeForce 7300 SE/7200 GS tab. (You can move the slider to change the color quality. Software Installation English 3.1.6. You can select other properties from the pop-out menu. - 21 -
Manual
Page 27
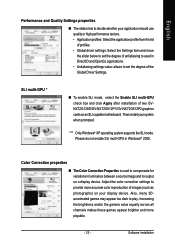
...SLI multi-GPU in Direct3D and OpenGL applications. • Antialiasing settings value: allows to set the degree of two GVNX72G128D/GV-NX72G512P1/GV-NX72G512P2 graphics cards on an SLI-capable motherboard. Also, many 3Daccelerated games may appear too dark to compensate for variations in luminance ...display device. SLI multi-GPU * „ To enable SLI mode, select the Enable SLI multi-GPU check box and click Apply after installation of the Global Driver Settings. Then restart your display device. Adjust the color correction settings to provide more playable. - 23 - "*" Only...
...SLI multi-GPU in Direct3D and OpenGL applications. • Antialiasing settings value: allows to set the degree of two GVNX72G128D/GV-NX72G512P1/GV-NX72G512P2 graphics cards on an SLI-capable motherboard. Also, many 3Daccelerated games may appear too dark to compensate for variations in luminance ...display device. SLI multi-GPU * „ To enable SLI mode, select the Enable SLI multi-GPU check box and click Apply after installation of the Global Driver Settings. Then restart your display device. Adjust the color correction settings to provide more playable. - 23 - "*" Only...