Manual
Page 2
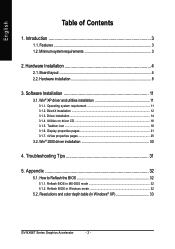
...MS-DOS mode 32 5.1.2. Hardware installation 8 3. DirectX installation ...12 3.1.3. Win® 2000 driver installation 30 4. Reflash BIOS in Windows mode 32 5.2. Hardware Installation 4 2.1. Win® XP driver and utilities installation 11 3.1.1. Appendix 32 5.1. Operating system requirement 11... 1.2. Board layout 4 2.2. Display properties pages 21 3.1.7. Resolutions and color depth table (In Windows® XP 33 GV-NX66T Series Graphics Accelerator - 2 - How to Reflash the BIOS 32 5.1.1. Software Installation 11 3.1. English Table of Contents 1....
...MS-DOS mode 32 5.1.2. Hardware installation 8 3. DirectX installation ...12 3.1.3. Win® 2000 driver installation 30 4. Reflash BIOS in Windows mode 32 5.2. Hardware Installation 4 2.1. Win® XP driver and utilities installation 11 3.1.1. Appendix 32 5.1. Operating system requirement 11... 1.2. Board layout 4 2.2. Display properties pages 21 3.1.7. Resolutions and color depth table (In Windows® XP 33 GV-NX66T Series Graphics Accelerator - 2 - How to Reflash the BIOS 32 5.1.1. Software Installation 11 3.1. English Table of Contents 1....

Manual
Page 11
... the motherboard built on SIS or VIA chipsets, please install the appropriate driver program for that your system. • If you can see the AUTORUN window (if it does not show up, run "D:\setup.exe"). Or please contact your motherboard nearest dealer for your graphics card driver. (Please follow the guides...
... the motherboard built on SIS or VIA chipsets, please install the appropriate driver program for that your system. • If you can see the AUTORUN window (if it does not show up, run "D:\setup.exe"). Or please contact your motherboard nearest dealer for your graphics card driver. (Please follow the guides...
Manual
Page 12
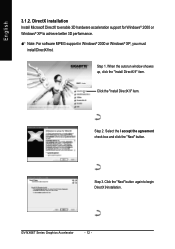
GV-NX66T Series Graphics Accelerator - 12 - Step 3. Click the "Next" button again to achieve better 3D performance. 0 Note: For software MPEG support in Windows® 2000 or Windows® XP, you must install DirectX first. When the autorun window showes up, click the "Install DirectX 9" item. Step 2. Select the I accept the agreement check box and...
GV-NX66T Series Graphics Accelerator - 12 - Step 3. Click the "Next" button again to achieve better 3D performance. 0 Note: For software MPEG support in Windows® 2000 or Windows® XP, you must install DirectX first. When the autorun window showes up, click the "Install DirectX 9" item. Step 2. Select the I accept the agreement check box and...
Manual
Page 14
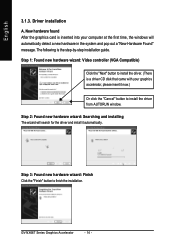
Driver installation A. GV-NX66T Series Graphics Accelerator - 14 - Step 1: Found new hardware wizard: Video controller (VGA Compatible) Click the "Next" button to install the driver. (There is a driver CD disk that came with your computer at the first time, the windows will search for the driver and install it now.) Or click the... inserted into your graphics accelerator, please insert it automatically. Step 3: Found new hardware wizard: Finish Click the "Finish" button to install the driver from AUTORUN window.
Driver installation A. GV-NX66T Series Graphics Accelerator - 14 - Step 1: Found new hardware wizard: Video controller (VGA Compatible) Click the "Next" button to install the driver. (There is a driver CD disk that came with your computer at the first time, the windows will search for the driver and install it now.) Or click the... inserted into your graphics accelerator, please insert it automatically. Step 3: Found new hardware wizard: Finish Click the "Finish" button to install the driver from AUTORUN window.
Manual
Page 15
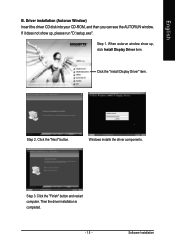
If it does not show up , please run "D:\setup.exe". Click the "Next" button. Software Installation English B. Click the "Install Display Driver" item. Step 2. Then the driver installation is completed. - 15 - Step 1. Step 3. When autorun window show up , click Install Display Driver item. Driver installation (Autorun Window) Insert the driver CD disk into your CD-ROM, and then you can see the AUTORUN window. Click the "Finish" button and restart computer. Windows installs the driver components.
If it does not show up , please run "D:\setup.exe". Click the "Next" button. Software Installation English B. Click the "Install Display Driver" item. Step 2. Then the driver installation is completed. - 15 - Step 1. Step 3. When autorun window show up , click Install Display Driver item. Driver installation (Autorun Window) Insert the driver CD disk into your CD-ROM, and then you can see the AUTORUN window. Click the "Finish" button and restart computer. Windows installs the driver components.

Manual
Page 16
English 3.1.4. Step 3. Step 5. Then the V-Tuner2 installation is completed. Click the "Finish" button and restart computer. If it does not show up, please run "D:\setup.exe". • Install V-Tuner 2: Step 1.Click the "Utilities" item. Click the "Next" button. Step 2.Click the "GIGABYTE Utility" item. Step 4. GV-NX66T Series Graphics Accelerator - 16 - Utilities on driver CD Insert the driver CD disk into your name and company. Enter your CD-ROM, and then you can see the AUTORUN window.
English 3.1.4. Step 3. Step 5. Then the V-Tuner2 installation is completed. Click the "Finish" button and restart computer. If it does not show up, please run "D:\setup.exe". • Install V-Tuner 2: Step 1.Click the "Utilities" item. Click the "Next" button. Step 2.Click the "GIGABYTE Utility" item. Step 4. GV-NX66T Series Graphics Accelerator - 16 - Utilities on driver CD Insert the driver CD disk into your name and company. Enter your CD-ROM, and then you can see the AUTORUN window.

Manual
Page 21
Settings (Resolutions and Color depth for adapter and setting. Click the "Advanced" button for Windows) You may adjust the screen resolution and color quality settings in Settings, you'll see the Default Monitor and NVIDIA GeForce 6600 GT Properties dialog ...
Settings (Resolutions and Color depth for adapter and setting. Click the "Advanced" button for Windows) You may adjust the screen resolution and color quality settings in Settings, you'll see the Default Monitor and NVIDIA GeForce 6600 GT Properties dialog ...

Manual
Page 22
... lets to decide whether your preferred nView display modes here. Select the format for your system when prompted. "*" Only Windows XP operating system supports the SLI mode. Display Model GV-NX66T128D/256D GV-NX66T128VP/VP-E Matrix CRT+TV Yes Yes CRT+DVI Yes Yes DVI+TV Yes Yes "*" This feature will not be available...
... lets to decide whether your preferred nView display modes here. Select the format for your system when prompted. "*" Only Windows XP operating system supports the SLI mode. Display Model GV-NX66T128D/256D GV-NX66T128VP/VP-E Matrix CRT+TV Yes Yes CRT+DVI Yes Yes DVI+TV Yes Yes "*" This feature will not be available...
Manual
Page 23
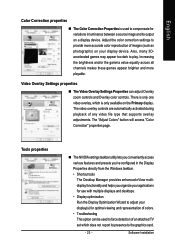
... properties „ The NVIDIA settings taskbar utility lets you conveniently access various features and presets you've configured in the Display Properties directly from the Windows taskbar. • Shortcut tools The Desktop Manager provides enhanced nView multidisplay functionality and helps you organize your applications for optimal viewing and representation of colors...
... properties „ The NVIDIA settings taskbar utility lets you conveniently access various features and presets you've configured in the Display Properties directly from the Windows taskbar. • Shortcut tools The Desktop Manager provides enhanced nView multidisplay functionality and helps you organize your applications for optimal viewing and representation of colors...
Manual
Page 25
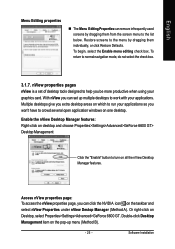
... the nView properties page, you won't have to run your applications. Multiple desktops give you extra desktop areas on which to crowd several open application windows on desktop and choose Properties>Settings>Advanced>GeForce 6600 GT> Desktop Management Click the "Enable" button to the list below. To begin, select the Enable...
... the nView properties page, you won't have to run your applications. Multiple desktops give you extra desktop areas on which to crowd several open application windows on desktop and choose Properties>Settings>Advanced>GeForce 6600 GT> Desktop Management Click the "Enable" button to the list below. To begin, select the Enable...

Manual
Page 27
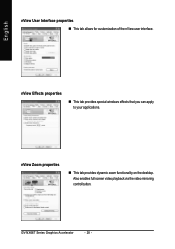
nView Desktops properties „ This tab allows you to control nView settings depending different applications. nView Applications properties „ This tab allows you to create up to control window and dialog box placement when using multiple monitors. English nView Windows properties „ This tab allows you to 32 unique desktops. - 27 - Software Installation
nView Desktops properties „ This tab allows you to control nView settings depending different applications. nView Applications properties „ This tab allows you to create up to control window and dialog box placement when using multiple monitors. English nView Windows properties „ This tab allows you to 32 unique desktops. - 27 - Software Installation
Manual
Page 28
GV-NX66T Series Graphics Accelerator - 28 - nView Effects properties „ This tab provides special windows effects that you can apply to your applications. English nView User Interface properties „ This tab allows for customization of the nView user interface. nView Zoom properties „ This tab provides dynamic zoom functionality on the desktop. Also enables full screen video playback via the video mirroring control button.
GV-NX66T Series Graphics Accelerator - 28 - nView Effects properties „ This tab provides special windows effects that you can apply to your applications. English nView User Interface properties „ This tab allows for customization of the nView user interface. nView Zoom properties „ This tab provides dynamic zoom functionality on the desktop. Also enables full screen video playback via the video mirroring control button.

Manual
Page 30
... CD-ROM drive, substitute D with the correct drive letter.) 4. Please make sure the Windows® 2000 have installed Windows® 2000 Service Pack (or later) before installing the graphics accelerator driver. GV-NX66T Series Graphics Accelerator - 30 - Click "Yes" to begin the Installation Wizard. ...6. If Windows® does not show up. Select Run. 3. Follow the Wizard's on the control bar. 2. To ...
... CD-ROM drive, substitute D with the correct drive letter.) 4. Please make sure the Windows® 2000 have installed Windows® 2000 Service Pack (or later) before installing the graphics accelerator driver. GV-NX66T Series Graphics Accelerator - 30 - Click "Yes" to begin the Installation Wizard. ...6. If Windows® does not show up. Select Run. 3. Follow the Wizard's on the control bar. 2. To ...

Manual
Page 31
...132; Make sure that the monitor and computer are plugged in and receiving power. „ If necessary, disable any built-in the Windows® Help or contact your keyboard after system starts up. After getting into Safe Mode, in Device Manager check whether the driver for ... problems. Contact your dealer or GBT for the graphics card is securely fastened to the monitor's manual.) - 31 - English 4. When the Windows Advanced Options Menu appears, select Safe Mode and press Enter. For more assistance, use the Troubleshooting Guide located in graphics capabilities on your computer...
...132; Make sure that the monitor and computer are plugged in and receiving power. „ If necessary, disable any built-in the Windows® Help or contact your keyboard after system starts up. After getting into Safe Mode, in Device Manager check whether the driver for ... problems. Contact your dealer or GBT for the graphics card is securely fastened to the monitor's manual.) - 31 - English 4. When the Windows Advanced Options Menu appears, select Safe Mode and press Enter. For more assistance, use the Troubleshooting Guide located in graphics capabilities on your computer...

Manual
Page 32
...a. Then @VGA will automatically download the BIOS for your card from GBT @VGA server and do the update for your card from your computer. 5.1.2. c. GV-NX66T Series Graphics Accelerator - 32 - Appendix 5.1. To back up the current BIOS, at the A:\> prompt, type [BIOS flash utility name] -p [BIOS... 2. Download the BIOS ZIP file for you.(@VGA will find a GBT icon in the lower-right corner of the Taskbar. Reflash BIOS in Windows mode 1. This procedure assumes drive A. 2. Complete the update procedure following the on your card is the latest one.) 3. English 5. Right-...
...a. Then @VGA will automatically download the BIOS for your card from GBT @VGA server and do the update for your card from your computer. 5.1.2. c. GV-NX66T Series Graphics Accelerator - 32 - Appendix 5.1. To back up the current BIOS, at the A:\> prompt, type [BIOS flash utility name] -p [BIOS... 2. Download the BIOS ZIP file for you.(@VGA will find a GBT icon in the lower-right corner of the Taskbar. Reflash BIOS in Windows mode 1. This procedure assumes drive A. 2. Complete the update procedure following the on your card is the latest one.) 3. English 5. Right-...

Manual
Page 33
Appendix The actual resolutions supported depend on the monitor you use. - 33 - Resolutions and Color Depth Table (In Windows® XP) GeForce 6600 GT Single Display Stardard Modes Display Screen Resolution 320 x 200 320 x 240 400 x 300 480 x 360 512 x 384 640 x 400 640 x ...
Appendix The actual resolutions supported depend on the monitor you use. - 33 - Resolutions and Color Depth Table (In Windows® XP) GeForce 6600 GT Single Display Stardard Modes Display Screen Resolution 320 x 200 320 x 240 400 x 300 480 x 360 512 x 384 640 x 400 640 x ...
