
Manual
Page 2
... Table of Contents 1. Minimum system requirement 3 2. Driver installation ...12 3.1.4. Reflash BIOS in Windows mode 30 5.2. Troubleshooting Tips 29 5. Features ...3 1.2. Software Installation 9 3.1. Windows® XP Driver and Utilities Installation 9 3.1.1. Operating System Requirement 9 3.1.2. Utilities on driver CD ...14 3.1.5. nView Properties pages 23 3.2. Resolutions and Color Depth Table (In Windows® XP 31 GV-NX66L128DP/GV-NX66L256DP Graphics Accelerator - 2 -
... Table of Contents 1. Minimum system requirement 3 2. Driver installation ...12 3.1.4. Reflash BIOS in Windows mode 30 5.2. Troubleshooting Tips 29 5. Features ...3 1.2. Software Installation 9 3.1. Windows® XP Driver and Utilities Installation 9 3.1.1. Operating System Requirement 9 3.1.2. Utilities on driver CD ...14 3.1.5. nView Properties pages 23 3.2. Resolutions and Color Depth Table (In Windows® XP 31 GV-NX66L128DP/GV-NX66L256DP Graphics Accelerator - 2 -

Manual
Page 3
Graphics cards working in an SLI configuration must be of available disk space for full installation • CD-ROM or DVD-ROM drive (Note) SLI technology requires a PCI Express motherboard with two x16 physical connectors. Features • Powered by NVIDIA®... requires driver version 77.74 or later. - 3 - Minimum system requirement • IBM® or 100% PC compatible with 256MB DDR memory (Only for GV-NX66L128DP) • Integrated with Pentium® III 650MHz or AMD Athlon 650MHz class processor or higher • One PCI Express x 16 slot • Operating Systems Windows&#...
Graphics cards working in an SLI configuration must be of available disk space for full installation • CD-ROM or DVD-ROM drive (Note) SLI technology requires a PCI Express motherboard with two x16 physical connectors. Features • Powered by NVIDIA®... requires driver version 77.74 or later. - 3 - Minimum system requirement • IBM® or 100% PC compatible with 256MB DDR memory (Only for GV-NX66L128DP) • Integrated with Pentium® III 650MHz or AMD Athlon 650MHz class processor or higher • One PCI Express x 16 slot • Operating Systems Windows&#...

Manual
Page 5
... Adapter Analog LCD Monitor VGA Output TV-out DVI-I to ensure your graphics card working correctly, please use official Gigabyte BIOS only. Turn off your computer and unplug power supply. 2. Unpacking and installation should be easily damaged by static electricity, so the card should follow some precautions whenever you should be done...
... Adapter Analog LCD Monitor VGA Output TV-out DVI-I to ensure your graphics card working correctly, please use official Gigabyte BIOS only. Turn off your computer and unplug power supply. 2. Unpacking and installation should be easily damaged by static electricity, so the card should follow some precautions whenever you should be done...

Manual
Page 6
... graphics card. For more information, please see you may need to install your computer, you are ready to disable it on -board graphics capability, you computer documentation. GV-NX66L128DP/GV-NX66L256DP Graphics Accelerator - 6 - Now that you have prepared your graphics accelerator card. To remove the existing graphics card: 1. Remove the computer cover. Or, if...
... graphics card. For more information, please see you may need to install your computer, you are ready to disable it on -board graphics capability, you computer documentation. GV-NX66L128DP/GV-NX66L256DP Graphics Accelerator - 6 - Now that you have prepared your graphics accelerator card. To remove the existing graphics card: 1. Remove the computer cover. Or, if...

Manual
Page 7
Plug the display cable into your new graphics card: 1. Hardware Installation Locate the PCI Express x 16 slot. If your graphics card with a DVI-I connector, you can connect a flat panel display to fasten the card in firmly ... PCI Express x 16 slot, and press it in place, and replace the computer cover. 3. English To install your card; Replace the screw to the appropriate connector, as shown below... Please refer to proceed with the installation of the graphics card driver. If necessary, remove the metal cover from this slot; then turn...
Plug the display cable into your new graphics card: 1. Hardware Installation Locate the PCI Express x 16 slot. If your graphics card with a DVI-I connector, you can connect a flat panel display to fasten the card in firmly ... PCI Express x 16 slot, and press it in place, and replace the computer cover. 3. English To install your card; Replace the screw to the appropriate connector, as shown below... Please refer to proceed with the installation of the graphics card driver. If necessary, remove the metal cover from this slot; then turn...

Manual
Page 8
... How to enable NVIDIA® SLITM (Scalable Link Interface) technology: After installing two SLI-ready graphics cards of the same model on Desktop and select Properties. In Settings, click the Advanced button. GV-NX66L128DP/GV-NX66L256DP Graphics Accelerator - 8 - When Display Properties dialog box appears, select... dialog box appears. Figure 1 Step 1: After installing the graphics card driver, right-click on an SLI motherboard (Figure 1), users can enable SLI mode simply through the graphics card driver (For the GV-NX66L128DP/GV-NX66L256DP, driver version must be at least 77.74...
... How to enable NVIDIA® SLITM (Scalable Link Interface) technology: After installing two SLI-ready graphics cards of the same model on Desktop and select Properties. In Settings, click the Advanced button. GV-NX66L128DP/GV-NX66L256DP Graphics Accelerator - 8 - When Display Properties dialog box appears, select... dialog box appears. Figure 1 Step 1: After installing the graphics card driver, right-click on an SLI motherboard (Figure 1), users can enable SLI mode simply through the graphics card driver (For the GV-NX66L128DP/GV-NX66L256DP, driver version must be at least 77.74...

Manual
Page 9
...graphics card driver. (Please follow the subsection 3.1.3 "Driver installation" to be Drive D: The installation of SIS or VIA chipsets, please install the appropriate driver program for motherboard driver. - 9 - Or please contact your graphics accelerator.) 3.1. Software Installation Operating System Requirement • When loading the graphics card ...drivers for the system, please make sure your CD-ROM Drive letter to install the driver for your motherboard nearest dealer for that motherboard. When you insert the driver CD into your CD-ROM...
...graphics card driver. (Please follow the subsection 3.1.3 "Driver installation" to be Drive D: The installation of SIS or VIA chipsets, please install the appropriate driver program for motherboard driver. - 9 - Or please contact your graphics accelerator.) 3.1. Software Installation Operating System Requirement • When loading the graphics card ...drivers for the system, please make sure your CD-ROM Drive letter to install the driver for your motherboard nearest dealer for that motherboard. When you insert the driver CD into your CD-ROM...
Manual
Page 10
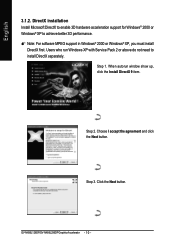
... support in Windows® 2000 or Windows® XP, you must install DirectX first. Step 2. DirectX installation Install Microsoft DirectX to enable 3D hardware acceleration support for Windows® 2000 or Windows® XP to install DirectX separately. Choose I accept the agreement and click the Next button. Step 1. Step 3. English 3.1.2. GV-NX66L128DP/GV-NX66L256DP Graphics Accelerator - 10 -
... support in Windows® 2000 or Windows® XP, you must install DirectX first. Step 2. DirectX installation Install Microsoft DirectX to enable 3D hardware acceleration support for Windows® 2000 or Windows® XP to install DirectX separately. Choose I accept the agreement and click the Next button. Step 1. Step 3. English 3.1.2. GV-NX66L128DP/GV-NX66L256DP Graphics Accelerator - 10 -

Manual
Page 11
English Installing the components. Then the DirectX 9 installation is completed. - 11 - Software Installation Click Finish to restart computer. Step 4.
English Installing the components. Then the DirectX 9 installation is completed. - 11 - Software Installation Click Finish to restart computer. Step 4.

Manual
Page 12
...GV-NX66L128DP/GV-NX66L256DP Graphics Accelerator - 12 - Step 3: Found new hardware wizard: Finish Click the Finish button to install the driver from AUTORUN window. Step 1: Found new hardware wizard: Video controller (VGA Compatible) Click the Next button to install the driver. (There is the step-by-step installation...first time, the windows will search for the driver and install it now.) Or click the Cancel button to finish the installation. Driver installation A. Step 2: Found new hardware wizard: Searching and installing The wizard will automatically detect a new hardware in the...
...GV-NX66L128DP/GV-NX66L256DP Graphics Accelerator - 12 - Step 3: Found new hardware wizard: Finish Click the Finish button to install the driver from AUTORUN window. Step 1: Found new hardware wizard: Video controller (VGA Compatible) Click the Next button to install the driver. (There is the step-by-step installation...first time, the windows will search for the driver and install it now.) Or click the Cancel button to finish the installation. Driver installation A. Step 2: Found new hardware wizard: Searching and installing The wizard will automatically detect a new hardware in the...
Manual
Page 13
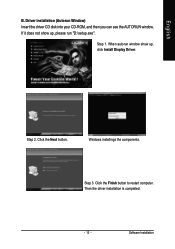
Then the driver installation is completed. - 13 - English B. Driver installation (Autorun Window) Insert the driver CD disk into your CD-ROM, and then you can see the AUTORUN window. When autorun window show up , click Install Display Driver. Step 3. If it does not show up , please run "D:\setup.exe". Click the Next button. Software Installation Step 1. Windows installings the components. Step 2. Click the Finish button to restart computer.
Then the driver installation is completed. - 13 - English B. Driver installation (Autorun Window) Insert the driver CD disk into your CD-ROM, and then you can see the AUTORUN window. When autorun window show up , click Install Display Driver. Step 3. If it does not show up , please run "D:\setup.exe". Click the Next button. Software Installation Step 1. Windows installings the components. Step 2. Click the Finish button to restart computer.

Manual
Page 14
Enter your CD-ROM, and then you can see the AUTORUN window. Then the utilities installation is completed. Click the Next button. Step 4. English 3.1.4. Then click the GIGABYTE Utility item. Step 3. Click the Finish button to restart computer. Utilities on driver CD Insert the driver CD disk into your name and company. When autorun window show up , click the Utilities item. Step 2. If it does not show up , please run "D:\setup.exe". • Install GIGABYTE Utility (V-Tuner 2): Step 1. GV-NX66L128DP/GV-NX66L256DP Graphics Accelerator - 14 -
Enter your CD-ROM, and then you can see the AUTORUN window. Then the utilities installation is completed. Click the Next button. Step 4. English 3.1.4. Then click the GIGABYTE Utility item. Step 3. Click the Finish button to restart computer. Utilities on driver CD Insert the driver CD disk into your name and company. When autorun window show up , click the Utilities item. Step 2. If it does not show up , please run "D:\setup.exe". • Install GIGABYTE Utility (V-Tuner 2): Step 1. GV-NX66L128DP/GV-NX66L256DP Graphics Accelerator - 14 -

Manual
Page 15
Software Installation Displays core clock status Displays memory clock status Adjust core speed The tunning CLK will only be applied when running 3D mode. Opens Help page Adjust memory speed Select choice of the graphic engine and video memory (Core Clock and Memory Clock). English V-Tuner 2 V-Tuner 2 lets you monitor the working frequency of skin - 15 -
Software Installation Displays core clock status Displays memory clock status Adjust core speed The tunning CLK will only be applied when running 3D mode. Opens Help page Adjust memory speed Select choice of the graphic engine and video memory (Core Clock and Memory Clock). English V-Tuner 2 V-Tuner 2 lets you monitor the working frequency of skin - 15 -

Manual
Page 16
... click the Display Properties item, and then click Settings. GV-NX66L128DP/GV-NX66L256DP Graphics Accelerator - 16 - You can link to change your display settings. Right click the icon. Taskbar icon After installation of the graphics card's enhanced and other information. Click the appropriate tab to GIGABYTE website for updated information about the graphics accelerator, latest...
... click the Display Properties item, and then click Settings. GV-NX66L128DP/GV-NX66L256DP Graphics Accelerator - 16 - You can link to change your display settings. Right click the icon. Taskbar icon After installation of the graphics card's enhanced and other information. Click the appropriate tab to GIGABYTE website for updated information about the graphics accelerator, latest...

Manual
Page 17
Color Adjust Color Adjust allows you to make color adjustments, such as brightness, contrast and gamma values for each or all of RGB colors. - 17 - English VGA Information VGA Info lists the relevant information about your card. Software Installation
Color Adjust Color Adjust allows you to make color adjustments, such as brightness, contrast and gamma values for each or all of RGB colors. - 17 - English VGA Information VGA Info lists the relevant information about your card. Software Installation

Manual
Page 18
You can adjust the properties of the display drivers, you will find a NVIDIA icon on the taskbar's status area. Click this icon to open the control panel. GV-NX66L128DP/GV-NX66L256DP Graphics Accelerator - 18 - Right click the icon. English After installation of the graphics accelerator from here.
You can adjust the properties of the display drivers, you will find a NVIDIA icon on the taskbar's status area. Click this icon to open the control panel. GV-NX66L128DP/GV-NX66L256DP Graphics Accelerator - 18 - Right click the icon. English After installation of the graphics accelerator from here.

Manual
Page 19
... settings in Settings, you'll see Plug and Play Monitor and NVIDIA GeForce 6600 LE Properties dialog box. Software Installation English 3.1.6. Display Properties pages To access Display Properties pages, right-click the GIGABYTE icon on the taskbar and select Display Properties or right-click on the taskbar and select Nvidia Display to...
... settings in Settings, you'll see Plug and Play Monitor and NVIDIA GeForce 6600 LE Properties dialog box. Software Installation English 3.1.6. Display Properties pages To access Display Properties pages, right-click the GIGABYTE icon on the taskbar and select Display Properties or right-click on the taskbar and select Nvidia Display to...

Manual
Page 20
...Driver Settings. SLI multi-GPU properties * „ To enable SLI mode, select the Enable SLI multi-GPU check box and click Apply after installation of profiles. • Global Driver Settings: Select the Settings item and move the slider below . • Make this , click "Device ...: Single display/ Clone/ Horizontal span/ Vertical span/ Dualview • Primary/Secondary display: select a single display or display pair. GV-NX66L128DP/GV-NX66L256DP Graphics Accelerator - 20 - Select the format for your preferred nView display modes here. Display Matrix Model CRT+TV CRT+DVI...
...Driver Settings. SLI multi-GPU properties * „ To enable SLI mode, select the Enable SLI multi-GPU check box and click Apply after installation of profiles. • Global Driver Settings: Select the Settings item and move the slider below . • Make this , click "Device ...: Single display/ Clone/ Horizontal span/ Vertical span/ Dualview • Primary/Secondary display: select a single display or display pair. GV-NX66L128DP/GV-NX66L256DP Graphics Accelerator - 20 - Select the format for your preferred nView display modes here. Display Matrix Model CRT+TV CRT+DVI...

Manual
Page 21
...; The Video Overlay Settings Properties can adjust the display to provide more playable. There is only one video overlay, which is being played. - 21 - Software Installation English Color Correction properties „ The Color Correction Properties is used to play. The video overlay controls are automatically activated during playback of images(such...
...; The Video Overlay Settings Properties can adjust the display to provide more playable. There is only one video overlay, which is being played. - 21 - Software Installation English Color Correction properties „ The Color Correction Properties is used to play. The video overlay controls are automatically activated during playback of images(such...

Manual
Page 23
... desktop. To return to crowd several open application windows on which to run your applications so you be more productive when using your applications. Software Installation To begin, check the Enable screen menu editing check box. nView Properties pages nView is a set up multiple desktops to turn on desktop and choose...
... desktop. To return to crowd several open application windows on which to run your applications so you be more productive when using your applications. Software Installation To begin, check the Enable screen menu editing check box. nView Properties pages nView is a set up multiple desktops to turn on desktop and choose...