

Manual
Page 2
...; XP Driver and Utilities Installation 9 3.1.1. How to Reflash the BIOS 31 5.1.1. Software Installation 9 3.1. Taskbar Icon ...16 3.1.6. Windows® 2000 Driver Installation 29 4. Minimum System Requirement 3 2. Utilities on Driver CD ...14 3.1.5. Resolutions and Color Depth Table (In Windows® XP 32 GV-N66128DP/GV-N66256DP Graphics Accelerator - 2 - Hardware Installation 7 3. DirectX Installation ...10 3.1.3. Reflash BIOS in...
...; XP Driver and Utilities Installation 9 3.1.1. How to Reflash the BIOS 31 5.1.1. Software Installation 9 3.1. Taskbar Icon ...16 3.1.6. Windows® 2000 Driver Installation 29 4. Minimum System Requirement 3 2. Utilities on Driver CD ...14 3.1.5. Resolutions and Color Depth Table (In Windows® XP 32 GV-N66128DP/GV-N66256DP Graphics Accelerator - 2 - Hardware Installation 7 3. DirectX Installation ...10 3.1.3. Reflash BIOS in...

Manual
Page 9
... to install the driver for your graphics card driver. (Please follow the guides to setup your graphics accelerator.) 3.1. Windows® XP Driver and Utilities Installation 3.1.1. Software Installation English 3. Software Installation In this manual, we assume that motherboard.
... to install the driver for your graphics card driver. (Please follow the guides to setup your graphics accelerator.) 3.1. Windows® XP Driver and Utilities Installation 3.1.1. Software Installation English 3. Software Installation In this manual, we assume that motherboard.

Manual
Page 10
Step 1. Choose I accept the agreement and Click "Next" button. Click "Next" button. Click "Install DirectX 9" item. GV-N66128DP/GV-N66256DP Graphics Accelerator - 10 - When autorun window show up, click Install DirectX 9 item. DirectX Installation Install Microsoft DirectX to enable 3D hardware acceleration support for Windows® 2000 or Windows® XP to achieve better 3D performence. 0 Note: For software MPEG support in Windows® 2000 or Windows® XP, you must install DirectX first. Step 2. English 3.1.2. Step 3.
Step 1. Choose I accept the agreement and Click "Next" button. Click "Next" button. Click "Install DirectX 9" item. GV-N66128DP/GV-N66256DP Graphics Accelerator - 10 - When autorun window show up, click Install DirectX 9 item. DirectX Installation Install Microsoft DirectX to enable 3D hardware acceleration support for Windows® 2000 or Windows® XP to achieve better 3D performence. 0 Note: For software MPEG support in Windows® 2000 or Windows® XP, you must install DirectX first. Step 2. English 3.1.2. Step 3.
Manual
Page 11
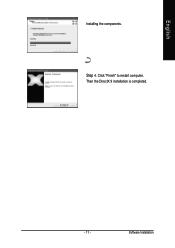
Software Installation Click "Finish" to restart computer. English Installing the components. Step 4. Then the DirectX 9 installation is completed. - 11 -
Software Installation Click "Finish" to restart computer. English Installing the components. Step 4. Then the DirectX 9 installation is completed. - 11 -
Manual
Page 13
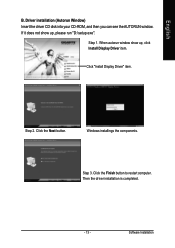
Step 1. Click the Next button. Driver installation (Autorun Window) Insert the driver CD disk into your CD-ROM, and then you can see the AUTORUN window. Step 2. Click the Finish button to restart computer. Software Installation Windows installings the components. If it does not show up , please run "D:\setup.exe". Then the driver installation is completed. - 13 - Step 3. When autorun window show up , click Install Display Driver item. Click "Install Display Driver" item. English B.
Step 1. Click the Next button. Driver installation (Autorun Window) Insert the driver CD disk into your CD-ROM, and then you can see the AUTORUN window. Step 2. Click the Finish button to restart computer. Software Installation Windows installings the components. If it does not show up , please run "D:\setup.exe". Then the driver installation is completed. - 13 - Step 3. When autorun window show up , click Install Display Driver item. Click "Install Display Driver" item. English B.

Manual
Page 15
Software Installation Displays core clock status Displays memory clock status Opens Help page Select choice of the graphic engine and video memory (Core Clock and Memory Clock). English V-Tuner 2 V-Tuner 2 lets you monitor the working frequency of skin - 15 -
Software Installation Displays core clock status Displays memory clock status Opens Help page Select choice of the graphic engine and video memory (Core Clock and Memory Clock). English V-Tuner 2 V-Tuner 2 lets you monitor the working frequency of skin - 15 -
Manual
Page 17
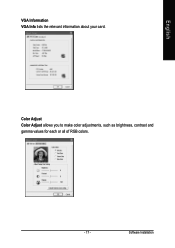
English VGA Information VGA Info lists the relevant information about your card. Software Installation Color Adjust Color Adjust allows you to make color adjustments, such as brightness, contrast and gamma values for each or all of RGB colors. - 17 -
English VGA Information VGA Info lists the relevant information about your card. Software Installation Color Adjust Color Adjust allows you to make color adjustments, such as brightness, contrast and gamma values for each or all of RGB colors. - 17 -

Manual
Page 19
You can move the slider to change the color quality. Software Installation The Display Properties dialog box shows the information of display adapter, color, the range of display area, and the refresh rate. You can also ... and Play Monitor on the taskbar and select Nvidia Display to change the resolution. Display Properties pages To access Display Properties pages, right-click the GIGABYTE icon on the taskbar and select Display Properties or right-click on Desktop and then select Properties.
You can move the slider to change the color quality. Software Installation The Display Properties dialog box shows the information of display adapter, color, the range of display area, and the refresh rate. You can also ... and Play Monitor on the taskbar and select Nvidia Display to change the resolution. Display Properties pages To access Display Properties pages, right-click the GIGABYTE icon on the taskbar and select Display Properties or right-click on Desktop and then select Properties.

Manual
Page 21
... video overlay, which is used to full screen mode when video is being played. - 21 - The "Adjust Colors" button will access "Color Correction" properties page. Software Installation Increasing the brightness and/or the gamma value equally across all channels makes these games appear brighter and more accurate color reproduction of any...
... video overlay, which is used to full screen mode when video is being played. - 21 - The "Adjust Colors" button will access "Color Correction" properties page. Software Installation Increasing the brightness and/or the gamma value equally across all channels makes these games appear brighter and more accurate color reproduction of any...

Manual
Page 23
... using your applications so you won't have to run your graphics card. Restore screens to the menu by dragging them individually, or click Restore Defaults. Software Installation
... using your applications so you won't have to run your graphics card. Restore screens to the menu by dragging them individually, or click Restore Defaults. Software Installation
Manual
Page 25
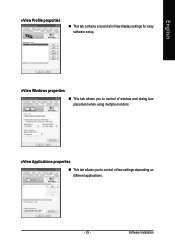
nView Windows properties „ This tab allows you to control of window and dialog box placement when using multiple monitors. nView Applications properties „ This tab allows you to control nView settings depending on different applications. - 25 - English nView Profile properties „ This tab contains a record all nView display settings for easy software setup. Software Installation
nView Windows properties „ This tab allows you to control of window and dialog box placement when using multiple monitors. nView Applications properties „ This tab allows you to control nView settings depending on different applications. - 25 - English nView Profile properties „ This tab contains a record all nView display settings for easy software setup. Software Installation
Manual
Page 27
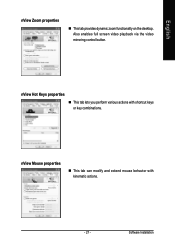
Also enables full screen video playback via the video mirroring control button. Software Installation nView Hot Keys properties „ This tab lets you perform various actions with kinematic actions. - 27 - English nView Zoom properties „ This tab provides dynamic zoom functionality on the desktop. nView Mouse properties „ This tab can modify and extend mouse behavior with shortcut keys or key combinations.
Also enables full screen video playback via the video mirroring control button. Software Installation nView Hot Keys properties „ This tab lets you perform various actions with kinematic actions. - 27 - English nView Zoom properties „ This tab provides dynamic zoom functionality on the desktop. nView Mouse properties „ This tab can modify and extend mouse behavior with shortcut keys or key combinations.

Manual
Page 29
... shipped with the correct drive letter.) 4. Select Run. 3. If Windows® does not show up. Click the Start button on your graphics card. Click OK. 5. Software Installation Click Yes to install the driver. English 3.2. To install the graphics card driver for Windows® 2000, please insert the Installation CD. Type the...
... shipped with the correct drive letter.) 4. Select Run. 3. If Windows® does not show up. Click the Start button on your graphics card. Click OK. 5. Software Installation Click Yes to install the driver. English 3.2. To install the graphics card driver for Windows® 2000, please insert the Installation CD. Type the...