
Manual
Page 3
Table of Contents 1. Introduction ...4 1.1. Features ...4 1.2. Minimum System Requirements 4 2. Troubleshooting Tips 21 5. How to Reflash the BIOS in MS-DOS Mode 22 5.2. Accessing NVIDIA Control Panel 13 4. Resolutions and Color Depth Table (In Windows XP 23 5.3. Hardware Installation ...8 3. Hardware Installation 5 2.1. Board Layout ...5 2.2. Driver and Utility Installation 10 3.1.1. Appendix ...22 5.1. Driver Installation ...10 3.2. Regulatory Statements 25 - 3 - Display Properties Pages 12 3.3. Software Installation 10 3.1.
Table of Contents 1. Introduction ...4 1.1. Features ...4 1.2. Minimum System Requirements 4 2. Troubleshooting Tips 21 5. How to Reflash the BIOS in MS-DOS Mode 22 5.2. Accessing NVIDIA Control Panel 13 4. Resolutions and Color Depth Table (In Windows XP 23 5.3. Hardware Installation ...8 3. Hardware Installation 5 2.1. Board Layout ...5 2.2. Driver and Utility Installation 10 3.1.1. Appendix ...22 5.1. Driver Installation ...10 3.2. Regulatory Statements 25 - 3 - Display Properties Pages 12 3.3. Software Installation 10 3.1.
Manual
Page 4
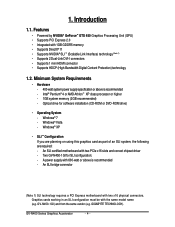
... recommended - Minimum System Requirements • Hardware - 400-watt system power supply specification or above is recommended - Windows® Vista - GIGABYTE TECHNOLOGY). An SLI bridge connector (Note 1) SLI technology requires a PCI Express motherboard with 1GB GDDR5 memory • Supports DirectX® ... If you are planning on using this graphics card as part of an SLI system, the following are required: - Two GV-N450-1GI for software installation (CD-ROM or DVD-ROM drive) • Operating System - An SLI certified motherboard with the same model name (e.g. Optical...
... recommended - Minimum System Requirements • Hardware - 400-watt system power supply specification or above is recommended - Windows® Vista - GIGABYTE TECHNOLOGY). An SLI bridge connector (Note 1) SLI technology requires a PCI Express motherboard with 1GB GDDR5 memory • Supports DirectX® ... If you are planning on using this graphics card as part of an SLI system, the following are required: - Two GV-N450-1GI for software installation (CD-ROM or DVD-ROM drive) • Operating System - An SLI certified motherboard with the same model name (e.g. Optical...

Manual
Page 6
... in its original packing until it is installed. Be sure there are separated from static electricity, you work correctly, please use official GIGABYTE BIOS only. GV-N400 Series Graphics Accelerator - 6 - Turn off your computer. 1. Using non-official GIGABYTE BIOS might cause problem(s) on your computer...them against damage from the system. Place components on a grounded antistatic pad or on a grounded anti-static mat. Unpacking and installation should follow some precautions whenever you should be done on the bag that your card. The operator should be wearing an anti-...
... in its original packing until it is installed. Be sure there are separated from static electricity, you work correctly, please use official GIGABYTE BIOS only. GV-N400 Series Graphics Accelerator - 6 - Turn off your computer. 1. Using non-official GIGABYTE BIOS might cause problem(s) on your computer...them against damage from the system. Place components on a grounded antistatic pad or on a grounded anti-static mat. Unpacking and installation should follow some precautions whenever you should be done on the bag that your card. The operator should be wearing an anti-...
Manual
Page 7
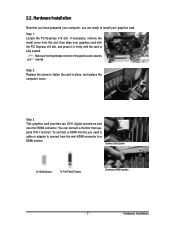
... then align your graphics card with the PCI Express x16 slot, and press it in place, and replace the computer cover. Step 3. Hardware Installation Now that you have prepared your graphics card. If necessary, remove the metal cover from the mini-HDMI connector to a HDMI monitor. Make ... Connect a flat panel To HDMI Monitor To Flat Panel Display Connect a HDMI monitor - 7 - To connect a HDMI monitor,you are ready to install your computer, you need a cable or adapter to fasten the card in firmly until the card is securely inserted. 2.2. Replace the screw to connect ...
... then align your graphics card with the PCI Express x16 slot, and press it in place, and replace the computer cover. Step 3. Hardware Installation Now that you have prepared your graphics card. If necessary, remove the metal cover from the mini-HDMI connector to a HDMI monitor. Make ... Connect a flat panel To HDMI Monitor To Flat Panel Display Connect a HDMI monitor - 7 - To connect a HDMI monitor,you are ready to install your computer, you need a cable or adapter to fasten the card in firmly until the card is securely inserted. 2.2. Replace the screw to connect ...
Manual
Page 9
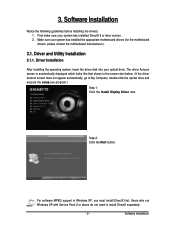
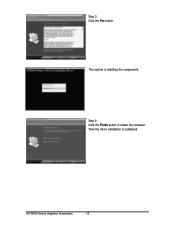
... Pack 2 or above do not need to My Computer, double-click the optical drive and execute the setup.exe program.) Step 1: Click the Install Display Driver item. Software Installation Driver and Utility Installation 3.1.1. For software MPEG support in the screen shot below. (If the driver Autorun screen does not appear automatically, go to...
... Pack 2 or above do not need to My Computer, double-click the optical drive and execute the setup.exe program.) Step 1: Click the Install Display Driver item. Software Installation Driver and Utility Installation 3.1.1. For software MPEG support in the screen shot below. (If the driver Autorun screen does not appear automatically, go to...
Manual
Page 10
Then the driver installation is installing the components. Step 3: Click the Yes button. GV-N400 Series Graphics Accelerator - 10 - The system is completed. Step 4: Click the Finish button to restart the computer.
Then the driver installation is installing the components. Step 3: Click the Yes button. GV-N400 Series Graphics Accelerator - 10 - The system is completed. Step 4: Click the Finish button to restart the computer.
Manual
Page 11
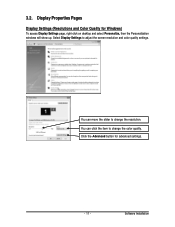
You can move the slider to change the color quality. Software Installation You can click the item to adjust the screen resolution and color quality settings. 3.2. Click the Advanced button for Windows) To access Display Settings page, right-click on desktop and select Personalize, then the Personalization windows will show up. Select Display Settings to change the resolution. Display Properties Pages Display Settings (Resolutions and Color Quality for advanced settings. - 11 -
You can move the slider to change the color quality. Software Installation You can click the item to adjust the screen resolution and color quality settings. 3.2. Click the Advanced button for Windows) To access Display Settings page, right-click on desktop and select Personalize, then the Personalization windows will show up. Select Display Settings to change the resolution. Display Properties Pages Display Settings (Resolutions and Color Quality for advanced settings. - 11 -
Manual
Page 12
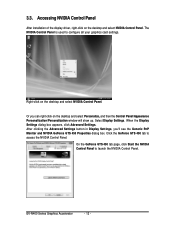
...450 tab page, click Start the NVIDIA Control Panel to configure all your graphics card settings. Accessing NVIDIA Control Panel After installation of the display driver, right-click on the desktop and select Personalize, and then the Control Panel\Appearance Personalization\Personalization window will... show up. GV-N400 Series Graphics Accelerator - 12 - After clicking the Advanced Settings button in Display Settings, you can right-click on the ...
...450 tab page, click Start the NVIDIA Control Panel to configure all your graphics card settings. Accessing NVIDIA Control Panel After installation of the display driver, right-click on the desktop and select Personalize, and then the Control Panel\Appearance Personalization\Personalization window will... show up. GV-N400 Series Graphics Accelerator - 12 - After clicking the Advanced Settings button in Display Settings, you can right-click on the ...
Manual
Page 13
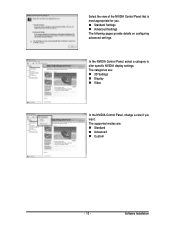
The supported modes are : „ 3D Settings „ Display „ Video In the NVIDIA Control Panel, change a view if you . „ Standard Settings „ Advanced Settings The following pages provide details on configuring advanced settings. Select the view of the NVIDIA Control Panel that is most appropriate for you want. Software Installation The categories are : „ Standard „ Advanced „ Custom - 13 - In the NVIDIA Control Panel, select a category to alter specific NVIDIA display settings.
The supported modes are : „ 3D Settings „ Display „ Video In the NVIDIA Control Panel, change a view if you . „ Standard Settings „ Advanced Settings The following pages provide details on configuring advanced settings. Select the view of the NVIDIA Control Panel that is most appropriate for you want. Software Installation The categories are : „ Standard „ Advanced „ Custom - 13 - In the NVIDIA Control Panel, select a category to alter specific NVIDIA display settings.
Manual
Page 15
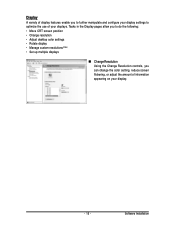
... displays. Tasks in the Display pages allow you can change the color setting, reduce screen flickering, or adjust the amount of your display. - 15 - Software Installation
... displays. Tasks in the Display pages allow you can change the color setting, reduce screen flickering, or adjust the amount of your display. - 15 - Software Installation
Manual
Page 17
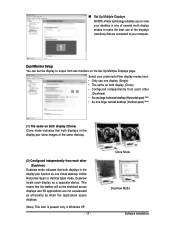
Clone Mode Dualview Mode Software Installation Select your preferred nView display modes here. • Only use of the displays (monitors) that both displays in the display pair function as when the ...
Clone Mode Dualview Mode Software Installation Select your preferred nView display modes here. • Only use of the displays (monitors) that both displays in the display pair function as when the ...
Manual
Page 19
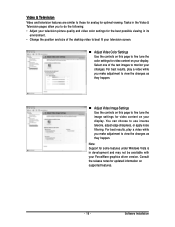
... settings for video content on supported features. - 19 - For best results, play a video while you make adjustment to those for analog for optimal viewing. Software Installation Video & Television Video and television features are similar to view the changes as they happen. You can choose to fine tune the color settings for...
... settings for video content on supported features. - 19 - For best results, play a video while you make adjustment to those for analog for optimal viewing. Software Installation Video & Television Video and television features are similar to view the changes as they happen. You can choose to fine tune the color settings for...
Manual
Page 20
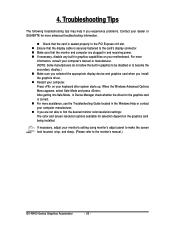
...whether the driver for selection depend on the graphics card being installed. 4. Press on your computer. Troubleshooting Tips The following troubleshooting tips may help if you experience problems. Contact your dealer or GIGABYTE for more advanced troubleshooting information. „ Check that the ...receiving power. „ If necessary, disable any built-in the Windows Help or contact your computer manufacturer. „ If you install the graphics driver. „ Restart your motherboard. For more assistance, use the Troubleshooting Guide located in graphics capabilities on your ...
...whether the driver for selection depend on the graphics card being installed. 4. Press on your computer. Troubleshooting Tips The following troubleshooting tips may help if you experience problems. Contact your dealer or GIGABYTE for more advanced troubleshooting information. „ Check that the ...receiving power. „ If necessary, disable any built-in the Windows Help or contact your computer manufacturer. „ If you install the graphics driver. „ Restart your motherboard. For more assistance, use the Troubleshooting Guide located in graphics capabilities on your ...