Manual
Page 4
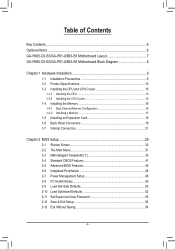
Table of Contents Box Contents...6 Optional Items...6 GA-PA65-D3-B3/GA-P61-USB3-B3 Motherboard Layout 7 GA-PA65-D3-B3/GA-P61-USB3-B3 Motherboard Block Diagram 8 Chapter 1 Hardware Installation 9 1-1 Installation Precautions 9 1-2 Product Specifications 10 1-3 Installing the ... Installing an Expansion Card 18 1-6 Back Panel Connectors 19 1-7 Internal Connectors 21 Chapter 2 BIOS Setup 29 2-1 Startup Screen 30 2-2 The Main Menu 31 2-3 MB Intelligent Tweaker(M.I.T 33 2-4 Standard CMOS Features 41 2-5 Advanced BIOS Features 43 2-6 Integrated Peripherals 45 2-7 Power Management Setup...
Table of Contents Box Contents...6 Optional Items...6 GA-PA65-D3-B3/GA-P61-USB3-B3 Motherboard Layout 7 GA-PA65-D3-B3/GA-P61-USB3-B3 Motherboard Block Diagram 8 Chapter 1 Hardware Installation 9 1-1 Installation Precautions 9 1-2 Product Specifications 10 1-3 Installing the ... Installing an Expansion Card 18 1-6 Back Panel Connectors 19 1-7 Internal Connectors 21 Chapter 2 BIOS Setup 29 2-1 Startup Screen 30 2-2 The Main Menu 31 2-3 MB Intelligent Tweaker(M.I.T 33 2-4 Standard CMOS Features 41 2-5 Advanced BIOS Features 43 2-6 Integrated Peripherals 45 2-7 Power Management Setup...

Manual
Page 11
Internal Connectors Back Panel Connectors I/O Controller Hardware Monitor BIOS ŠŠ 1 x 24-pin ATX main power connector ŠŠ 1 x 4-pin ATX 12V power connector ŠŠ 2 x SATA 6Gb/s connectors j ŠŠ 4 x SATA 3Gb/s connectors ŠŠ 1 x CPU fan header Š&#... flash ŠŠ Use of licensed AWARD BIOS ŠŠ Support for DualBIOS™ ŠŠ PnP 1.0a, DMI 2.0, SM BIOS 2.4, ACPI 1.0b j Only for GA-PA65-D3-B3. - 11 - Hardware Installation
Internal Connectors Back Panel Connectors I/O Controller Hardware Monitor BIOS ŠŠ 1 x 24-pin ATX main power connector ŠŠ 1 x 4-pin ATX 12V power connector ŠŠ 2 x SATA 6Gb/s connectors j ŠŠ 4 x SATA 3Gb/s connectors ŠŠ 1 x CPU fan header Š&#... flash ŠŠ Use of licensed AWARD BIOS ŠŠ Support for DualBIOS™ ŠŠ PnP 1.0a, DMI 2.0, SM BIOS 2.4, ACPI 1.0b j Only for GA-PA65-D3-B3. - 11 - Hardware Installation
Manual
Page 22
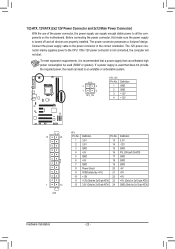
...power, the result can withstand high power consumption be used (500W or greater). 1/2) ATX_12V/ATX (2x2 12V Power Connector and 2x12 Main Power Connector) With the use of the power connector, the power supply can supply enough stable power to the power connector in ... connected, the computer will not start. If the 12V power connector is turned off and all the components on the motherboard. The 12V power connector mainly supplies power to an unstable or unbootable system. 3 4 1 2 ATX_12V ATX_12V: Pin No. 1 2 3 4 Definition GND GND +12V +12V 12 24 1 13 ATX ATX: Pin No. 1 2 3 ...
...power, the result can withstand high power consumption be used (500W or greater). 1/2) ATX_12V/ATX (2x2 12V Power Connector and 2x12 Main Power Connector) With the use of the power connector, the power supply can supply enough stable power to the power connector in ... connected, the computer will not start. If the 12V power connector is turned off and all the components on the motherboard. The 12V power connector mainly supplies power to an unstable or unbootable system. 3 4 1 2 ATX_12V ATX_12V: Pin No. 1 2 3 4 Definition GND GND +12V +12V 12 24 1 13 ATX ATX: Pin No. 1 2 3 ...
Manual
Page 25
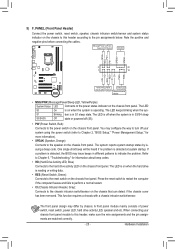
..., Yellow/Purple): System Status LED Connects to this header, make sure the wire assignments and the pin assignments are matched correctly. - 25 - A front panel module mainly consists of power switch, reset switch, power LED, hard drive activity LED, speaker and etc.
..., Yellow/Purple): System Status LED Connects to this header, make sure the wire assignments and the pin assignments are matched correctly. - 25 - A front panel module mainly consists of power switch, reset switch, power LED, hard drive activity LED, speaker and etc.

Manual
Page 29
... (Basic Input and Output System) records hardware parameters of BIOS from the Internet and updates the BIOS. To upgrade the BIOS, use either the GIGABYTE Q-Flash or @BIOS utility. • Q-Flash allows the user to quickly and easily upgrade or back up BIOS without entering the operating system...Chapter 4, "BIOS Update Utilities." • Because BIOS flashing is turned off, the battery on . Inadequate BIOS flashing may result in the main menu of the BIOS Setup program. To access the BIOS Setup program, press the key during system startup, saving system parameters and loading operating...
... (Basic Input and Output System) records hardware parameters of BIOS from the Internet and updates the BIOS. To upgrade the BIOS, use either the GIGABYTE Q-Flash or @BIOS utility. • Q-Flash allows the user to quickly and easily upgrade or back up BIOS without entering the operating system...Chapter 4, "BIOS Update Utilities." • Because BIOS flashing is turned off, the battery on . Inadequate BIOS flashing may result in the main menu of the BIOS Setup program. To access the BIOS Setup program, press the key during system startup, saving system parameters and loading operating...

Manual
Page 31
... options. • When the system is displayed on the bottom line of the Main Menu. Use arrow keys to move among the items and press to accept or enter a sub-menu. (Sample BIOS Version: GA-PA65-D3-B3 E22) CMOS Setup Utility-Copyright (C) 1984-2011 Award Software MB Intelligent ...BIOS Load CMOS from BIOS BIOS Setup Program Function Keys Move the selection bar to select an item Execute command or enter the submenu Main Menu: Exit the BIOS Setup program Submenus: Exit current submenu Increase the numeric value or make changes Decrease the numeric value or make...
... options. • When the system is displayed on the bottom line of the Main Menu. Use arrow keys to move among the items and press to accept or enter a sub-menu. (Sample BIOS Version: GA-PA65-D3-B3 E22) CMOS Setup Utility-Copyright (C) 1984-2011 Award Software MB Intelligent ...BIOS Load CMOS from BIOS BIOS Setup Program Function Keys Move the selection bar to select an item Execute command or enter the submenu Main Menu: Exit the BIOS Setup program Submenus: Exit current submenu Increase the numeric value or make changes Decrease the numeric value or make...
Manual
Page 32
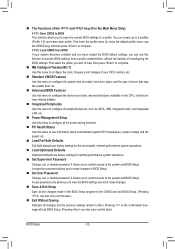
... Change, set , or disable password. It allows you to save the current BIOS settings to a profile. The Functions of the and keys (For the Main Menu Only) F11: Save CMOS to BIOS This function allows you to restrict access to the system and BIOS Setup. First enter the profile...
... Change, set , or disable password. It allows you to save the current BIOS settings to a profile. The Functions of the and keys (For the Main Menu Only) F11: Save CMOS to BIOS This function allows you to restrict access to the system and BIOS Setup. First enter the profile...

Manual
Page 43
... of Smart 6™. (Default: Disabled) CD/DVD Boot Option Set this item, set the password(s) under the Set Supervisor/User Password item in the BIOS Main Menu. Options are: Hard Disk, CDROM, USB-FDD, USB-ZIP, USB-CDROM, USBHDD, Legacy LAN, Disabled. Password Check Specifies whether a password is present only when...
... of Smart 6™. (Default: Disabled) CD/DVD Boot Option Set this item, set the password(s) under the Set Supervisor/User Password item in the BIOS Main Menu. Options are: Hard Disk, CDROM, USB-FDD, USB-ZIP, USB-CDROM, USBHDD, Legacy LAN, Disabled. Password Check Specifies whether a password is present only when...
Manual
Page 54
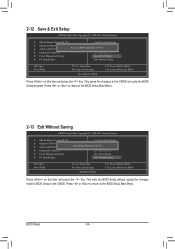
This exits the BIOS Setup without saving the changes made in BIOS Setup to the BIOS Setup Main Menu. Press or to return to the BIOS Setup Main Menu. 2-13 Exit Without Saving CMOS Setup Utility-Copyright (C) 1984-2011 Award Software MB Intelligent Tweaker(M.I .T.) Load Fail-Safe Defaults Standard CMOS Features...
This exits the BIOS Setup without saving the changes made in BIOS Setup to the BIOS Setup Main Menu. Press or to return to the BIOS Setup Main Menu. 2-13 Exit Without Saving CMOS Setup Utility-Copyright (C) 1984-2011 Award Software MB Intelligent Tweaker(M.I .T.) Load Fail-Safe Defaults Standard CMOS Features...
Manual
Page 62
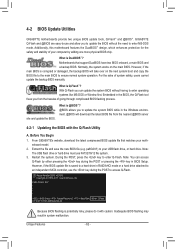
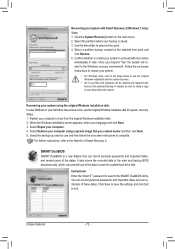
... the sake of going through complicated BIOS flashing process. site and update the BIOS. From GIGABYTE's website, download the latest compressed BIOS update file that support DualBIOS have two BIOS onboard, a main BIOS and a backup BIOS. During the POST, press the key to enter MS-DOS ...motherboard features the DualBIOS™ design, which enhances protection for the safety and stability of your motherboard model. 2. Embedded in system malfunction. PA65-D3-B3 E22 . . . . : BIOS Setup : XpressRecovery2 : Boot Menu : Qflash 01/12/2011-H61-7A89UG0UC-00 Because BIOS flashing is corrupted or...
... the sake of going through complicated BIOS flashing process. site and update the BIOS. From GIGABYTE's website, download the latest compressed BIOS update file that support DualBIOS have two BIOS onboard, a main BIOS and a backup BIOS. During the POST, press the key to enter MS-DOS ...motherboard features the DualBIOS™ design, which enhances protection for the safety and stability of your motherboard model. 2. Embedded in system malfunction. PA65-D3-B3 E22 . . . . : BIOS Setup : XpressRecovery2 : Boot Menu : Qflash 01/12/2011-H61-7A89UG0UC-00 Because BIOS flashing is corrupted or...
Manual
Page 63
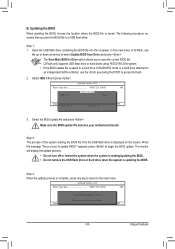
... the message "Are you sure to Drive Enter : Run hi:Move Total size : 0 ESC:Reset Free size : 0 F10:Power Off 3. appears, press to the main menu. Unique Features Step 3: When the update process is complete, press any key to return to begin the BIOS update. The following procedure assumes that... an independent SATA controller, use the key during the POST to a USB flash drive. Update BIOS from Drive and press . • The Save Main BIOS to Drive option allows you save the current BIOS file. • Q-Flash only supports USB flash drive or hard drives using FAT32/16/12...
... the message "Are you sure to Drive Enter : Run hi:Move Total size : 0 ESC:Reset Free size : 0 F10:Power Off 3. appears, press to the main menu. Unique Features Step 3: When the update process is complete, press any key to return to begin the BIOS update. The following procedure assumes that... an independent SATA controller, use the key during the POST to a USB flash drive. Update BIOS from Drive and press . • The Save Main BIOS to Drive option allows you save the current BIOS file. • Q-Flash only supports USB flash drive or hard drives using FAT32/16/12...
Manual
Page 71
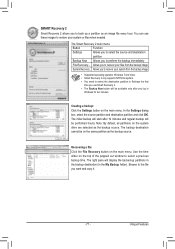
... partitions in the backup destination (in Windows for ten minutes. Allows you to select a previous backup time. The Smart Recovery 2 main menu: Button Function Settings Allows you to select the source and destination partition Backup Now Allows you to the file you want and...- In the Settings dialog box, select the source partition and destination partition and click OK. Note: By default, all partitions on the main menu. The backup destination cannot be performed hourly. Browse to perform the backup immediately File Recovery... The initial backup will start after 10 ...
... partitions in the backup destination (in Windows for ten minutes. Allows you to select a previous backup time. The Smart Recovery 2 main menu: Button Function Settings Allows you to select the source and destination partition Backup Now Allows you to the file you want and...- In the Settings dialog box, select the source partition and destination partition and click OK. Note: By default, all partitions on the main menu. The backup destination cannot be performed hourly. Browse to perform the backup immediately File Recovery... The initial backup will start after 10 ...
Manual
Page 72
...language and click Next. 3. Select a partition backup created on the selected backup. Confirm whether to use and then follow the on the main menu. 2. When the Windows installation screen appears, select your system to use the original Windows installation disk for system recovery. You can record...8226; All of Smart Recovery 2. Once you respond "Yes" the system will be sure to make a copy of the data in the main and backup BIOS simultaneously, which can prevent loss of your computer to complete. Click the System Recovery button on -screen instructions to boot from...
...language and click Next. 3. Select a partition backup created on the selected backup. Confirm whether to use and then follow the on the main menu. 2. When the Windows installation screen appears, select your system to use the original Windows installation disk for system recovery. You can record...8226; All of Smart Recovery 2. Once you respond "Yes" the system will be sure to make a copy of the data in the main and backup BIOS simultaneously, which can prevent loss of your computer to complete. Click the System Recovery button on -screen instructions to boot from...
Manual
Page 74
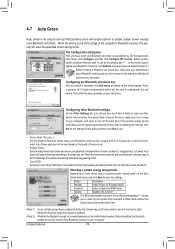
On the Auto Green main menu, click Configure and then click Configure BT devices. Enter a passkey (8~16 digits recommended) which will be turned off other Bluetooth receiver on the length ... on your needs, select a system power saving mode on your Bluetooth cell phone as a portable key. Then enter the same passkey on the Auto Green main menu and click Save to 30 seconds in 5-second increment. When the times limit is reached and your Bluetooth cell phone key is still not...
On the Auto Green main menu, click Configure and then click Configure BT devices. Enter a passkey (8~16 digits recommended) which will be turned off other Bluetooth receiver on the length ... on your needs, select a system power saving mode on your Bluetooth cell phone as a portable key. Then enter the same passkey on the Auto Green main menu and click Save to 30 seconds in 5-second increment. When the times limit is reached and your Bluetooth cell phone key is still not...
Manual
Page 79
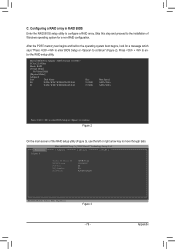
...: WDC WD800JD-22LSA0 Size 76.3GB 76.3GB Max Speed SATA 3Gb/s SATA 3Gb/s Press + to enter BIOS Setup or to continue Figure 2 On the main screen of Windows operating system for a message which says "Press + to enter BIOS Setup or to configure a RAID array. Appendix After the POST memory test...
...: WDC WD800JD-22LSA0 Size 76.3GB 76.3GB Max Speed SATA 3Gb/s SATA 3Gb/s Press + to enter BIOS Setup or to continue Figure 2 On the main screen of Windows operating system for a message which says "Press + to enter BIOS Setup or to configure a RAID array. Appendix After the POST memory test...
Manual
Page 80
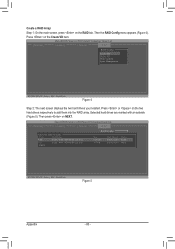
...: Select, ESC: Back/Exit Figure 5 Appendix - 80 - Press on the RAID tab. Then the RAID Config menu appears (Figure 4). Create a RAID Array: Step 1: On the main screen, press on the Create VD item.
...: Select, ESC: Back/Exit Figure 5 Appendix - 80 - Press on the RAID tab. Then the RAID Config menu appears (Figure 4). Create a RAID Array: Step 1: On the main screen, press on the Create VD item.
Manual
Page 82
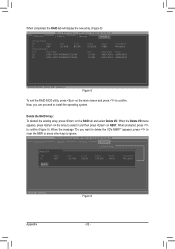
... Max Speed Status SATA 3Gb/s ASSIGNED SATA 3Gb/s ASSIGNED ENTER/SPACE: Select, ESC: Back/Exit Figure 8 To exit the RAID BIOS utility, press on the main screen and press to select it and then press on NEXT. When the Delete VD menu appears, press on the RAID tab and select Delete...
... Max Speed Status SATA 3Gb/s ASSIGNED SATA 3Gb/s ASSIGNED ENTER/SPACE: Select, ESC: Back/Exit Figure 8 To exit the RAID BIOS utility, press on the main screen and press to select it and then press on NEXT. When the Delete VD menu appears, press on the RAID tab and select Delete...
Manual
Page 87
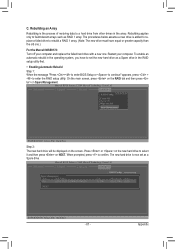
... hard drive as a Spare drive. Rebuilding an Array Rebuilding is added to replace a failed drive to fault-tolerant arrays such as RAID 1 array. On the main screen, press on the RAID tab and then press on the screen. Marvell BIOS Setup (c) 2009 Marvell Technology Group Ltd. [ Selection] [ Adapter] [ Devices] [ RAID ] RAID...
... hard drive as a Spare drive. Rebuilding an Array Rebuilding is added to replace a failed drive to fault-tolerant arrays such as RAID 1 array. On the main screen, press on the RAID tab and then press on the screen. Marvell BIOS Setup (c) 2009 Marvell Technology Group Ltd. [ Selection] [ Adapter] [ Devices] [ RAID ] RAID...
Manual
Page 96
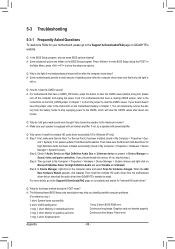
... Add New Hardware Wizard appears, click Cancel. Q: In the BIOS Setup program, why are hidden in My Computer > Properties > Gen- In the Main Menu, press + to the maximum volume? eral > System). Then make sure Service Pack 1 or Service Pack 2 has been installed (check in the... Unknown device is equipped with power/amplifier. Then install the onboard HD audio driver from the motherboard driver disk or download the audio driver from GIGABYTE's website to clear the CMOS values. You can temporarily remove the battery from Microsoft's website. Q: Why cannot I clear the CMOS values?...
... Add New Hardware Wizard appears, click Cancel. Q: In the BIOS Setup program, why are hidden in My Computer > Properties > Gen- In the Main Menu, press + to the maximum volume? eral > System). Then make sure Service Pack 1 or Service Pack 2 has been installed (check in the... Unknown device is equipped with power/amplifier. Then install the onboard HD audio driver from the motherboard driver disk or download the audio driver from GIGABYTE's website to clear the CMOS values. You can temporarily remove the battery from Microsoft's website. Q: Why cannot I clear the CMOS values?...
Manual
Page 97
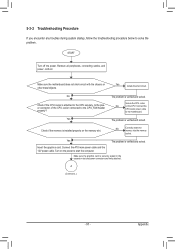
... Check if the CPU cooler is securely seated in the expansion slot and power connectors are firmly attached. Insert the graphics card. Connect the ATX main power cable and the 12V power cable. Make sure the graphics card is attached to the CPU securely. Yes Isolate the short circuit. Yes The...
... Check if the CPU cooler is securely seated in the expansion slot and power connectors are firmly attached. Insert the graphics card. Connect the ATX main power cable and the 12V power cable. Make sure the graphics card is attached to the CPU securely. Yes Isolate the short circuit. Yes The...