Manual
Page 5
... 57 3-1 Installing Chipset Drivers 57 3-2 Application Software 58 3-3 Technical Manuals 58 3-4 Contact ...59 3-5 System ...59 3-6 Download Center 60 Chapter 4 Unique Features 61 4-1 Xpress ...BIOS with the @BIOS Utility 69 4-3 EasyTune 6...70 4-4 Easy Energy Saver 71 Chapter 5 Appendix ...73 5-1 Configuring AudioInput and Output 73 5-1-1 Configuring 2/4/5.1/7.1-Channel Audio 73 5-1-2 Configuring S/PDIF Out 76 5-1-3 Configuring Microphone Recording 77 5-1-4 Using the Sound Recorder 79 5-2 Troubleshooting 80 5-2-1 Frequently Asked Questions 80 5-2-2 Troubleshooting Procedure 81...
... 57 3-1 Installing Chipset Drivers 57 3-2 Application Software 58 3-3 Technical Manuals 58 3-4 Contact ...59 3-5 System ...59 3-6 Download Center 60 Chapter 4 Unique Features 61 4-1 Xpress ...BIOS with the @BIOS Utility 69 4-3 EasyTune 6...70 4-4 Easy Energy Saver 71 Chapter 5 Appendix ...73 5-1 Configuring AudioInput and Output 73 5-1-1 Configuring 2/4/5.1/7.1-Channel Audio 73 5-1-2 Configuring S/PDIF Out 76 5-1-3 Configuring Microphone Recording 77 5-1-4 Using the Sound Recorder 79 5-2 Troubleshooting 80 5-2-1 Frequently Asked Questions 80 5-2-2 Troubleshooting Procedure 81...
Manual
Page 12
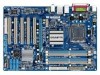
GA-P43-ES3G Motherboard - 12 - BIOS Unique Features Bundled Software Operating System Form Factor Š 2 x 8 Mbit flash Š Use of licensed AWARD BIOS Š Support for DualBIOSTM Š ... is installed, the actual memory size displayed will be less than 4 GB. (Note 2) To enable 7.1-channel audio, you have to use an HD front panel audio module and enable the multi-channel audio feature through the audio driver. (Note 3) Whether the CPU/system fan speed control function is supported will depend on the CPU cooler...
GA-P43-ES3G Motherboard - 12 - BIOS Unique Features Bundled Software Operating System Form Factor Š 2 x 8 Mbit flash Š Use of licensed AWARD BIOS Š Support for DualBIOSTM Š ... is installed, the actual memory size displayed will be less than 4 GB. (Note 2) To enable 7.1-channel audio, you have to use an HD front panel audio module and enable the multi-channel audio feature through the audio driver. (Note 3) Whether the CPU/system fan speed control function is supported will depend on the CPU cooler...
Manual
Page 20
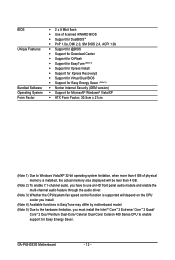
... connected to the instructions on setting up a 2/4/5.1/7.1-channel audio configuration in a 4/5.1-channel audio configuration. GA-P43-ES3G Motherboard - 20 - Line Out Jack (Green) The default line out jack. Microphones must be used to use an HD front panel audio module and enable the multi-channel audio feature through the audio driver. Line In Jack (Blue) The default line in...
... connected to the instructions on setting up a 2/4/5.1/7.1-channel audio configuration in a 4/5.1-channel audio configuration. GA-P43-ES3G Motherboard - 20 - Line Out Jack (Green) The default line out jack. Microphones must be used to use an HD front panel audio module and enable the multi-channel audio feature through the audio driver. Line In Jack (Blue) The default line in...
Manual
Page 46
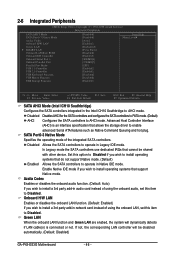
SATA Port0-3 Native Mode Specifies the operating mode of using the onboard audio, set this option to Disabled if you wish to install operating systems that cannot be disabled automatically. (Default: Disabled) GA-P43-ES3G Motherboard - 46 - Enable Native IDE mode if you wish to Disabled. Onboard H/W LAN... instead of the integrated SA TA controllers. Azalia Codec Enables or disables the onboard audio function. (Default: Auto) If you wish to install operating systems that allows the storage driver to AHCI mode. Green LAN When the onboard LAN function and Green LAN are enabed...
SATA Port0-3 Native Mode Specifies the operating mode of using the onboard audio, set this option to Disabled if you wish to install operating systems that cannot be disabled automatically. (Default: Disabled) GA-P43-ES3G Motherboard - 46 - Enable Native IDE mode if you wish to Disabled. Onboard H/W LAN... instead of the integrated SA TA controllers. Azalia Codec Enables or disables the onboard audio function. (Default: Auto) If you wish to install operating systems that allows the storage driver to AHCI mode. Green LAN When the onboard LAN function and Green LAN are enabed...

Manual
Page 73
.... Then manually configures the jack for microphone functionality. • Audio signals will appear in your operating system has been updated with the latest Service Pack for each jack through the audio driver. For example, users can listen to MP3 music, have an... (Note) 2/4/5.1/7.1- High Definition Audio (HD Audio) HD Audio includes multiple high quality digital-to-analog converters (DACs) that allows the user to the following instructions use Windows XP as the example operating system.) Step 1: After installing the audio driver, the Audio Manager icon will be simultaneously ...
.... Then manually configures the jack for microphone functionality. • Audio signals will appear in your operating system has been updated with the latest Service Pack for each jack through the audio driver. For example, users can listen to MP3 music, have an... (Note) 2/4/5.1/7.1- High Definition Audio (HD Audio) HD Audio includes multiple high quality digital-to-analog converters (DACs) that allows the user to the following instructions use Windows XP as the example operating system.) Step 1: After installing the audio driver, the Audio Manager icon will be simultaneously ...
Manual
Page 77
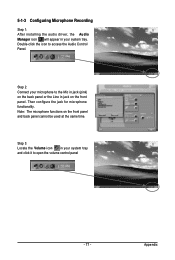
Note: The microphone functions on the front panel and back panel cannot be used at the same time. Double-click the icon to open the volume control panel - 77 - Appendix Then configure the jack for microphone functionality. Step 3: Locate the Volume icon in your microphone to the Mic in jack (pink) on the back panel or the Line in your system tray. Step 2: Connect your system tray and click it to access the Audio Control Panel. 5-1-3 Configuring Microphone Recording Step 1: After installing the audio driver, the Audio Manager icon will appear in jack on the front panel.
Note: The microphone functions on the front panel and back panel cannot be used at the same time. Double-click the icon to open the volume control panel - 77 - Appendix Then configure the jack for microphone functionality. Step 3: Locate the Volume icon in your microphone to the Mic in jack (pink) on the back panel or the Line in your system tray. Step 2: Connect your system tray and click it to access the Audio Control Panel. 5-1-3 Configuring Microphone Recording Step 1: After installing the audio driver, the Audio Manager icon will appear in jack on the front panel.


