Manual
Page 5
... 59 3-1 Installing Chipset Drivers 59 3-2 Application Software 60 3-3 Technical Manuals 60 3-4 Contact...61 3-5 System...61 3-6 Download Center 62 Chapter 4 Unique Features 63 4-1 Xpress Recovery2 63 ... SATA Hard Drive(s 73 5-1-1 Configuring the Onboard SATA Controller 73 5-1-2 Making a SATA RAID/AHCI Driver Diskette 79 5-1-3 Installing the SATA RAID/AHCI Driver and Operating System 81 5-2 Configuring Audio Input and Output 85 5-2-1 Configuring 2/4/5.1/7.1-Channel Audio 85 5-2-2 Configuring S/PDIF In/Out 88 5-2-3 Configuring Microphone Recording 90 5-2-4 Using the Sound Recorder ...
... 59 3-1 Installing Chipset Drivers 59 3-2 Application Software 60 3-3 Technical Manuals 60 3-4 Contact...61 3-5 System...61 3-6 Download Center 62 Chapter 4 Unique Features 63 4-1 Xpress Recovery2 63 ... SATA Hard Drive(s 73 5-1-1 Configuring the Onboard SATA Controller 73 5-1-2 Making a SATA RAID/AHCI Driver Diskette 79 5-1-3 Installing the SATA RAID/AHCI Driver and Operating System 81 5-2 Configuring Audio Input and Output 85 5-2-1 Configuring 2/4/5.1/7.1-Channel Audio 85 5-2-2 Configuring S/PDIF In/Out 88 5-2-3 Configuring Microphone Recording 90 5-2-4 Using the Sound Recorder ...
Manual
Page 12
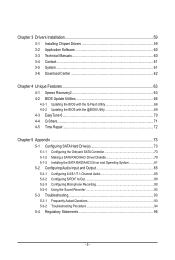
... connection by adapter. (Note 3) Simultaneous output for DVI-D and HDMI is not supported. (Note 4) To configure 7.1-channel audio, you have to use an HD front panel audio module and enable themulti-channel audio feature through the audio driver. (Note 5) Whether the CPU fan speed control function is supported will depend on the CPU cooler you...
... connection by adapter. (Note 3) Simultaneous output for DVI-D and HDMI is not supported. (Note 4) To configure 7.1-channel audio, you have to use an HD front panel audio module and enable themulti-channel audio feature through the audio driver. (Note 5) Whether the CPU fan speed control function is supported will depend on the CPU cooler you...
Manual
Page 20
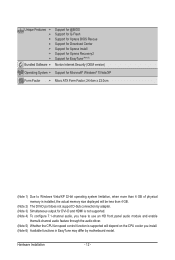
...receiving is occurring Off No data transmission or receiving is occurring Line In Jack (Blue) The default line in jack. Use this audio jack for a headphone or 2-channel speaker. This jack can be connected to the recom mended system requirements (or better) below... Use this audio jack for line in Chapter 5, "Configuring 2/4/5.1/7.1-Channel Audio." • When removing the cable connected to 1 Gbps data rate. The following describes the states of UMA Frame Buffer Size (refer to use an HD front panel audio module and enable themulti-channel audio feature through the audio driver.
...receiving is occurring Off No data transmission or receiving is occurring Line In Jack (Blue) The default line in jack. Use this audio jack for a headphone or 2-channel speaker. This jack can be connected to the recom mended system requirements (or better) below... Use this audio jack for line in Chapter 5, "Configuring 2/4/5.1/7.1-Channel Audio." • When removing the cable connected to 1 Gbps data rate. The following describes the states of UMA Frame Buffer Size (refer to use an HD front panel audio module and enable themulti-channel audio feature through the audio driver.
Manual
Page 47
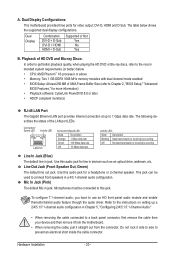
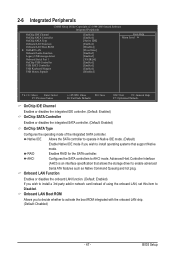
...decide whether to AHCI mode. Onboard LAN Boot ROM Allows you wish to install operating systems that allows the storage driver to Disabled. Native IDE Allows the SATA controller to operate in network card instead of the integrated SATA controller. ... Integrated Peripherals OnChip IDE Channel OnChip SATA Controller OnChip SATA Type Onboard LAN Function Onboard LAN Boot ROM } SMART LAN Onboard Audio Function Legacy USB storage detect Onboard Serial Port 1 OnChip USB Controller USB EHCI Controller USB Keyboard Support USB Mouse Support [Enabled...
...decide whether to AHCI mode. Onboard LAN Boot ROM Allows you wish to install operating systems that allows the storage driver to Disabled. Native IDE Allows the SATA controller to operate in network card instead of the integrated SATA controller. ... Integrated Peripherals OnChip IDE Channel OnChip SATA Controller OnChip SATA Type Onboard LAN Function Onboard LAN Boot ROM } SMART LAN Onboard Audio Function Legacy USB storage detect Onboard Serial Port 1 OnChip USB Controller USB EHCI Controller USB Keyboard Support USB Mouse Support [Enabled...

Manual
Page 85
...: Refer to change the function for each jack through the audio driver. 5-2 Configuring Audio Input and Output 5-2-1 Configuring 2/4/5.1/7.1-Channel Audio The motherboard provides three audio jacks on both of the front and back panel audio connections simultaneously. The integrated HD (High Definition) audio provides jack retasking capability that support 44.1KHz/48KHz/ 96KHz/192KHz sampling rate. Configuring...
...: Refer to change the function for each jack through the audio driver. 5-2 Configuring Audio Input and Output 5-2-1 Configuring 2/4/5.1/7.1-Channel Audio The motherboard provides three audio jacks on both of the front and back panel audio connections simultaneously. The integrated HD (High Definition) audio provides jack retasking capability that support 44.1KHz/48KHz/ 96KHz/192KHz sampling rate. Configuring...

Manual
Page 90
... notification area. Step 2: Connect your microphone to microphone, right-click on Microphone and select Set Default Device. Double-click the icon to access the HD Audio Manager. 5-2-3 Configuring Microphone Recording Step 1: After installing the audio driver, the HD Audio Manager icon will appear in jack (pink) on the front panel.
... notification area. Step 2: Connect your microphone to microphone, right-click on Microphone and select Set Default Device. Double-click the icon to access the HD Audio Manager. 5-2-3 Configuring Microphone Recording Step 1: After installing the audio driver, the HD Audio Manager icon will appear in jack (pink) on the front panel.
Manual
Page 93
... yes, please disable this device. (If not, skip this jumper, refer to show the advanced options. Then install the onboard HD audio driver from the motherboard driver disk or download the audio driver from GIGABYTE's website to My Computer > Properties > Hardware > Device Manager > System devices and right-click on our website and search for your speaker...
... yes, please disable this device. (If not, skip this jumper, refer to show the advanced options. Then install the onboard HD audio driver from the motherboard driver disk or download the audio driver from GIGABYTE's website to My Computer > Properties > Hardware > Device Manager > System devices and right-click on our website and search for your speaker...


