Manual
Page 9
... system components as well as a motherboard, CPU or memory. These stickers are connected tightly and securely. • When handling the motherboard, avoid touching any installation steps or have it on top of an antistatic pad or within the computer casing. • Do not place the computer system on an uneven surface...
... system components as well as a motherboard, CPU or memory. These stickers are connected tightly and securely. • When handling the motherboard, avoid touching any installation steps or have it on top of an antistatic pad or within the computer casing. • Do not place the computer system on an uneven surface...
Manual
Page 14
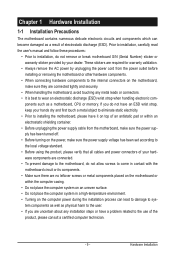
Follow the steps below to correctly install the CPU into the motherboard CPU socket. • Before installing the CPU, make sure to turn off the computer and unplug ... in if oriented incorrectly. Make sure that the CPU pins fit perfectly into the CPU socket. CPU Socket Locking Lever Step 1: Completely lift up the CPU socket locking lever. Hardware Installation - 14 - B. Step 2: Align the CPU pin one finger down on the CPU socket and gently insert the CPU into the fully...
Follow the steps below to correctly install the CPU into the motherboard CPU socket. • Before installing the CPU, make sure to turn off the computer and unplug ... in if oriented incorrectly. Make sure that the CPU pins fit perfectly into the CPU socket. CPU Socket Locking Lever Step 1: Completely lift up the CPU socket locking lever. Hardware Installation - 14 - B. Step 2: Align the CPU pin one finger down on the CPU socket and gently insert the CPU into the fully...
Manual
Page 15
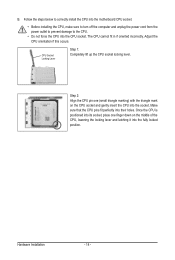
...cooler clip to the mounting lug on the retention frame. 1-3-2 Installing the CPU Cooler Follow the steps below to correctly install the CPU cooler on the CPU. (The following procedure uses the GIGABYTE cooler as the picture above shows) to lock into place. (Refer to your CPU cooler ...installation manual for instructions on installing the cooler.) Step 5: Finally, attach the power connector of the CPU cooler to the ...
...cooler clip to the mounting lug on the retention frame. 1-3-2 Installing the CPU Cooler Follow the steps below to correctly install the CPU cooler on the CPU. (The following procedure uses the GIGABYTE cooler as the picture above shows) to lock into place. (Refer to your CPU cooler ...installation manual for instructions on installing the cooler.) Step 5: Finally, attach the power connector of the CPU cooler to the ...

Manual
Page 17
... and unplug the power cord from the power outlet to prevent damage to install DDR3 DIMMs on this motherboard. Step 1: Note the orientation of the socket will snap into the memory socket. Follow the steps below to correctly install your fingers on the left, place your memory modules in the memory sockets.... Step 2: The clips at both ends of the memory module. As indicated in one direction. Place the memory module on the memory and insert it can ...
... and unplug the power cord from the power outlet to prevent damage to install DDR3 DIMMs on this motherboard. Step 1: Note the orientation of the socket will snap into the memory socket. Follow the steps below to correctly install your fingers on the left, place your memory modules in the memory sockets.... Step 2: The clips at both ends of the memory module. As indicated in one direction. Place the memory module on the memory and insert it can ...
Manual
Page 18
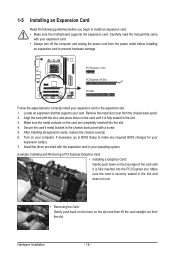
... install an expansion card: • Make sure the motherboard supports the expansion card. PCI Express x1 Slot PCI Express x16 Slot PCI Slot Follow the steps below to make any required BIOS changes for your expansion card in the slot and does not rock. • Removing the Card: Gently push back...
... install an expansion card: • Make sure the motherboard supports the expansion card. PCI Express x1 Slot PCI Express x16 Slot PCI Slot Follow the steps below to make any required BIOS changes for your expansion card in the slot and does not rock. • Removing the Card: Gently push back...
Manual
Page 63
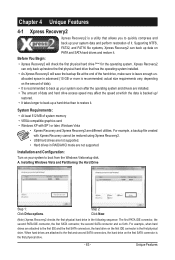
... data). • It is recommended to back up a hard drive than to restore it . A. Installing Windows Vista and Partitioning the Hard Drive Step 1: Click Drive options. System Requirements: • At least 512 MB of system memory • VESA compatible graphics card • Windows XP with... that has the operating system installed. • As Xpress Recovery2 will check the first physical hard drive (Note) for the operating system. Step 2: Click New. (Note) Xpress Recovery2 checks the first physical hard drive in RAID/AHCI mode are attached to leave enough unallocated space in...
... data). • It is recommended to back up a hard drive than to restore it . A. Installing Windows Vista and Partitioning the Hard Drive Step 1: Click Drive options. System Requirements: • At least 512 MB of system memory • VESA compatible graphics card • Windows XP with... that has the operating system installed. • As Xpress Recovery2 will check the first physical hard drive (Note) for the operating system. Step 2: Click New. (Note) Xpress Recovery2 checks the first physical hard drive in RAID/AHCI mode are attached to leave enough unallocated space in...
Manual
Page 64
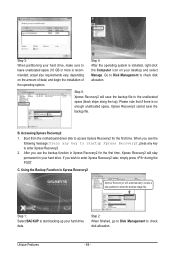
...the Backup Function in Xpress Recovery2 Xpress Recovery2 will save the backup file. actual size requirements vary, depending on your hard drive data. Step 5: Xpress Recovery2 will automatically create a new partition to enter Xpress Recovery2 later, simply press during the POST. B. After you use the... is no enough unallocated space, Xpress Recovery2 cannot save the backup file to enter Xpress Recovery2. 2. Step 2: When finished, go to Disk Management to check disk allocation. Step 4: After the operating system is installed, right-click the Computer icon on the amount of data) and...
...the Backup Function in Xpress Recovery2 Xpress Recovery2 will save the backup file. actual size requirements vary, depending on your hard drive data. Step 5: Xpress Recovery2 will automatically create a new partition to enter Xpress Recovery2 later, simply press during the POST. B. After you use the... is no enough unallocated space, Xpress Recovery2 cannot save the backup file to enter Xpress Recovery2. 2. Step 2: When finished, go to Disk Management to check disk allocation. Step 4: After the operating system is installed, right-click the Computer icon on the amount of data) and...

Manual
Page 65
Step 2: After the backup file is removed, no backup is created before. Removing the Backup Step 1: If you wish to exit Xpress Recovery2. - 65 - Exiting Xpress Recovery2 Select REBOOT to remove the backup file, select REMOVE. The RESTORE option will not be present if no backup image file will be present in case the system breaks down. F. E. Unique Features Using the Restore Function in Xpress Recovery2 Select RESTORE to restore the backup to your hard drive in Disk Management and hard drive space will be freed up. D.
Step 2: After the backup file is removed, no backup is created before. Removing the Backup Step 1: If you wish to exit Xpress Recovery2. - 65 - Exiting Xpress Recovery2 Select REBOOT to remove the backup file, select REMOVE. The RESTORE option will not be present if no backup image file will be present in case the system breaks down. F. E. Unique Features Using the Restore Function in Xpress Recovery2 Select RESTORE to restore the backup to your hard drive in Disk Management and hard drive space will be freed up. D.

Manual
Page 67
...- The following procedure assumes that you sure to Drive Enter : Run hi:Move ESC:Reset F10:Power Off Total size : 0 Free size : 0 3. Step 1: 1. Step 3: When the update process is displayed on the screen. Q-Flash Utility v2.14 Flash Type/Size MXIC 25L8005 1M Keep0 DfilMe(Is)DfaotuandEnable Floppy A Loa...?" ing the BIOS. Insert the floppy disk containing the BIOS file into the floppy disk drive. Select the BIOS update file and press . Step 2: The process of Q-Flash, use the up or down arrow key to select Update BIOS from the floppy disk is complete, press any ...
...- The following procedure assumes that you sure to Drive Enter : Run hi:Move ESC:Reset F10:Power Off Total size : 0 Free size : 0 3. Step 1: 1. Step 3: When the update process is displayed on the screen. Q-Flash Utility v2.14 Flash Type/Size MXIC 25L8005 1M Keep0 DfilMe(Is)DfaotuandEnable Floppy A Loa...?" ing the BIOS. Insert the floppy disk containing the BIOS file into the floppy disk drive. Select the BIOS update file and press . Step 2: The process of Q-Flash, use the up or down arrow key to select Update BIOS from the floppy disk is complete, press any ...
Manual
Page 68
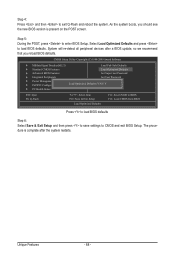
...Flash Select Item F10: Save & Exit Setup Load Optimized Defaults F11: Save CMOS to BIOS F12: Load CMOS from BIOS Press to load BIOS defaults Step 6: Select Save & Exit Setup and then press to save settings to load BIOS defaults. The procedure is complete after a BIOS update, so we... BIOS version is present on the POST screen. System will re-detect all peripheral devices after the system restarts. Step 5: During the POST, press to exit Q-Flash and reboot the system. Step 4: Press and then to enter BIOS Setup. Unique Features - 68 - As the system boots, you reload ...
...Flash Select Item F10: Save & Exit Setup Load Optimized Defaults F11: Save CMOS to BIOS F12: Load CMOS from BIOS Press to load BIOS defaults Step 6: Select Save & Exit Setup and then press to save settings to load BIOS defaults. The procedure is complete after a BIOS update, so we... BIOS version is present on the POST screen. System will re-detect all peripheral devices after the system restarts. Step 5: During the POST, press to exit Q-Flash and reboot the system. Step 4: Press and then to enter BIOS Setup. Unique Features - 68 - As the system boots, you reload ...
Manual
Page 73
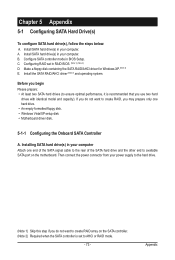
... on the motherboard. Install SATA hard drive(s) in BIOS Setup. Configure SATA controller mode in your power supply to the hard drive. (Note 1) Skip this step if you do not want to AHCI or RAID mode. - 73 - Chapter 5 Appendix 5-1 Configuring SATA Hard Drive(s) To configure SATA hard drive(s), follow the...
... on the motherboard. Install SATA hard drive(s) in BIOS Setup. Configure SATA controller mode in your power supply to the hard drive. (Note 1) Skip this step if you do not want to AHCI or RAID mode. - 73 - Chapter 5 Appendix 5-1 Configuring SATA Hard Drive(s) To configure SATA hard drive(s), follow the...

Manual
Page 74
... BIOS Setup. der Integrated Peripherals, make sure OnChip SATA Controller is enabled. The actual BIOS Setup menu options you have and the BIOS version. Step 1: Turn on the motherboard you will see shall depend on your motherboard. Appendix - 74 - B. CMOS Setup Utility-Copyright (C) 1984-2009 Award... F5: Previous Values +/-/PU/PD: Value F10: Save F6: Fail-Safe Defaults Figure 1 ESC: Exit F1: General Help F7: Optimized Defaults Step 2: Save changes and exit BIOS Setup. To enable RAID, set OnChip SATA Type to enter BIOS Setup during the POST (Power-On Self-Test).
... BIOS Setup. der Integrated Peripherals, make sure OnChip SATA Controller is enabled. The actual BIOS Setup menu options you have and the BIOS version. Step 1: Turn on the motherboard you will see shall depend on your motherboard. Appendix - 74 - B. CMOS Setup Utility-Copyright (C) 1984-2009 Award... F5: Previous Values +/-/PU/PD: Value F10: Save F6: Fail-Safe Defaults Figure 1 ESC: Exit F1: General Help F7: Optimized Defaults Step 2: Save changes and exit BIOS Setup. To enable RAID, set OnChip SATA Type to enter BIOS Setup during the POST (Power-On Self-Test).

Manual
Page 75
... Utility" (Figure 2). Press + to enter the Delete LD window. RAID Option ROM Version 3.0.1540.47 (c) 2008 Advanced Micro Devices, Inc. Figure 2 Step 2: Main Menu This is defined.. To delete an array, press to enter the RAID BIOS setup utility. Option ROM Utility (c) 2008 Advanced Micro Devices,... to enter the View Drive Assignments window. C. To view the disk drives assigned to arrays, press to enter the Controller Configuration window. Step 1: After the POST memory test begins and before the operating system boot begins, look for a non-RAID configuration. No Array is the...
... Utility" (Figure 2). Press + to enter the Delete LD window. RAID Option ROM Version 3.0.1540.47 (c) 2008 Advanced Micro Devices, Inc. Figure 2 Step 2: Main Menu This is defined.. To delete an array, press to enter the RAID BIOS setup utility. Option ROM Utility (c) 2008 Advanced Micro Devices,... to enter the View Drive Assignments window. C. To view the disk drives assigned to arrays, press to enter the Controller Configuration window. Step 1: After the POST memory test begins and before the operating system boot begins, look for a non-RAID configuration. No Array is the...
Manual
Page 79
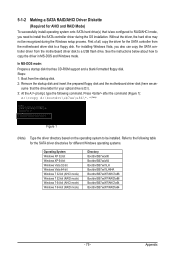
...\*.* (Note) Figure 1 (Note) Type the driver directory based on the operating system to a USB flash drive. See the instructions below about how to a floppy disk. Steps: 1: Boot from the motherboard driver disk to be recognized during the OS installation. For installing Windows Vista, you need to the following command. Appendix 5-1-2 Making...
...\*.* (Note) Figure 1 (Note) Type the driver directory based on the operating system to a USB flash drive. See the instructions below about how to a floppy disk. Steps: 1: Boot from the motherboard driver disk to be recognized during the OS installation. For installing Windows Vista, you need to the following command. Appendix 5-1-2 Making...
Manual
Page 80
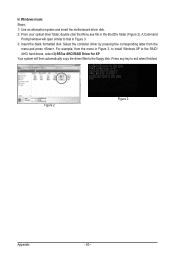
... (Figure 2). Press any key to exit when finished. A Command Prompt window will then automatically copy the driver files to the floppy disk. In Windows mode: Steps: 1: Use an alternative system and insert the motherboard driver disk. 2: From your optical drive folder, double click the Menu.exe file in Figure 3, to install...
... (Figure 2). Press any key to exit when finished. A Command Prompt window will then automatically copy the driver files to the floppy disk. In Windows mode: Steps: 1: Use an alternative system and insert the motherboard driver disk. 2: From your optical drive folder, double click the Menu.exe file in Figure 3, to install...
Manual
Page 81
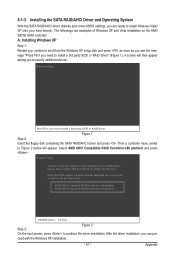
A. Installing Windows XP Step 1: Restart your hard drive(s). Figure 1 Step 2: Insert the floppy disk containing the SATA RAID/AHCI driver and press . Windows Setup You have chosen to install a 3rd party SCSI or RAID driver" (... Compatible RAID Controller-x86 platform and press . AMD AHCI Compatible RAID Controller-x86 platform AMD AHCI Compatible RAID Controller-x64 platform ENTER=Select F3=Exit Step 3: Figure 2 On the next screen, press to specify additional device. Select the SCSI Adapter you want from the Windows XP setup disk and press as...
A. Installing Windows XP Step 1: Restart your hard drive(s). Figure 1 Step 2: Insert the floppy disk containing the SATA RAID/AHCI driver and press . Windows Setup You have chosen to install a 3rd party SCSI or RAID driver" (... Compatible RAID Controller-x86 platform and press . AMD AHCI Compatible RAID Controller-x86 platform AMD AHCI Compatible RAID Controller-x64 platform ENTER=Select F3=Exit Step 3: Figure 2 On the next screen, press to specify additional device. Select the SCSI Adapter you want from the Windows XP setup disk and press as...

Manual
Page 82
... Vista (go to the BootDrv folder and save the whole SB7xxV folder to boot from the Windows Vista setup disk and perform standard OS installation steps. Note: For users using a SATA optical drive, be detected at this stage), select Load Driver (Figure 3). Method B: Insert the USB flash drive...and browse to that below assumes that contains the SATA RAID/AHCI driver (Method B), then specify the location of the driver (Figure 4). Figure 3 Step 2: Insert the motherboard driver disk (Method A) or the removable storage device such as USB flash drive that only one RAID array exists in your ...
... Vista (go to the BootDrv folder and save the whole SB7xxV folder to boot from the Windows Vista setup disk and perform standard OS installation steps. Note: For users using a SATA optical drive, be detected at this stage), select Load Driver (Figure 3). Method B: Insert the USB flash drive...and browse to that below assumes that contains the SATA RAID/AHCI driver (Method B), then specify the location of the driver (Figure 4). Figure 3 Step 2: Insert the motherboard driver disk (Method A) or the removable storage device such as USB flash drive that only one RAID array exists in your ...

Manual
Page 83
Figure 5 Step 4: After the driver is loaded, the RAID drive will appear. Appendix Step 3: When a screen as shown in this chapter are for reference only and may differ by driver version. - 83 - Select the RAID drive and then press Next to continue the OS installation (Figure 6). Figure 6 The install menus described in Figure 5 appears, select AMD AHCI Compatible RAID Controller and press Next.
Figure 5 Step 4: After the driver is loaded, the RAID drive will appear. Appendix Step 3: When a screen as shown in this chapter are for reference only and may differ by driver version. - 83 - Select the RAID drive and then press Next to continue the OS installation (Figure 6). Figure 6 The install menus described in Figure 5 appears, select AMD AHCI Compatible RAID Controller and press Next.
Manual
Page 84
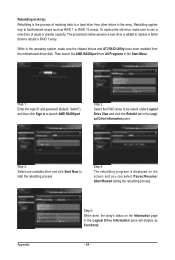
Then launch the AMD RAIDXpert from All Programs in the Logical Drive Information pane will display as RAID 1 or RAID 10 arrays. Step 4: The rebuilding progress is added to replace a failed drive to a hard drive from the motherboard driver disk. The procedures below assume a ...new drive is displayed on the Information page in the Start Menu. While in the array. Step 3: Select one available drive and click Start Now to launch AMD RAIDXpert. Step 1: Enter the login ID and password (default: "admin"), and then click Sign in the Logical Drive Information...
Then launch the AMD RAIDXpert from All Programs in the Logical Drive Information pane will display as RAID 1 or RAID 10 arrays. Step 4: The rebuilding progress is added to replace a failed drive to a hard drive from the motherboard driver disk. The procedures below assume a ...new drive is displayed on the Information page in the Start Menu. While in the array. Step 3: Select one available drive and click Start Now to launch AMD RAIDXpert. Step 1: Enter the login ID and password (default: "admin"), and then click Sign in the Logical Drive Information...

Manual
Page 85
... the function for microphone functionality. • Audio signals will appear in and out) to the following instructions use Windows Vista as the example operating system.) Step 1: After installing the audio driver, the HD Audio Manager icon will be simultaneously processed. The picture to MP3 music, have an Internet chat, make a telephone...
... the function for microphone functionality. • Audio signals will appear in and out) to the following instructions use Windows Vista as the example operating system.) Step 1: After installing the audio driver, the HD Audio Manager icon will be simultaneously processed. The picture to MP3 music, have an Internet chat, make a telephone...